Reassembly Modding by Example
Reassembly modding is fun. This comprehensive resource has three goals:
- To be what the average modder constantly checks to get field names correct,
- To document more obscure parts of Reassembly modding (frags, shrouds, jank, etc.),
- And to have some possibly useful advice on improvement and productivity when modding Reassembly.
Reassembly Discord: https://discord.gg/8fCjt3J.
The link to this book is https://luexks.github.io/reassembly_modding_by_example/.
Download this book and use it without internet: https://github.com/Luexks/reassembly_modding_by_example/releases/tag/reassembly_modding_by_example.
The source code of this book on Github is: https://github.com/Luexks/reassembly_modding_by_example.
Written by Luexks.
Mod Structure
Local (i.e., what you create) mod folders are stored in the mods/ folder, which must be created next to the data/ folder at the following location:
C:/Users/<your username here>/Saved Games/Reassembly/
You should now have what looks like this:
Reassembly/
├── data/
└── mods/           # This is the folder you just created
Now, make your new mod's folder into mods/.
Reassembly/
├── data/
└── mods/
    └── Terran V2/   # Name it something suitable.
                    # If it's a faction mod, call it the name of the faction.
There are multiple data/ folders scattered around your computer. One in Save Games/, one in the games actual installation, and one in the Steam cloud folder if you're using that. Mod structure mirrors the structure of the Reassembly data/ folders. If your mod has the same folder and file names as those in the Reassembly data/ folders then it will work. The data/ folders are grouped up when the game is run and all the common files and folders between both mods and the base game are merged.
This resource is organised by Reassembly's moddable files and folders. Below is what mod folders tend to look like:
Reassembly/
├── data/
└── mods/
    └── Blue Sun/
        ├── audio/
        │   ├── sub_folder_for_lasers/
        │   │   ├── laser_0.ogg
        │   │   ├── laser_1.ogg
        │   │   └── laser_2.ogg
        │   ├── machine_gun_0.ogg
        │   ├── machine_gun_1.ogg
        │   └── machine_gun_2.ogg
        │
        ├── ships/
        │   ├── 256_ship_1.lua
        │   ├── 256_ship_2.lua
        │   └── 256_ship_3.lua
        │
        ├── folder_for_unused_ships_that_i'll_delete_before_i_post_the_mod/
        │   └── 256_ship_wip.lua
        │
        ├── audio.lua
        ├── blocks.lua
        ├── cvars.txt
        ├── factions.lua
        ├── regions.lua
        ├── shapes.lua
        │
        ├── preview.png         # Here's your reminder that all of these images individually must be >1 MB to get uploaded to the Steam Workshop.
        ├── capture1.jpg        # You can have as many `capture#.jpg`s as you want.
        ├── capture2.jpg
        ├── capture3.jpg
        │
        └── anything.txt        # Random stuff that won't be picked up by the game
Publishing to the Steam Workshop
Once your mod is in a state where you are happy to release it or when you are finished with it, you can prepare it for publication to the Steam Workshop.
To do this, you should create preview images that explain and show off your mod for people browsing the Steam Workshop.
Adding preview.png
preview.png is the main picture of your mod and decides the first impressions that people will have when they first see your mod. It is located in the same place as blocks.lua.
Reassembly/
└── mods/
    └── My New Mod/
        ├── blocks.lua
        └── preview.png
        └── <other mod stuff here>
Key requirements:
- Called
preview.png, note the.pngfile format. - In the right place (see above).
- Less than 1 MB file size.
Recommended factors:
- Square image so it looks correct.
- Big, easy to read title. Try making it out of your faction's blocks.
- Show off what makes your faction interesting. Put out your biggest, coolest ship for all the world to see.
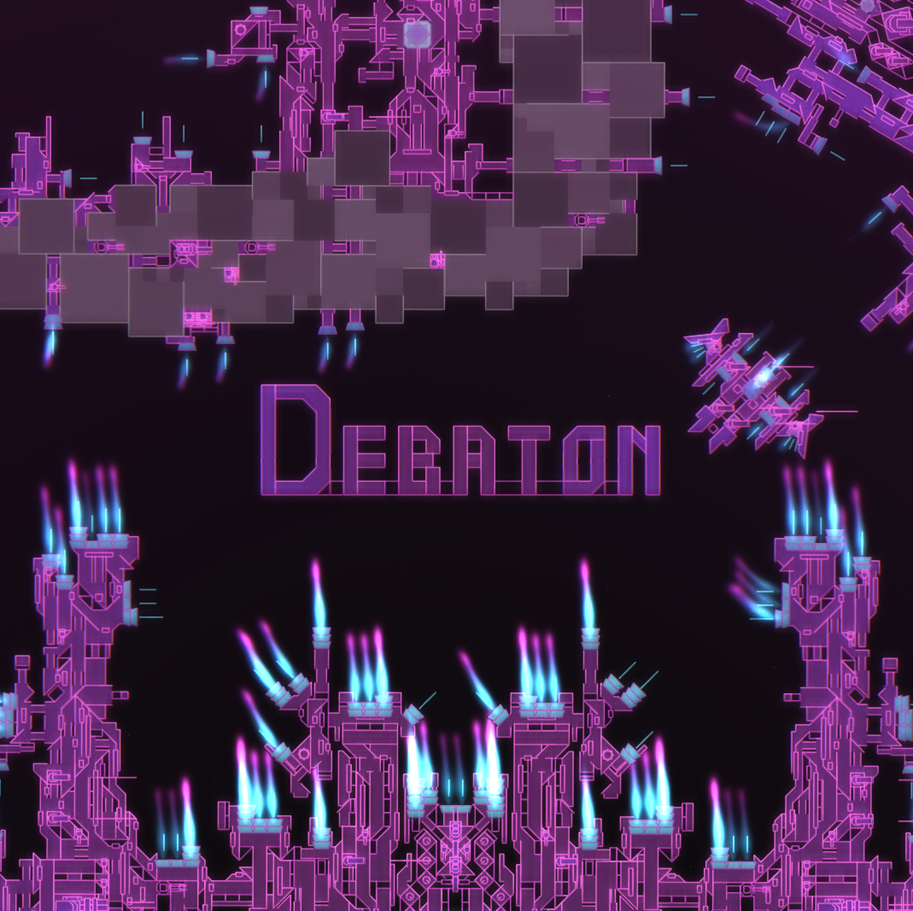
I think that the preview.png I made for Debaton is a good example:
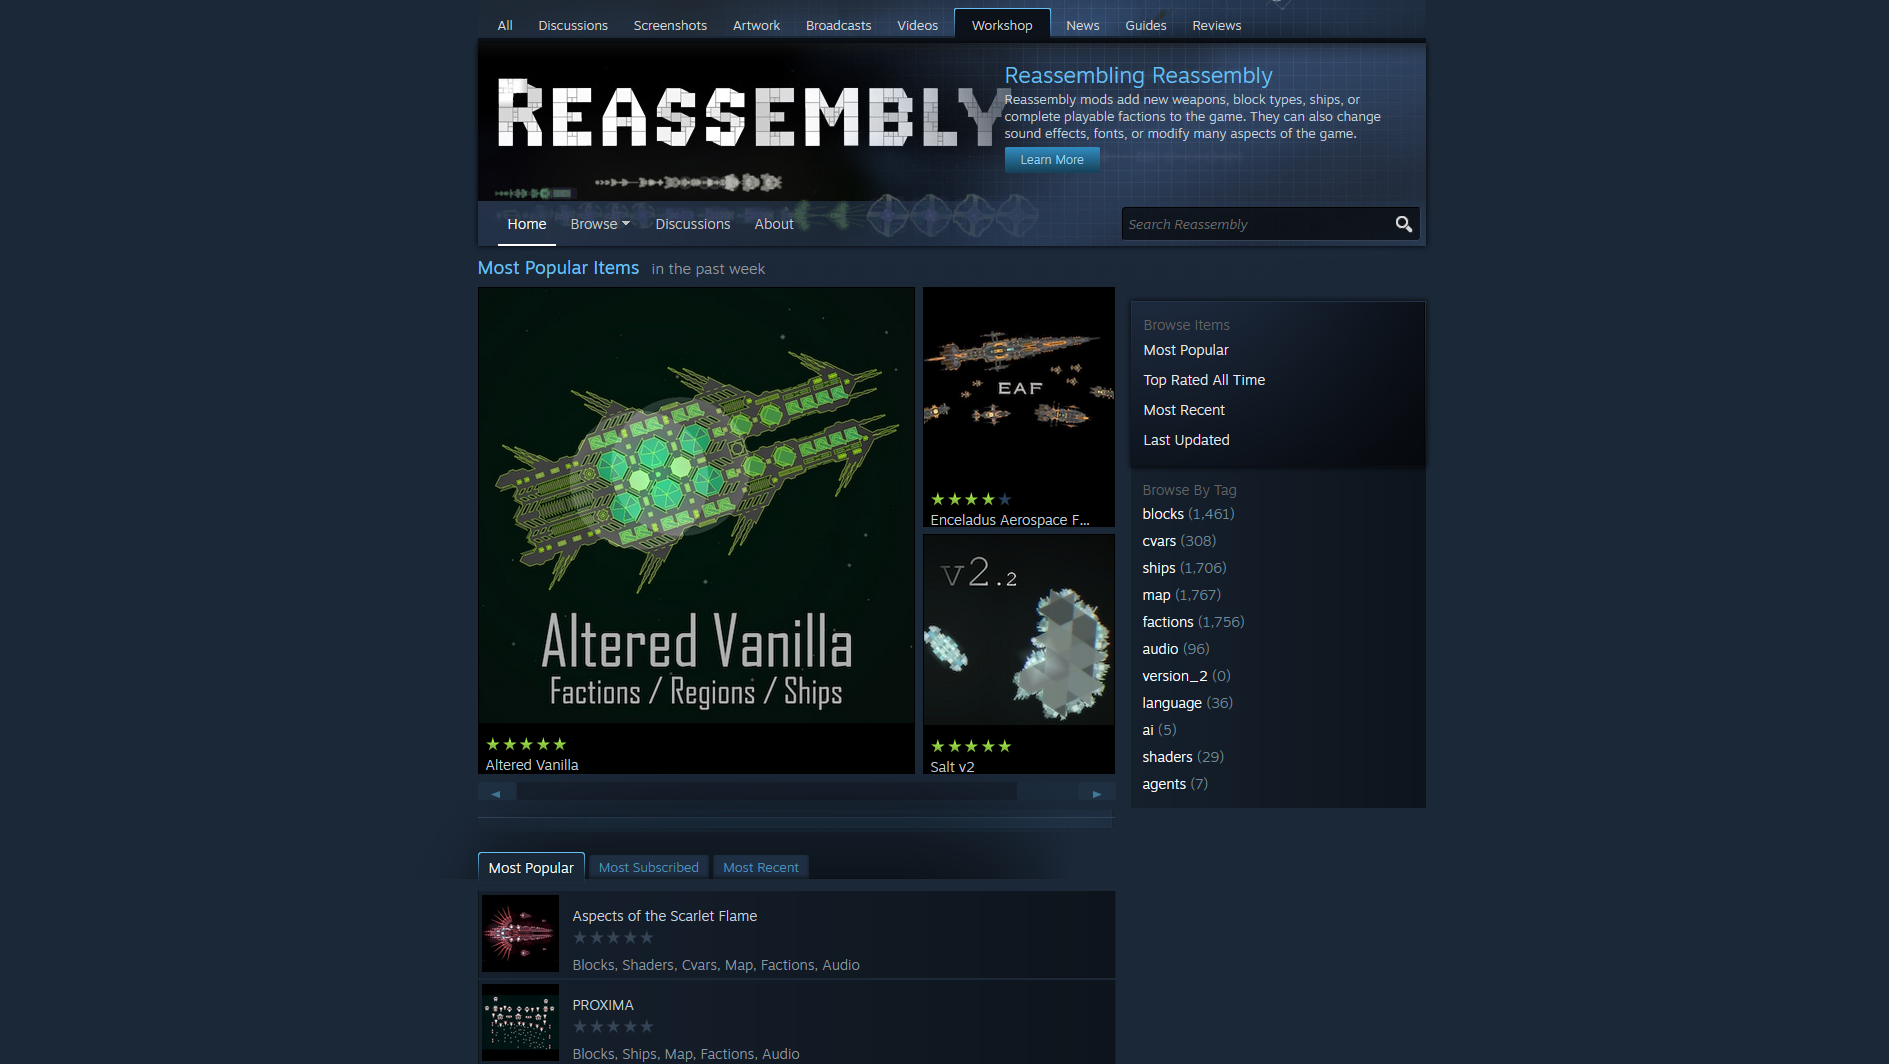
Here is an example of how other preview.png look on the popular section of the Steam Workshop:
Secondary Preview Images

Secondary preview images do not need to be in a mod's files and are uploaded directly into the Steam Workshop page.
Key requirements:
- Less than 8 MB file size each.
Recommended factors:
- Do not store these in your mod's folder so that they are not uploaded to the Steam Workshop and take up the storage space of whoever downloads it.
- Show off your ships, your weapons, anything you could not fit in the
preview.png. - Add text to explain things, such as faction gimmicks.
Mod Description
Before you publish to the Steam Workshop, it is a good idea to prepare a mod description.
It could answer these questions:
- What is this mod?
- Does it have any gimmicks?
- What makes it special?
- How strong is this faction?
- Does it have any interesting lore?
- Who helped you make it?
Publishing to the Steam Workshop
Navigate to the mod menu and click the 'publish' button.
Next, you will see a your mod's workshop page open with the following message, which can be ignored:

Now you can add your secondary preview images and mod description
Adding Secondary Preview Images
- Add/edit images & videos.
- Choose files.
- Upload.
- Manage images.
- Save and Continue.
Adding a Mod Description
If your mod requires any beta features, put it in [CAPITAL] text in the title so that nobody can miss it: [BETA REQUIRED].
- Edit title & description.
- Description.
- Title.
- Save.
Advertise your Mod
If you are not a part of it already, go to the Reassembly Discord server and tell everyone about your mod.
Reassembly Discord: https://discord.gg/8fCjt3J.
Sandbox Basics

The sandbox is where a faction's blocks can be tested out and where ships can be built without anything annoying getting in the way.
Sandbox Modes
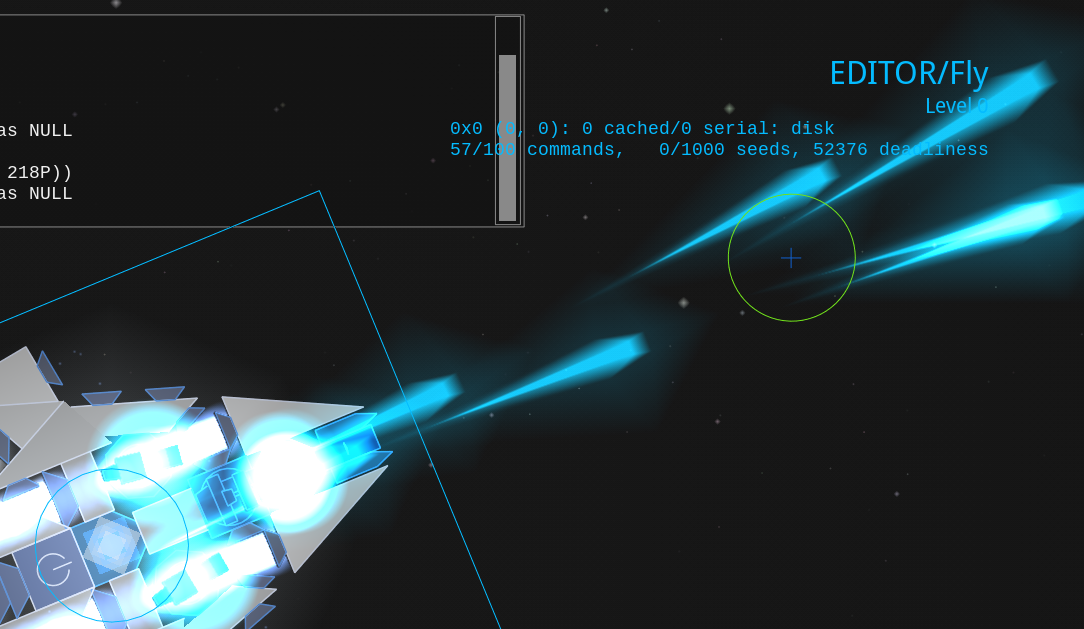
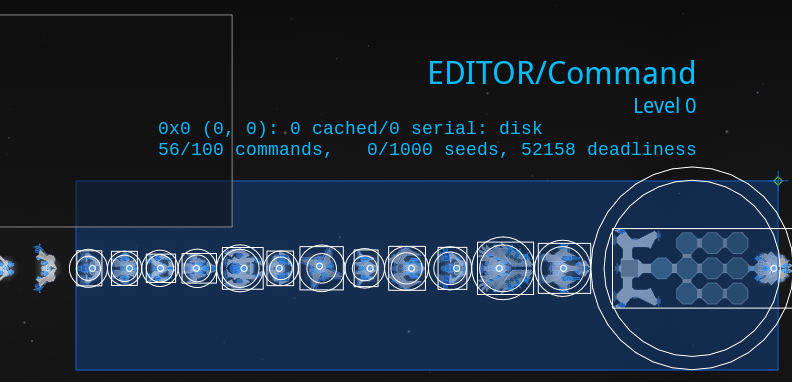
There are 3 modes for interacting with the sandbox:
-
Fly: start controlling the selected ship.
-
Command: select ships and see how your ships will look in game.
-
Construct: interact with everything with the controls of the campaign's editor and look at the selected ship's construction info in the bottom right.
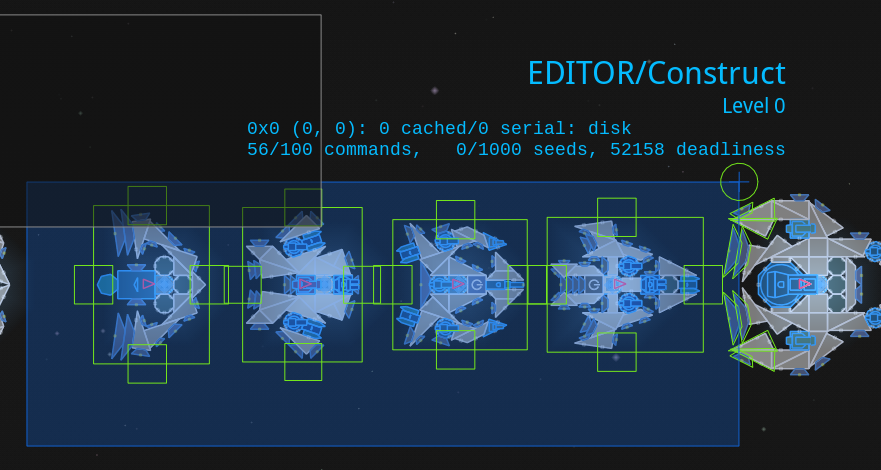
Switch between the modes by pressing the corresponding number keys without having your mouse cursor over the console. (1 for fly, 2 for command, 3 for construct.)
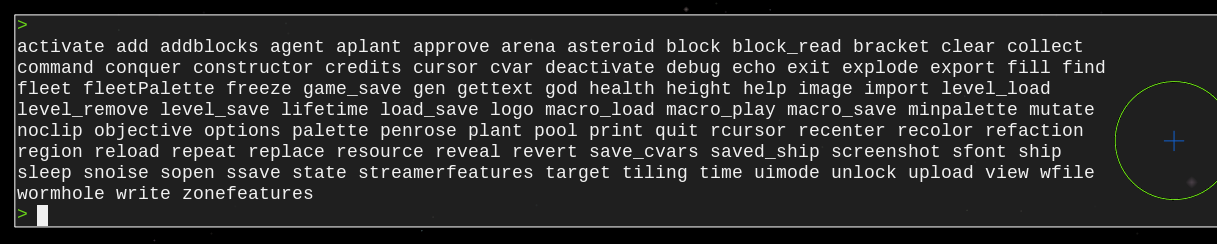
Interacting with the Console
Hovering your mouse over the console in the top left lets you type console commands.
Pressing Tab will either autocomplete what you are typing or list out what options you could type.
For example, pressing tab on an empty console will give you every command in a list:
Many commands do an action at the deploy location, the blue circle with an X. Change its location by double clicking.
Also, if you use the shortest distinct way of typing the command, the console will understand it. These abbreviations will be shown in brackets next to the full versions of commands.

Spawning in Palettes
Each faction has a palette that can be spawned in using the palette (pa) command followed by either its group in the blocks.lua or its name in the factions.lua.
You can also use the minpalette (mi) command to only spawn in one of each scale of block to keep your workspace small.
Work with the palette using normal editor controls by switching to command mode by pressing 3.
Looking at Ships
The main use of the command mode other than selecting ships is to look at ships without the construct mode's visual clutter.
This is useful if you care about how lines are drawn or if you just want to see how your ships will look in game.
Flying Ships
Duplicate your ship in construct mode (3) and then fly it around away from your construction area with fly mode (1).
(Always duplicate your ships before flying them so that they can always be saved in their latest state and so that they do not reassemble to a previous state if activated.)
Saving Modded Ships
Once you have spawned in a palette and made a ship with a command, save it to your mod's ships/ folder with the ssave <Ship Name Here> (ss) command. Note that you must use underscores instead of spaces.
Note that if neither your ship has a corresponding faction defined in the faction.lua nor there is a preexisting ships/ folder, your ship will instead be saved to C:/Users/<your username here>/Saved Games/Reassembly/Data/ships/.
Exporting Ships
Another way of turning ships into files is by using the export <Ship Name Here> (expo) command. This sends the ship to your desktop, which is useful when exporting ships made with vanilla factions so that you do not have to search in the game files.
Spawning Fleet Palettes
Spawn in a faction's fleets by using the fleetpalette (fleetp) command followed by either its faction ID or its name in the factions.lua.
(fleetpalette 0 spawns in plants, fleetpalette -10 spawns in every faction except for the Contestants, and specifying any other negative faction ID spawns in every faction plus the Contestants.)
Saving the Sandbox
Use Ctrl + S to save the state of the sandbox.
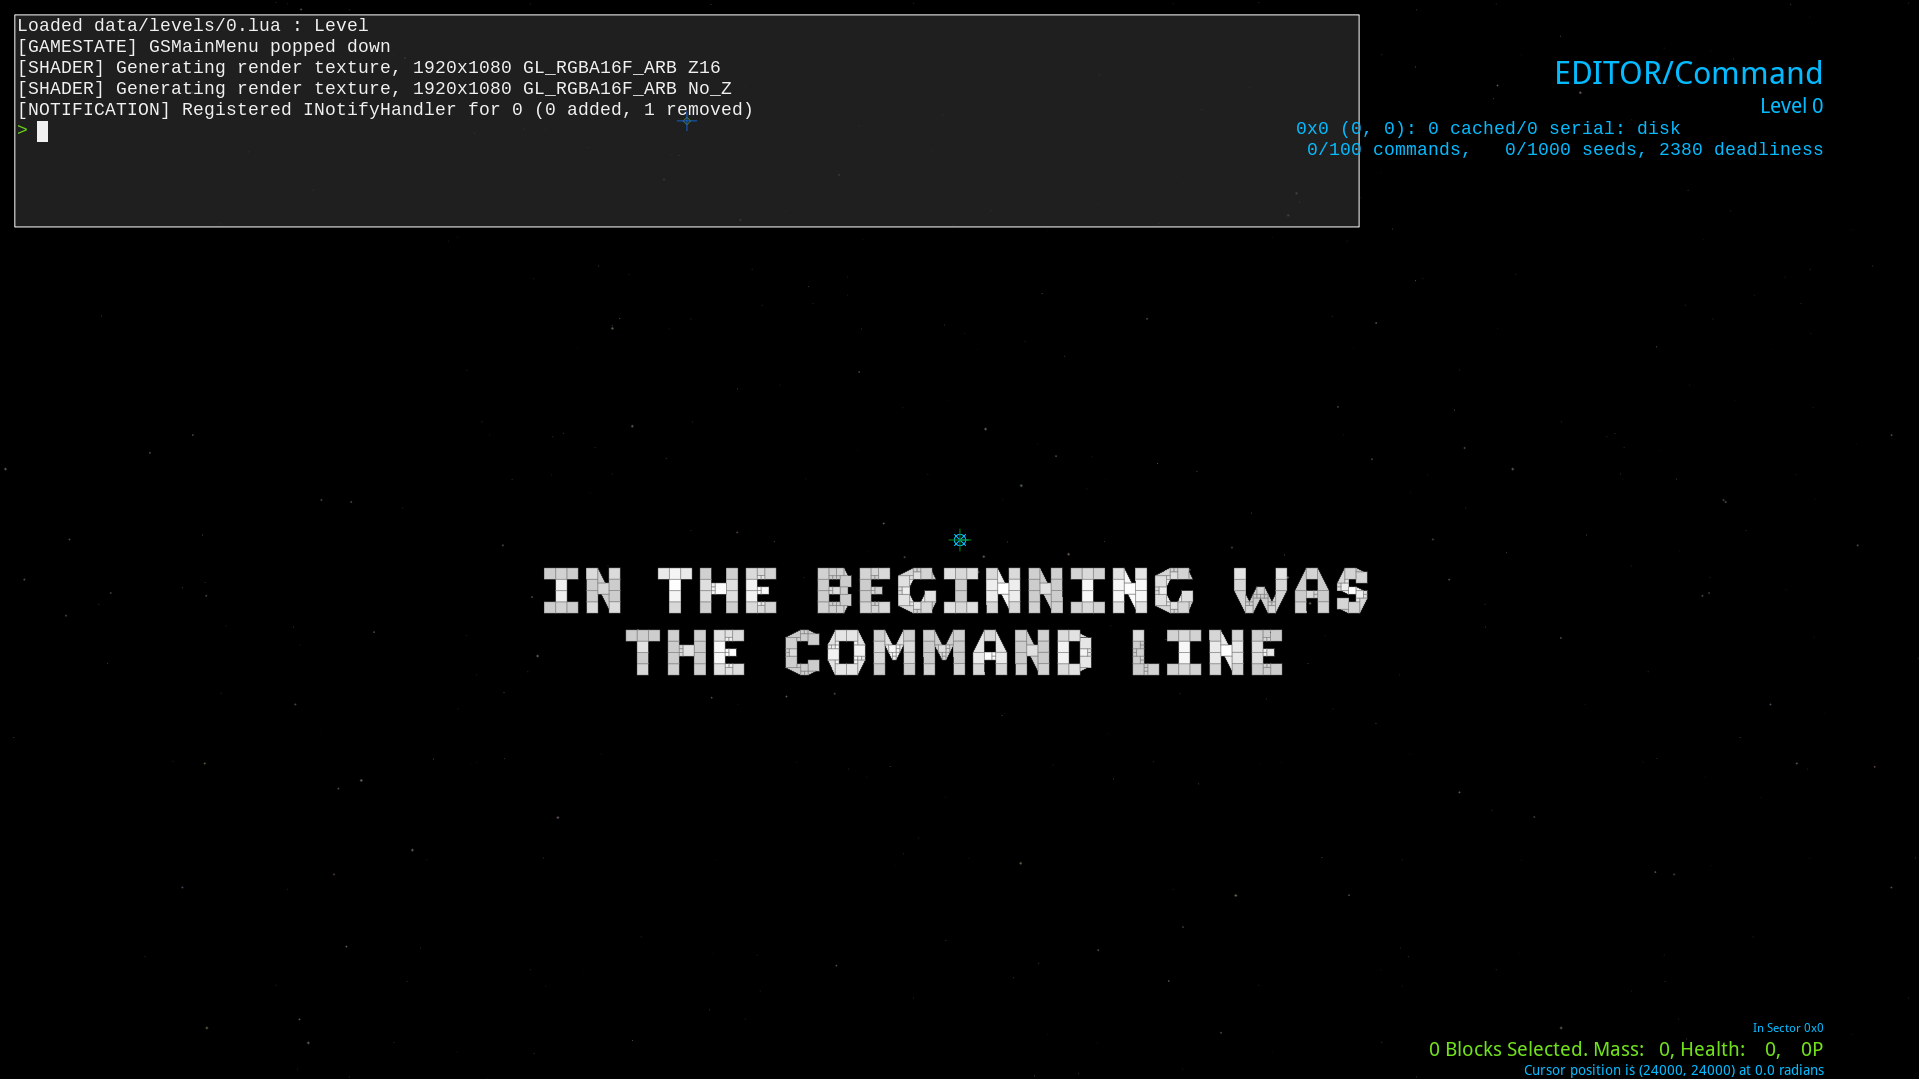
If you want a clean state for your sandbox a big block of text saying 'IN THE BEGINNING WAS THE COMMAND LINE', use the cl command to clear everything and the do Ctrl + S.
Opening and Closing the Console
Use the ` or ~ buttons without the mouse cursor over the console to open and close the console view. Works everywhere and not just the sandbox (save for most menus).
Pressing Esc also closes the console view.
Time Settings
Use P without the mouse cursor over the console to freeze and unfreeze time.
Use O in the same way to progress Reassembly's simulation by 1 update (can be held down).
Use { to speed up time by 50% and } to slow it down by 50% (updates per second remains constant).
Use the deb fps command to open the FPS debugger in the bottem left to check update rate and UPS.`
Further Ship Testing
This chapter covers how to understand a ship more than how well it flies and whether it shoots.
Activating and Deactivating Ships
The activate (ac) command activates the selected ships and the deactivate (dea) command deactivates the selected ships.
Activated ships have AI control and reassemble themselve's to their state when activated.
Spawning Targets and Asteroids
The target (ta) and asteroid (as) command are useful for testing how deadly your weapons are.
target 1000 and asteroid are good defaults (no need to specify their other fields).
Fighting Fleets
The fleet <Fleet Index> <Total P> command spawns a fleet of the specified fleet index and total P, which is useful for balancing.
blocks.lua
blocks.lua is well-named. It controls the blocks of a mod and can become the most complicated of all the files you work with in a Reassembly mod.
This section will be like a shopping list. Do you want to add a shield? Go to the shield chapter in the section on block features. Do you want to add block decals using shrouding? Go to the shrouding chapter.
But before you do any of that cool stuff, here's how to set up your blocks.lua and not have to deal with Reassembly undecipherable punctuation errors at you:
{
    {<ID here> -- First block
        <block stuff here>
    }
    {<Different ID here> -- Second block
        <more block stuff here>
    }
    {<Another Different ID here> -- Third block
        <even more block stuff here>
    }
}
Brackets are how the game keeps understands when one thing starts and ends and what something contains.
Below is how the above structure might be represented if it actually defined three blocks:
{
    { 17000
        group=98
        sort=1
        fillColor=0x5555AA
        fillColor1=0x3333AA
        lineColor=0xFFFFFF
        shape=SQUARE
        scale=1
        name="Hull"
        blurb="1x1\nBasic structure"
        durability=1.001
        density=0.1
        features=PALETTE
    }
    -- Extended blocks copy the fields of the blocks they extend.
    { 17001 extends=17000 scale=2}
    { 17002 extends=17000 scale=3}
}
If you are a beginner, read Basic Fields and Hull and Block Features.
Basic Fields and Hull
Below are some basic fields that should be defined for every block, using hull as a example:
{ 17000		 -- This is the block's ID that the game uses to keep track of things.
        	 -- Keep them within the range 17000-26000.

	group=98 -- The command `palette 98` will spawn this block.
	sort=1 	 -- Orders blocks in the campaign's databank.


	-- A block's color alternates between fillColor and fillColor1.

	-- All 3 color fields can be either 0xRRGGBB, for red green blue,
	-- or 0xAARRGGBB, for alpha (the less the alpha, the greater the transparency),
	-- then red, green, blue.
	fillColor=0x5555AA
	fillColor1=0x3333AA
	-- Note that lines do not render transparency even when defined with 0xAARRGGBB.
	lineColor=0xFFFFFF


	-- Base game shapes are text, custom shapes are whole numbers.
	shape=SQUARE
	-- Scales count up from 1.
	scale=1


	name="Hull"
	blurb="1x1\nBasic structure"

	-- Block health is calculated per block based on its durability and area,
	durability=1.00001
	-- Don't set durability to 1 if you want to use block extensions as
	-- block health will not be recalculated for each block.


	-- Block mass is calculated per block based on its density and area,
	density=0.1

	-- The greater the grow rate, the faster the block grows.
	growRate=20


	-- Give every block the PALETTE feature if you want it to show up in the campaign.
	features=PALETTE
}
{ 17001 extends=17000 scale=2 blurb="2x2\nBasic structure" }
Block Features
The use of block features are how different types of blocks are created.
Say you want a generator, you would use features=GENERATOR.
Say you want a generator that also produced R. To do this you would add a delimiting pipe | character between the word GENERATOR and PHOTOSYNTH, giving you features=GENERATOR|PHOTOSYNTH.
Although there are exceptions, most block types are defined by either one or multiple feature flags. Features are what make Reassembly modding versatile.
Feature List
Alphabetical
ALWAYSFIREASSEMBLERAUTOFIREAUTOLAUNCHBUMPERCANNONCANNON_BOOSTCHARGINGCOMMANDDEACTIVATESENVIRONMENTALEXPLODEFACTORYFREERESGENERATORGROWINTLINESINVULNERABLEINVISIBLELAUNCHLAUNCHERLAUNCHER_BARRAGELASERMELEENEVERFIRENOCLIPNOCLIP_ALLYNOICONNOPALETTENORECOLORNOREGENONEUSEPALETTEPERISHABLEPERSISTENTPHOTOSYNTHREGROWERROOTROTATORSEEDSELFFACTORYSHIELDTELEPORTERTELESPAWNTHRUSTERTORQUERTRACTORTRANSIENTTURRETUNGROWUNIQUE
Weapons
Components
Structures
Cosmetic
Other
Not To Use
Block Extensions
The extends field takes the Block ID of another block and duplicates all of that block's data into the new block. Fields after the extends field give the new block its differences.
{
    { 17000
        name="My First Block"
        group=78
        sort=0
        shape=SQUARE
        scale=1
        features=PALETTE
        -- Other block stuff here.
    }
    { 17001 extends=17000 scale=2
        name="My Second Block, which is exactly the same,"
        blurb="but is scale 2 and has a blurb and a different name."
    }
}
Looks at the above block of ID '17001'. It uses block extension, an great utility that makes block creation productive and concise.
Block extensions allow you to not have to rewrite stuff over and over again. It's especially useful for creating hull palettes.
Getting the most out of block extensions
Have everything in a faction as interconnected by using block extensions. If you have a good plan of what you are making, it will save you time.
Below is how you might want to map out an extension hierachy. The example has 3 types of hull, each containing squares and triangles, both of which have 4 scales, plus some non-hull components. Every branch represents an extends field. This is how I manage my mods.
Original Hull Square
├── Scale 2
├── Scale 3
├── Scale 4
│
├── Hull Triangle
│   ├── Scale 2
│   ├──	Scale 3
│   └──	Scale 4
│
│
├── Differently Colored Hull Square
│   ├──	Scale 2
│   ├──	Scale 3
│   ├──	Scale 4
│   └──	Differently Colored Hull Triangle
│	    ├── Scale 2
│	    ├── Scale 3
│	    └── Scale 4
│
│
├── Armored Hull Square
│   ├──	Scale 2
│   ├──	Scale 3
│   ├──	Scale 4
│   └──	Armored Hull Triangle
│	    ├── Scale 2
│	    ├── Scale 3
│	    └── Scale 4
│
│
├── Command
│
├── Generator Scale 1
│   ├── Generator Scale 2
│   ├── Generator Scale 3
│   └── Generator Scale 4
│
├── Gun Scale 1
│   ├── Gun Scale 2
│   └── Gun Scale 3
│
└── Different Type of Gun Scale 1
    ├── Different Type of Gun Scale 2
    └── Different Type of Gun Scale 3
I like making the most of block extension but I keep different components seperate to not sacrifice my ability to create and edit stuff.
For example, I like seperating different guns in the extends tree. This makes them easier to work with as they do not depend on each other for features.
Getting Blocks to Show Up in the Campaign's Databank
Use PALETTE for everything you want a player to access, use NOPALETTE for everything you don't want a player to access.
When a block has PALETTE, it will always shows up in campaign databank regardless of being present on one of the faction's ships.
{ 17000
    features=PALETTE
}
When a block has NOPALETTE, it will never shows up in campaign databank.
NOPALETTE blocks cannot be accessed by scaling in the campaign.
{ 17000
    features=NOPALETTE
}
Commands
{ 17000
    features=COMMAND
    blurb="The ship of this command cannot regenerate at all."
}
{ 17001
    features=COMMAND|REGROWER
    blurb="The command's ship can regenerate missing parts but not using debris."
}
{ 17002
    features=COMMAND|ASSEMBLER
    blurb="The command's ship can regenerate normally and by using debris."
}
Commands commonly have either the REGROWER or the ASSEMBLER features.
REGROWER allows the ship to be able to regenerate missing parts.
ASSEMBLER is the same as REGROWER, but also allows ships to reassemble themselves using parts from debris.
The command Field
Commands can also contain the command field, but it is unnecessary for most ships as the values it contains are controlled by factions.lua and how Reassembly handles blueprints.
Most use cases do not need to define all three command flags.
{ 17000
    features=COMMAND
    command={
        flags=RECKLESS|HATES_PLANTS -- These take priority over the faction's AI flags.
        faction=98                  -- Faction ID this command will be assigned to.
        blueprint="98_Test_Ship"    -- Blueprint that the command will become.
    }
}
Command Flags
These are the flags which are used for command={flags} and in aiflags.
NONE: does nothing.METAMORPHOSIS: AI will occasionally change blueprints.FOLLOWER: follows player.ATTACK: overrides all other command flags and makes AI attack ruthlessly. Used internally for tournament mode.FLOCKING: move in a flock with nearby allied ships at the speed of the slowest one.RECKLESS: disengage less.AGGRESSIVE: initiate attack more easily.CAUTIOUS: initiate attack less easily.SOCIAL: call for help when attacked.PEACEFUL: never initiate attack. Will still engage in combat if attacked, if nearby station is being captured, or if nearby allied ship with theSOCIALAI flag is under attack.WANDER: wander randomly if nothing else to do. Recommended for most factions.HATES_PLANTS: kill plants if in range.FORGIVING: stop attacking more easily.TRACTOR_TRANSIENT: grab blocks from the environment and use them.DODGES: dodge projectiles.RIPPLE_FIRE: use ripple fire on weapons.SPREAD_FIRE: use spread fire on weapons.BAD_AIM: aim poorly.POINT_DEFENSE: act like a point defense drone.INACTIVE: become a vegetable, yum.SMART_FIRE: use spread fire when enemy is expected to dodge.NO_PARENT: do not follow parent ship.CHILDREN_SET: used internally for AI ships that should not change their children blueprints as set by the player.BLUEPRINT_SET: used internally for AI ships that should not change their own blueprint as set by the player.HANGOUT: used to make the Anisoptera ship spin in circles :P.PACIFIST: never attack even when attacked.FIRE_AT_WILL: ignore parent ship target.
The following command flags can also be used for normal factions but at set in vanilla in the bindings menu:
ALWAYS_KITE: always attack from max range.ALWAYS_RUSH: always attack at closest range regardless of incoming damage.ALWAYS_MANEUVER: always dodging while attacking.AI_BINDING: attack from range of highest binding weapon that has not been destroyed.
Resource Containers
{ 17000
    capacity=50
}
Resource Collectors
'Tractor beam' is a synonym for 'resource collector'.
{ 17000
    features=TRACTOR
    tractorRange=500

    -- Resource Collectors tend to also store R.
    capacity=50
}
Resource Producers
'Photosynthesizer' and 'solar panel' are synonyms for 'resource producer'.
{ 17000
    features=PHOTOSYNTH
    photosynthPerSec=0.2

    -- Resource Producers tend to also store R.
    capacity=50
}
Generators
{ 17000
    features=GENERATOR
    generatorCapacityPerSec=150
    powerCapacity=150

    -- Generators tend to also store R.
    capacity=50
}
Thrusters
{ 17000
    features=THRUSTER

    thrusterForce=50000 -- =50K

    -- When a thruster is turned on, its thruster force is multipled by
    -- its thruster boost for `thrusterBoostTime` seconds.
    thrusterBoost=2.0
    thrusterBoostTime=3.0

    -- Thruster trail colors are decided by these two 0xAARRGGBB values.
    -- thrusterColor controls the color of the main thruster trail,
    thrusterColor=0xFFFFFFFF
    -- While thrusterColor1 controls the color of the trail
    -- immediately at the thruster.
    thrusterColor1=0xFFFFFFFF
}
Thruster Colors
The following videos each show the area of one thruster color type on a stationary vessel with thrusterForce=50000:
- Only
thrusterColor
{ 17000
    thrusterForce=50000
    thrusterColor=0xFFFFFFFF
    thrusterColor1=0x01000000
}
- Only
thrusterColor1
{ 17000
    thrusterForce=50000
    thrusterColor=0x01000000
    thrusterColor1=0xFFFFFFFF
}
Rotator Thrusters
{ 17000
    features=THRUSTER|ROTATOR

    -- Similar fields to those of turreted weapons.
    rotatorSpeed=6
    rotatorLimit=pi -- *

    -- Other thruster fields are identical:
    thrusterForce=50000
    thrusterBoost=2.0
    thrusterBoostTime=3.0
    thrusterColor=0xFFFFFFFF
    thrusterColor1=0xFFFFFFFF
}
A basic rotator thruster to show that it rotates weirdly with different player control schemes:
Rotator Limit Bug
The field rotatorLimit is bugged such that the rotator thruster always faces towards the front of the ship instead of the front of the block as one would expect.
Here is an example of 4 rotator thrusters with turretLimit=pi using the scale 2 CANNON shape to show that they face outwards from the command:
{ 17000
    features=PALETTE|THRUSTER|ROTATOR
	shape=CANNON
	scale=2
	rotatorLimit=pi
}
And here is the same thing but with turretLimit=0:
{ 17000
    features=PALETTE|THRUSTER|ROTATOR
	shape=CANNON
	scale=2
	rotatorLimit=0
}
Torquers
Torquers exert a turning force on the ship.
{ 17000
    features=TORQUER
    torquerTorque=10000 -- =10K
}
Factories
There are multiple types of factory blocks, but the default FACTORY factories are the most common.
{ 17000
    -- TRACTOR is not strictly necessary for factories.
    features=FACTORY|TRACTOR
    -- Factories tend to also store R and collect R.
    tractorRange=500
    capacity=50
}
Other Types of Factories
Self-Factories
Ships with a SELFFACTORY block on them can spawn ships as if every one of their blocks is a normal factory. Still requires R to spawn sips.
{ 17000
    features=SELFFACTORY
}
Telespawn
TELESPAWN is like FACTORY, but ships are 'teleported' in, fully built, and for no R cost.
{ 17000
    features=TELESPAWN
}
Shields
{ 17000
    features=SHIELD
    shield={
        strength=100            -- Maximum shield health.
        regen=20                -- 20 regeneration and 20 energy used up per second.
        radius=40
        delay=3                 -- Delay before shield regenerates health after taking damage.
        armor=0                 -- *
		color=0xFFFFFFFF        -- AARRGGBB color value.
		damagedColor=0xFFFFFFFF -- AARRGGBB color value.
		lineColor=0xFFFFFF      -- RRGGBB color value.
    }
}
* For the armor field, see Features and Fields Not To Use.
Void Shields
Void shields are an unintended varient of standard shields that have negative strength and regen, which are both conventionally set to -1.
Here is a list of what they do:
- Constantly radiates the shield death particle effect.
- When hit by explosive weaponry they take 0 damage but blocks in the explosion radius still take damage.
- When hit by non-explosive weaponry, the void shield block's health itself is used as the shield health.
- Does not work if the block or ship it is mounted on has no block with COMMAND
- The
armorfield doesn't function. - May have other yet undiscovered effects.
{ 17000
    features=SHIELD
    shield={
        -- These fields are necessary:
        strength=-1
        regen=-1

        -- These can be anything:
        radius=100
        delay=3
    }
}
Power Armor
A shield block, with a shield radius so small that it the shield cannot be hit, redirects incoming damage that hits the block to the health pool of the shield. As the shield block can only be destroyed when its shield goes down, the survivability of the block will be dependent on the survivability of the shield.
If a shield's delay is 0 and the ship it is attached to has enough power, then it can spend the ship's power to regenerate any amount of damage without being destroyed, as long as the shield's regen and strength provide enough buffer for any incoming damage.
Shield blocks like this translate the power store of their ship directly into survivability, and are thus called 'power armor'.
{ 17000
	features=SHIELD
	health=1
    shield={
        strength=100
        regen=10000
        radius=1
        delay=0
		color=0xFFFF0000
		lineColor=0x0000FF
		damagedColor=0xFFFF0000
    }
}
The following example showcases the difference between power armor on a ship with high power generation (Green) and one without (Red) using the Red's Tempest.
{ 17001 features=GENERATOR generatorCapacityPerSec=0     powerCapacity=50000
    fillColor=0xFF0000 fillColor1=0xFF0000 }
{ 17002 features=GENERATOR generatorCapacityPerSec=10000 powerCapacity=50000
    fillColor=0x00FF00 fillColor1=0x00FF00 }
Notice how the power armor only takes damage when the ship's power runs out after enough fire:
Power armor is effective against damage spread out over time, especially lasers, but is vulnerable to high amounts of instantaneous damage that is greater than the buffer of the shield's strength.
Teleporters
{ 17000
    features=TELEPORTER

    -- Energy used up per unit of mass to teleport the ship.
    teleporterPOWER=4
}
Melee blocks
Sentinel armor spikes have meleeDamage set to 5.0, which equates to 500% of base collision damage.
{ 17000
    features=MELEE
    -- This is a multiplier to melee damage.
    meleeDamage=5.0
}
Other Collision: Bumper and Elasticity
Elasticity
Bounciness of a block when it collides. More elasticity means more bounciness. Should be between 0.0 and 1.0.
{ 17000
    elasticity=0.4
}
Bumper
Does not take melee damage when colliding. Anti-melee armor.
{ 17000
    features=BUMPER
}
Explosive Blocks
{ 17000
    features=EXPLODE

    explodeDamage=50
    explodeRadius=50
    explodeStdDev=10  -- *
    explodeFaction=98 -- The specified faction will not take damage from the explosion.
}
*For the explodeStdDev field, see Standard Deviation Fields.
Invulnerable Blocks
Bullets phase through invulnerable blocks which are not commands.
{ 17000
    features=INVULNERABLE
}
Blocks with Lifetimes
{ 17000
    lifetime=20 -- Time in seconds after block is created that it destroys itself.
}
Noclipping blocks
Noclipping blocks have just their own collisions disabled, not the entire ship's blocks.
{ 17000
    features=NOCLIP
}
{ 17001
    features=NOCLIP_ALLY -- Only noclips with blocks of the same faction.
}
Blocks that support plant growth
Seeds, plants, and buildings can all attach to environmental blocks.
{ 17000
    features=ENVIRONMENTAL
}
Seeds
Compared to root blocks, seeds are more complicated in that they have many more interactions with other features. However, at its core, a SEED block can attach to an environmental block, such as an asteroid, on collision and then grow into a blueprint. They can also be generated as structures on asteroids in regions of their faction with structures enabled.
A basic seed has the SEED feature and a valid root shape, such as the vanilla seed shapes:
{ 17000
    features=SEED
    shape=SEED_1
}
When it hits an asteroid, the seed will randomly select a blueprint that uses itself as the main seed. However, if the seed is launched from a preexisting plant, the child plant will use the same blueprint as the parent plant.
Making plants
Create and save plants using the seed as you would any other modded ship. They should be in the ships/ folder.
Reassembly/
└── mods/
    └── Faction 98/
        ├── ships/
        │   ├── 98_Seed_Structure_1.lua
        │   ├── 98_Seed_Structure_2.lua
        │   └── 98_Seed_Structure_3.lua
        ├── blocks.lua
        └── factions.lua
        └── regions.lua
Note that plants whose seed lacks the COMMAND feature will be saved to the data/ships/ folder instead of in your mod's ships/ folder with a name that suggests that they are of faction zero.
Move them to your mod's ships/ and rename them to have the correct faction ID in their name (for example: 0_Plant.lua -> 98_Plant.lua).
Reassembly/
├── data/
├── └── ships/
│       └── 0_Plant_In_Wrong_Place.lua      <- Move this,
└── mods/
    └── Faction 98/
        └── ships/
            └── 98_Plant_In_Right_Place.lua <- to here.
Seed Launchers
Seeds can be launched from launchers and grow into plants on environmental blocks. The value of the launcher's replicateBlock field must be set to the ID of the seed.
Note that the launcher must be defined after the seed.
{ 17000
    features=SEED
    shape=SEED_1
}
{ 17001
    features=LAUNCHER
    shape=RECT_LAUNCHER1
    replicateBlock=17000
    -- Other launcher fields here.
}
(You can also fully define the seed block inside the replicateBlock with an ID, e.g.: replicateBlock={ 17001 features=SEED shape=SEED_1 }, but it is not recommended since any plants that use the seed will corrupt if the launcher corrupts, and having the two block definitions seperate makes for cleaner code.)
Plants that Grow Offspring Seeds
When a plant has a blueprint with extra seeds on it, the seeds are launched after being grown. In vanilla, this is how plants reproduce.
Note that the offspring seeds should be attached by their ROOT (yellow) port, otherwise the plant may spawn weirdly if generated in a sector on asteroids.
When the offspring seed hits an environmental, it will use the same blueprint as the parent plant.
Use launchSpeed to control how fast the offspring seed is ejected (different than launcherSpeed and launchOutSpeed).
{ 17000
    features=SEED
    shape=SEED_1
    launchSpeed=200
}
If plants that grow offspring seeds are spawned on asteroids in a region, it is recommended to reduce asteroid density as the offspring seeds will all launch immediately, causing lag.
launchResources
Defined in an offspring seed, launchResources is how much R a plant must store and spend to be able to launch the offspring seed after it has grown. When the offspring seed is launched, the launchResources value of R is subtracted from the parent plant.
Note that offspring seeds can still grow even if the launchResources value of R is not stored by the plant, the offspring seeds just cannot be launched.
-- The plant's R storage must be >= 50 to launch the offspring seed.
{ 17000
    features=SEED
    shape=SEED_1
    launchResources=50
}
Lifetime of Seeds and Plants
(Seed and plant lifetimes are very janky.)
If you want a seed and its plant to last forever, then give it the field seedLifetime=0.
{ 17000
    features=SEED
    shape=SEED_1
    seedLifetime=0
}
Otherwise, unlike other blocks which use the lifetime field, seeds use the seedLifetime and launchLifetime fields to control their lifetime and the lifetime of their plants.
Note that they do not work intuitively due to bugs; despite being used together in a seed's code in vanilla Reassembly, only one should actually be used. This is because seedLifetime overrides launchLifetime's purpose.
- Only
seedLifetime: the lifetime of the seed is set to this when it is created and when it is planted on anenvironmentalblock. This also determines the lifetime of blocks grown by the seed, even if the blocks have their ownlifetime. launchLifetime: controls the lifetime of the seed when it is launched. The lifetime of the seed when it is planted on anenvironmentalblock is set to 60 seconds. Any blocks grown by the seed also have their lifetime set to 60 seconds.
Each time an offspring seed finishes growing (not when launched), the lifetimes of all other blocks in the plant (including other offspring seeds, though this behaviour has little effect) are set to either seedLifetime seconds, if defined, otherwise to 60 seconds.
Because there is a difference to how seeds and their plants work depending on whether seedLifetime or launchLifetime is used, the use of one of the two fields must be decided on, although the choice is not very significant for normal seeds.
(Note that seedLifetime and launchLifetime are fields for the seeds and not the other blocks of the plant.)
{ 17000
    features=SEED
    shape=SEED_1
    seedLifetime=30
}

{ 17001
    features=SEED
    shape=SEED_1
    launchLifetime=30
}
Plant Growth Cycles
Unlike other ships, plants wait until all of their currently growing blocks have finished growing before beginning the growth of all available blocks.
This causes plants to grow their blocks in a synchronised way, although it can be inconsistent, especially due to just launched offspring seeds being in the way of where they were grown.
How Vanilla does Plants
As mentioned at the start of this chapter, seeds can have many interactions with different features, making them fairly complex. A good way to understand how to use seeds to create what you want is to understand how plants work in Reassembly.
Vanilla seed factors:
PHOTOSYNTHwithphotosynthPerSecbetween 0.1 and 1.0.THRUSTERwiththrusterForce=2000andlaunchSpeed=200so that offspring seeds can travel enough distance to collide with an asteroid.elasticity=0to make seeds collide and attach to asteroids better.capacity=5to store some R.
Vanilla plant factors:
- Main seed at the base with an exposed
ROOTport, offspring seeds at the end of stems attached to the stems with theirROOTports. - Leaf blocks with
PHOTOSYNTHto generate R. - Leaf blocks have
capacity=100so that the main seed can release more R on death if it has grown more leaves. - No
FREERESon any block so that each block of the plant turns into its own R packet on death.
{ 17000 name="Seed"
   features=NOPALETTE|SEED|PHOTOSYNTH|THRUSTER
   shape=SEED_1

   launchLife

   photosynthPerSec=0.5

   thrusterForce=2000

   capacity=5

   launchSpeed=200
}
{ 17001 name="Stem"
   features=NOPALETTE
   shape=GEM_2
}
{ 17002 name="Leaf"
   features=NOPALETTE|PHOTOSYNTH
   shape=GEM_2

   photosynthPerSec=2.0

   capacity=100
}
{ 17003 name="Plant Launcher"
   features=PALETTE|LAUNCHER
   shape=RECT_LAUNCHER1

   replicateBlock=17000

   replicateTime=1
   launcherPower=100
   launcherOutSpeed=100
}
Roots
Blocks with features=ROOT and a valid root shape, such as RECT_ROOT are used for structures on asteroids.
Unlike SEED blocks, root blocks cannot be used to make growable structures.
{ 17000
    features=ROOT
}
One-Use Blocks
A block with the ONEUSE feature explodes after it is activated or after it finishes activating depending on whatever feature its coupled with.
For example, a cannon block with ONEUSE will explode after firing, and a laser block with ONEUSE will explode after the laser decays.
{ 17000
    features=ONEUSE|CANNON
    -- Cannon fields here.
}
{ 17001
    features=ONEUSE|LASER
    -- Laser fields here.
}
The destruction of a one-use block does not inherently cause damage other blocks, but features like EXPLODE can make them more destructive.
Features which ONEUSE works with:
CANNON: block is destroyed after firing a single bullet. If burst fields are defined, then the block will be destroyed afterroundsPerBurstnumber of bullets have been fired.CANNONandCHARGING: block is destroyed after firing a single bullet. If burst fields is defined, thenONEUSEdoes not function.LASER: block is destroyed after laser finishes decaying. Burst fields do not work withONEUSE, the laser acts as if there are no burst fields.LASERandCHARGING: block is destroyed after laser finishes decaying. Burst fields do not work withONEUSE, the laser acts as if there are no burst fields.LAUNCHER: block is destroyed after firing a single launchable.SHIELD: block is destroyed after shield loses its health.FACTORY: block is destroyed after the command built by the factory finishes growing and is released. (SELFFACTORYandTELESPAWNdo not have this effect. Combinations of different factory fields have no noteworthy effects.).
Because the function of cannon, laser, and shield blocks are dependent on the energy stored by the ship, their destruction because of ONEUSE can be manipulated by controlling energy.
Cosmetic Features
All of the following features are purely decorative and do not affect block function.
Invisible Blocks
Block does not render. This includes feature icons but excludes barrels (not the turret circle beneath) and shrouds.
{ 17000
    feature=INVISIBLE
}
Internal Lines
Block always renders lines.
{ 17000
    features=INTLINES
}
No Icon
Block doesn't renders icons.
{ 17000
    features=NOICON
}
No Recolor
Block is not recolored by color schemes.
{ 17000
    features=NORECOLOR
}
Shrouding
A shroud is a purely decorative part of a block defined using the shroud field.
When a weapon with the TURRET or ROTATOR is shrouded, the shroud takes on the rotation of the turret or rotator.
{ 17000
    fillColor=0xFF555555
    fillColor1=0xFFAAAAAA
    lineColor=0xFFFFFFFF
    shroud={
        {
            shape=SQUARE            -- Note that scales cannot be used.

            size={10.0,5.0}         -- Size values can be negative for mirroring.
                                    -- (Square shrouds' Y sizes are doubled)

            offset={2.5,0,0.01}     -- X and Y offset is relative to icon center *.
                                    -- Z is 3D draw order. Increment by 0.02.
                                    -- Higher Z shrouds are drawn on top.
                                    -- Equal Z shrouds intersect their lines.
                                    -- 0 Z sets Z by order of shroud shapes in the list.

            taper=0.5               -- Only for shrouds with shape=SQUARE.
                                    -- Multiplies width of the square's front.

            angle=90*pi/180         -- Angle in radians. (add '*pi/180' for degrees)
                                    -- If the shroud's size is a multiple of the
                                    -- shape's bounding box (for a scale 1 square
                                    -- this could be size={10.0*2,10.0*2}), the shroud
                                    -- is scaled and then rotated,

                                    -- but if not, the size is applied after
                                    -- rotation, so for shrouds that need precisely
                                    -- angled blocks, it may be worth making custom
                                    -- shapes that are angled to use for shrouding.

            -- Shroud colors are assigned by the colors of the block.
            -- 0: fillColor.
            -- 1: fillColor1.
            -- 2: lineColor.
            tri_color_id= 0         -- fillColor of the shroud.
            tri_color1_id=1         -- fillColor1 of the shroud.
            line_color_id=2         -- lineColor of the shroud.

            count=1                 -- Usually undefined.
                                    -- Works in the same way as barrelCount.
        }
        -- The other shrouds are defined using the compact format:
        { shape=OCTAGON size={10.0,10.0} offset={ 2.5, 0.0,0.02}               tri_color_id=2 tri_color1_id=2 line_color_id=0 }
        { shape=OCTAGON size={15.0,10.0} offset={-2.5, 0.0,0.02}               tri_color_id=0 tri_color1_id=0 line_color_id=1 }
        { shape=1239879 size={ 5.0, 5.0} offset={ 0.0,-5.0,0.03} angle=pi*-0.5 tri_color_id=2 tri_color1_id=2 line_color_id=0 }
    }
}
Transparency in Shrouds
Because fillColor, fillColor1, and lineColor can have transparency with an alpha value less than FF (for example: fillColor1=7FFFFFFF, a 50% transparent white), shrouds can contain transparency. This chapter contains facts about transparency in shrouds.
Below is a basic example of a shroud with transparency:
{ 17142
	group=98 features=PALETTE
	fillColor =0xAA5555AA
	fillColor1=0xAAFF33AA
	lineColor =0xFFFFFFFF
	shroud={
		{ tri_color_id=0 tri_color1_id=0 line_color_id=2 shape=SQUARE size={15.0,2.0} offset={-5.0, 5.0,0.01} }
		{ tri_color_id=1 tri_color1_id=1 line_color_id=2 shape=SQUARE size={15.0,2.0} offset={-5.0, -5.0,0.01} }
} }
When lineColor is Transparent
When lineColor is transparent, lines will still be rendered with full opacity, but if a shroud's fill color (tri_color_id or tri_color1_id) uses the transparent line color, it will take on the transparency. Likewise, if a shroud's line_color_id uses a transparent fill color, it will be rendered opaque.
An example of the same color ID being rendered opaque as a line color and transparent as a fill color:
-- Shape 271390000 is a circle.
{ 17000
	features=INVISIBLE
	fillColor =0x20FF0000
	fillColor1=0x2000FF00
	lineColor =0x200000FF
	shroud={
		{ tri_color_id=0 tri_color1_id=0 line_color_id=0 shape=271390000 size={10.0,10.0} offset={2.5, 15.0,0.01} }
		{ tri_color_id=1 tri_color1_id=1 line_color_id=1 shape=271390000 size={10.0,10.0} offset={2.5,  0.0,0.01} }
		{ tri_color_id=2 tri_color1_id=2 line_color_id=2 shape=271390000 size={10.0,10.0} offset={2.5,-15.0,0.01} }
} }
Overlaying Transparent Shrouds
Overlaying transparent shrouds is best explained in the context of getting more that three colors.
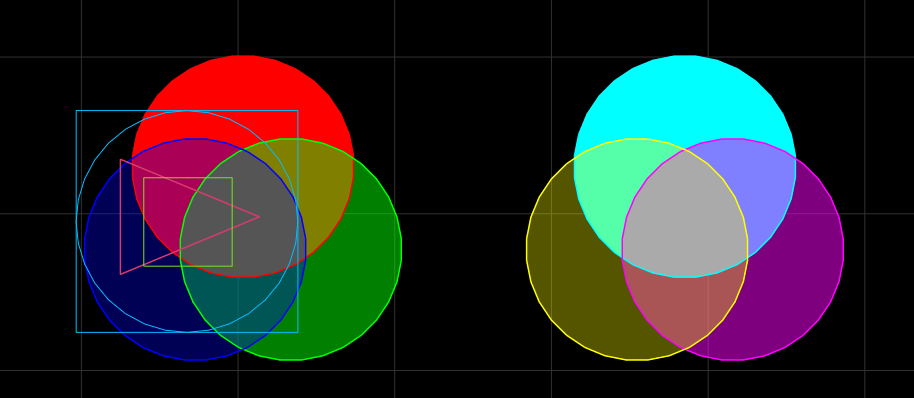
Getting More Than Three Colors
As shrouds are limited to using the three colors of their block (fillColor, fillColor1, and lineColor), they can usually only have three colors, but there are ways to get around the limitations.
Overlaying Transparent Shrouds
When shrouds with >100% alpha are overlayed, only the lines of the topmost shroud are rendered (unless the shrouds have the same Z level). However, the fill colors of all the shrouds are merged, which can be used to create more than three colors.
Below is an example of a shroud with 3 circles layered bottom up in the orders red, blue, and green, all with 50% alpha:
-- Shape 271390000 is a circle.
{ 17000
	features=INVISIBLE
	fillColor =0x7FFF0000
	fillColor1=0x7F00FF00
	lineColor =0x7F0000FF
	shroud={
		{ tri_color_id=0 tri_color1_id=0 line_color_id=0 shape=271390000 size={10.0,10.0} offset={2.500, 2.500,0.01} }
		{ tri_color_id=1 tri_color1_id=1 line_color_id=1 shape=271390000 size={10.0,10.0} offset={4.665,-1.250,0.01} }
		{ tri_color_id=2 tri_color1_id=2 line_color_id=2 shape=271390000 size={10.0,10.0} offset={0.335,-1.250,0.01} }
} }
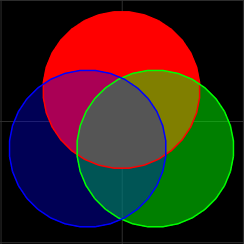
Even though all the circles in the above example have the same Z level of 0.01, and the same alpha value of 50%, the intersection of all three colors is mostly blue because of the digital compositing process.
The digital compositing process decides the color of the pixels of the intersection with this process:
- The opaque black background defaults pixels to black: 0% red, blue, and green.
- The black color is mixed with the red circle of 50% alpha. This leads to a color that is 50% black, and 50% red. In terms of RGB, this is 50% red, 0% blue, and 0% green.
- Then, this dark red color is mixed with the green circle of 50% alpha. This creates a color that is 25% black, 25% red, and 50% green. In terms of RGB, this is 25% red, 50% green, and 0% blue (
0x3F7F00). - Finally, this slightly dark impure green color is mixed with a 50% blue. This leads to a color that is 12.5% black, 12.5% red, 25% green, and 50% blue. In terms of RGB, this is 14.29% red, 28.57% green, and 57.14% blue, (
0x244992) which is a dark blue color.
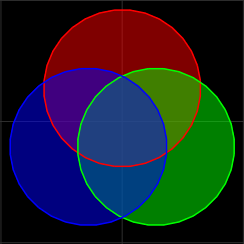
However, if you want a grey center from three circles colored red, green, and blue, you would need to make the final ratios after the digital compositing process of the three colors all equal.
To get a color of 1:1:1 R:G:B:
- Start with a full red at 100% alpha.
- Then split it equally with green using an alpha value of 50% for 50% red and 50% green.
- And then split those two colors with the third color, blue, at 33% alpha to get equal ratio for all colors.
The alpha values in order are:
- Red: 100%
- Green: 50%
- Blue: 33%
{ 17000
	features=INVISIBLE
	fillColor =0xFFFF0000
	fillColor1=0x7F00FF00
	lineColor =0x550000FF
	shroud={
		{ tri_color_id=0 tri_color1_id=0 line_color_id=0 shape=271390000 size={10.0,10.0} offset={2.500, 2.500,0.01} }
		{ tri_color_id=1 tri_color1_id=1 line_color_id=1 shape=271390000 size={10.0,10.0} offset={4.665,-1.250,0.01} }
		{ tri_color_id=2 tri_color1_id=2 line_color_id=2 shape=271390000 size={10.0,10.0} offset={0.335,-1.250,0.01} }
} }
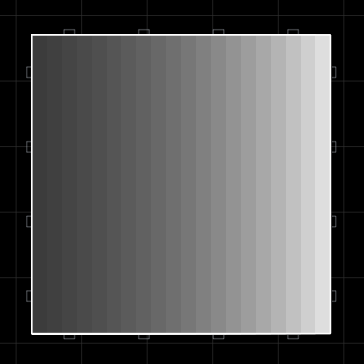
Merging their colors is of course limited, but it is useful for creating gradients with a non-opaque shroud on top to get rid of the lines:
{ 17000
	scale=4
	fillColor =0xFFFFFFFF
	fillColor1=0xFFFFFFFF
	lineColor =0x11000000
	shroud={
		{ tri_color_id=2 tri_color1_id=2 line_color_id=1 shape=SQUARE size={2* 1,20} offset={-10,0,0.01} }
		{ tri_color_id=2 tri_color1_id=2 line_color_id=1 shape=SQUARE size={2* 2,20} offset={-10,0,0.01} }
		{ tri_color_id=2 tri_color1_id=2 line_color_id=1 shape=SQUARE size={2* 3,20} offset={-10,0,0.01} }
		{ tri_color_id=2 tri_color1_id=2 line_color_id=1 shape=SQUARE size={2* 4,20} offset={-10,0,0.01} }
		{ tri_color_id=2 tri_color1_id=2 line_color_id=1 shape=SQUARE size={2* 5,20} offset={-10,0,0.01} }
		{ tri_color_id=2 tri_color1_id=2 line_color_id=1 shape=SQUARE size={2* 6,20} offset={-10,0,0.01} }
		{ tri_color_id=2 tri_color1_id=2 line_color_id=1 shape=SQUARE size={2* 7,20} offset={-10,0,0.01} }
		{ tri_color_id=2 tri_color1_id=2 line_color_id=1 shape=SQUARE size={2* 8,20} offset={-10,0,0.01} }
		{ tri_color_id=2 tri_color1_id=2 line_color_id=1 shape=SQUARE size={2* 9,20} offset={-10,0,0.01} }
		{ tri_color_id=2 tri_color1_id=2 line_color_id=1 shape=SQUARE size={2*10,20} offset={-10,0,0.01} }
		{ tri_color_id=2 tri_color1_id=2 line_color_id=1 shape=SQUARE size={2*11,20} offset={-10,0,0.01} }
		{ tri_color_id=2 tri_color1_id=2 line_color_id=1 shape=SQUARE size={2*12,20} offset={-10,0,0.01} }
		{ tri_color_id=2 tri_color1_id=2 line_color_id=1 shape=SQUARE size={2*13,20} offset={-10,0,0.01} }
		{ tri_color_id=2 tri_color1_id=2 line_color_id=1 shape=SQUARE size={2*14,20} offset={-10,0,0.01} }
		{ tri_color_id=2 tri_color1_id=2 line_color_id=1 shape=SQUARE size={2*15,20} offset={-10,0,0.01} }
		{ tri_color_id=2 tri_color1_id=2 line_color_id=1 shape=SQUARE size={2*16,20} offset={-10,0,0.01} }
		{ tri_color_id=2 tri_color1_id=2 line_color_id=1 shape=SQUARE size={2*17,20} offset={-10,0,0.01} }
		{ tri_color_id=2 tri_color1_id=2 line_color_id=1 shape=SQUARE size={2*18,20} offset={-10,0,0.01} }
		{ tri_color_id=2 tri_color1_id=2 line_color_id=1 shape=SQUARE size={2*19,20} offset={-10,0,0.01} }
		{ tri_color_id=2 tri_color1_id=2 line_color_id=1 shape=SQUARE size={2*20,20} offset={-10,0,0.01} }

		{ tri_color_id=2 tri_color1_id=2 line_color_id=1 shape=SQUARE size={2*20,20} offset={-10,0,0.03} }
} }
They can also fade into the background:
{ 17000
	features=INVISIBLE
	scale=4
	fillColor =0xFFFFFFFF
	fillColor1=0xFFFFFFFF
	lineColor =0x050000FF
	shroud={
		{ tri_color_id=2 tri_color1_id=2 line_color_id=1 shape=SQUARE size={2* 1,20} offset={-10,0,0.01} }
		{ tri_color_id=2 tri_color1_id=2 line_color_id=1 shape=SQUARE size={2* 2,20} offset={-10,0,0.01} }
		{ tri_color_id=2 tri_color1_id=2 line_color_id=1 shape=SQUARE size={2* 3,20} offset={-10,0,0.01} }
		{ tri_color_id=2 tri_color1_id=2 line_color_id=1 shape=SQUARE size={2* 4,20} offset={-10,0,0.01} }
		{ tri_color_id=2 tri_color1_id=2 line_color_id=1 shape=SQUARE size={2* 5,20} offset={-10,0,0.01} }
		{ tri_color_id=2 tri_color1_id=2 line_color_id=1 shape=SQUARE size={2* 6,20} offset={-10,0,0.01} }
		{ tri_color_id=2 tri_color1_id=2 line_color_id=1 shape=SQUARE size={2* 7,20} offset={-10,0,0.01} }
		{ tri_color_id=2 tri_color1_id=2 line_color_id=1 shape=SQUARE size={2* 8,20} offset={-10,0,0.01} }
		{ tri_color_id=2 tri_color1_id=2 line_color_id=1 shape=SQUARE size={2* 9,20} offset={-10,0,0.01} }
		{ tri_color_id=2 tri_color1_id=2 line_color_id=1 shape=SQUARE size={2*10,20} offset={-10,0,0.01} }
		{ tri_color_id=2 tri_color1_id=2 line_color_id=1 shape=SQUARE size={2*11,20} offset={-10,0,0.01} }
		{ tri_color_id=2 tri_color1_id=2 line_color_id=1 shape=SQUARE size={2*12,20} offset={-10,0,0.01} }
		{ tri_color_id=2 tri_color1_id=2 line_color_id=1 shape=SQUARE size={2*13,20} offset={-10,0,0.01} }
		{ tri_color_id=2 tri_color1_id=2 line_color_id=1 shape=SQUARE size={2*14,20} offset={-10,0,0.01} }
		{ tri_color_id=2 tri_color1_id=2 line_color_id=1 shape=SQUARE size={2*15,20} offset={-10,0,0.01} }
		{ tri_color_id=2 tri_color1_id=2 line_color_id=1 shape=SQUARE size={2*16,20} offset={-10,0,0.01} }
		{ tri_color_id=2 tri_color1_id=2 line_color_id=1 shape=SQUARE size={2*17,20} offset={-10,0,0.01} }
		{ tri_color_id=2 tri_color1_id=2 line_color_id=1 shape=SQUARE size={2*18,20} offset={-10,0,0.01} }
		{ tri_color_id=2 tri_color1_id=2 line_color_id=1 shape=SQUARE size={2*19,20} offset={-10,0,0.01} }
		{ tri_color_id=2 tri_color1_id=2 line_color_id=1 shape=SQUARE size={2*20,20} offset={-10,0,0.01} }

		{ tri_color_id=2 tri_color1_id=2 line_color_id=1 shape=SQUARE size={2*20,20} offset={-10,0,0.03} }
} }
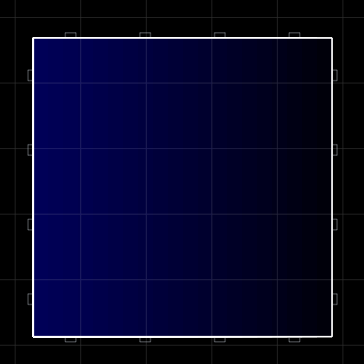
Sadly, there is no way to truly avoid rendering lines, as, when hiding lines, there must always be some higher-layered near-transparent shroud with its own rendered lines.
Never Firing Non-Turreted Launcher
A non-turreted never firing launcher, can hold a launchable that can have its own three colors and its own shroud.
The following example has 6 different colors (blending together to make two grays) using a small custom launcher and launchable shape:
{ 17000
	features=COMMAND|GENERATOR|INVISIBLE|LAUNCHER|NEVERFIRE|NOICON
	shape=271390004
	fillColor =0xFFFF0000
	fillColor1=0x7F00FF00
	lineColor =0x550000FF
	aihint_range=0
    launcherPower=inf
	shroud={
		{ tri_color_id=0 tri_color1_id=0 line_color_id=0 shape=271390002 size={10.0,10.0} offset={2.500, 2.500,0.02} }
		{ tri_color_id=1 tri_color1_id=1 line_color_id=1 shape=271390002 size={10.0,10.0} offset={4.665,-1.250,0.02} }
		{ tri_color_id=2 tri_color1_id=2 line_color_id=2 shape=271390002 size={10.0,10.0} offset={0.335,-1.250,0.02} }
	}
	replicateBlock={
		shape=271390005
		fillColor =0xFF00FFFF
		fillColor1=0x7FFF00FF
		lineColor =0x55FFFF00
		shroud={
			{ tri_color_id=0 tri_color1_id=0 line_color_id=0 shape=271390002 size={10.0,10.0} offset={22.500, 2.500,0.02} }
			{ tri_color_id=1 tri_color1_id=1 line_color_id=1 shape=271390002 size={10.0,10.0} offset={24.665,-1.250,0.02} }
			{ tri_color_id=2 tri_color1_id=2 line_color_id=2 shape=271390002 size={10.0,10.0} offset={20.335,-1.250,0.02} }
		}
	}
}
Centering Shrouds on Non-Turreted Blocks
This chapter discusses how one can center their shrouds' offsets with an understanding of how shroud centers are defined for non-turreted blocks.
Icon Center
A shape's icon center is where the center of its icon is. It is defined by the average position of the shape's vertices.
Icon Radius
A shape's icon radius is the size of its icon. It is defined by the mininum distance between the maximum distance from the icon center to any vertex and the mininum distance from the icon center to any of the sides' midpoints.
Shroud Center
A shape's shroud center is the position of a shroud at offset={0.0,0.0,_}. It is defined by icon center minus half the icon radius.
Subtract the block's shape's shroud center from the offset of a shroud to center it.
For example, if you want to center the shroud in the middle of a scale 1 square, you would probably use the Python program below to figure out that the shroud center is {-2.5,0}. Next, you would subtract {-2.5,0} from your shroud's offset, {0.0,0.0,0.01} to get {2.5,0.0,0.01}.
Example Python Code for Calculating Shroud Centers
Abstract things, as simple as they are, must be calculated using comedically complex looking Python programs.
import math

def get_icon_center(vertices: list[(float, float)]) -> (float, float):
    avg_x = sum(vertex[0] for vertex in vertices) / len(vertices)
    avg_y = sum(vertex[1] for vertex in vertices) / len(vertices)
    icon_center = (avg_x, avg_y)
    return icon_center

def get_max_dist_icon_center_to_vertex(icon_center: (float, float), vertices: list[(float, float)]) -> float:
    max_dist_icon_center_to_vertex = 0
    for vertex in vertices:
        dist_icon_center_to_vertex = math.dist(icon_center, vertex)
        max_dist_icon_center_to_vertex = max(
            max_dist_icon_center_to_vertex,
            dist_icon_center_to_vertex
        )
    return max_dist_icon_center_to_vertex

def get_min_dist_icon_center_to_side_midpoint(icon_center: (float, float), vertices: list[(float, float)]) -> float:
    min_dist_icon_center_to_side_midpoint = float('inf')
    for vertex_index in range(len(vertices)):
        vertex = vertices[vertex_index]
        next_vertex = vertices[(vertex_index + 1) % len(vertices)]
        side_mid_point = (
            (vertex[0] + next_vertex[0]) / 2,
            (vertex[1] + next_vertex[1]) / 2
        )
        dist_icon_center_to_side_midpoint = math.dist(icon_center, side_mid_point)
        min_dist_icon_center_to_side_midpoint = min(
            min_dist_icon_center_to_side_midpoint,
            dist_icon_center_to_side_midpoint
        )
    return min_dist_icon_center_to_side_midpoint

def get_icon_radius(vertices: list[(float, float)]) -> (float, float):
    icon_center = get_icon_center(vertices)
    max_dist_icon_center_to_vertex = get_max_dist_icon_center_to_vertex(icon_center, vertices)
    min_dist_icon_center_to_side_midpoint = get_min_dist_icon_center_to_side_midpoint(icon_center, vertices)
    icon_radius = min(
        max_dist_icon_center_to_vertex,
        min_dist_icon_center_to_side_midpoint
    )
    return icon_radius

def get_shroud_center(vertices: list[(float, float)]) -> (float, float):
    icon_center = get_icon_center(vertices)
    icon_radius = get_icon_radius(vertices)
    shroud_center = (icon_center[0] - 0.5 * icon_radius, icon_center[1])
    return shroud_center

# Add you own shapes using the following as examples:
shapes = [
    [(-5, -5), (-5, 5), (5, 5), (5, -5)],   # Square
    [(0, 0), (0, 5), (5, 0)],               # Triangle
    [(-10, -10), (50, 100), (0, 0)]         # ???
]

for shape in shapes:
    print(f"{shape}\n\t{get_shroud_center(shape)}\n")
Cannons
Below is an example cannon which has the most basic features.
{ 17000
    features=CANNON
    cannon={
        damage=100        -- ...per shot fired.
        roundsPerSec=5
        muzzleVel=1000    -- Velocity of bullet.
        range=1000        -- Distance travelled by bullet before it is destroyed.
        power=10          -- ...per shot fired.
        spread=0.1        -- Maximum random spread of bullets in radians.
        color=0xFFFFFFFF  -- AARRGGBB color value.
        recoil=1          -- ...per shot fired.
    }
}
To be precise, that definition of bullet range is not correct, as bullets are destroyed based a duration calculated from just their muzzleVel and the range.
If the bullet was fired from a stationary ship, then it would travel 1000 units at 1000 units per second over 1 second. However, if the bullet was fired from a moving ship, then the bullet would inherit its velocity.
For the above example, if the ship firing the bullet was travelling in the same direction as the bullet being fired, the bullet would travel a greater distance with a greater speed over the same amount of time.
Firing in Bursts
If you want a cannon to fire in bursts, you need to define its burstyness and roundsPerBurst.
The way that a cannon using burstyness fires is defined by its burstyness, roundsPerBurst, and roundsPerSec. Keep in mind that roundsPerSec is always constant.
The value of burstyness must be between 0.0 and 1.0.
A burstyness of 0 means that a cannon will not fire in bursts and a burstyness of 1 means that a cannon will fire the value of roundsPerBurst all at once.
Burstyness values in between 0 and 1 will fire however many roundsPerBurst they have, wait, and then fire another burst again.
{ 17000
    features=CANNON
    cannon={
        -- This cannon will fire 5 bullets at once every 1 second.
        burstyness=1
        roundsPerSec=5
        roundsPerBurst=5

        -- Other cannon fields here.
    }
}
Bullet Damage Output
Think of a bullet's damage output as its health which it 'spends' on damaging blocks. When the bullet runs out of damage output, it is destroyed.
More specifically, when a bullet (that's non-explosive=ENABLED) hits a block, it deal as much of its damage to the block as it can. If the bullet had more remaining damage output than the block's remaining health before the collision, then the bullet will continue existing with the block's prior remaining health subtracted from its damage output.
Explosive Cannons
If you want a cannon to fire explosives, you need to define its explosive and explodeRadius.
The explosive field has three flags for non-fragment bullets:
ENABLED: bullet explodes when hitting a target.FINAL: bullet explodes at either the end of its range or when the bullet's damage output is exhausted.PROXIMITY: bullet snaps its explosion to the closest enemy block relative to its explode radius.
(Explosive flags for fragments)
{ 17000
    features=CANNON
    cannon={
        -- This bullet will explode on hitting a block.
        -- It will deal its damage to all blocks in a radius of 50.
        explosive=ENABLED
        explodeRadius=50
        -- Other cannon fields here.
    }
}
The explosive field is a flag type, so the way it works is similar to the features field for blocks. This means you can combine explosive flags for a desired effect, but this is unnecessary to know about with the three explosive flags stated prior unless you want to use Fragments.
Fragments
When a bullet is destroyed, it can produce fragments. These fragments can also produce fragments when they are destroyed, creating one of the most versatile systems in Reassembly modding.
Fragments are nested within projectile code and have the same field types as base cannons except for those which wouldn't make sense.
Look at the code below and look at the similarities between the base cannon bullet and the fragment which is nested within it:
{ 17000
    features=CANNON
    cannon={
        damage=100
        roundsPerSec=5
        muzzleVel=1000
        range=1000
        power=10
        spread=0.1
        color=0xFFFFFFFF
        recoil=1

        burstyness=1
        roundsPerBurst=5

        explosive=ENABLED
        explodeRadius=50

        fragment={
            damage=50
            -- Fragments don't have `roundsPerSec`.
            muzzleVel=500
            range=500
            -- Fragments don't need `power`.
            spread=0.1
            color=0xFFFFFFFF
            -- Fragments have no need to exert `recoil`.

            -- Fragments also don't have `burstyness`.
            roundsPerBurst=5

            explosive=ENABLED
            explodeRadius=25
        }
    }
}
In fragments, roundsPerBurst is repurposed as the amount of fragments released when a bullet is destroyed.
In the code extract above, the base cannon bullet will split into 5 fragments, which are all identical. The fragments will also be created at a spread of 0.1 radians, or ~5.72°, as defined by the fragment's spread field.
Fragment Chaining
As fragments can be nested within each other, we can create fragment chains. Below is an example of one using conventional one-line fragments for easy reading:
{ 17000
    features=CANNON
    cannon={
        damage=100
        roundsPerSec=1
        muzzleVel=50
        range=50
        power=10
        -- Some fields have been left out for ease of explaining.

        fragment={ damage=100 muzzleVel=50 range=50 roundsPerBurst=1
        fragment={ damage=100 muzzleVel=50 range=50 roundsPerBurst=1
        fragment={ damage=100 muzzleVel=50 range=50 roundsPerBurst=1
        fragment={ damage=100 muzzleVel=50 range=50 roundsPerBurst=1
        }}}} -- Closing brackets are lined up at the end of the chain.
    }
}
In this code extract, there will be 5 fragment projectiles that spawn after one another in a chain.
The Relationship of range and muzzleVel
If you fire the cannon from the code extract above, you might notice something unexpected if you are unfamilier with fragment modding. Each new fragment is faster than the last by 50 units per second:
This is caused by each successive fragment inheriting the sum of the velocities of all the bullets that came before it.
To have uniform velocities on the bullets, one might expect the solution to be to make the muzzleVel equal 0, but this does not work:
    cannon={
        damage=100
        roundsPerSec=1
        muzzleVel=50
        range=50
        power=10

        fragment={ damage=100 muzzleVel=0 range=50 roundsPerBurst=1
        -- None of the other fragments are reached.
        fragment={ damage=100 muzzleVel=0 range=50 roundsPerBurst=1
        fragment={ damage=100 muzzleVel=0 range=50 roundsPerBurst=1
        fragment={ damage=100 muzzleVel=0 range=50 roundsPerBurst=1
        }}}}
    }
Although the second bullet has velocity, it is inherited from the first stage. Think back to how bullet duration is calculated based on only a bullet's muzzleVel and range, not its current velocity.
Now, understand that the second bullet will never transition to the third stage as the second bullet is "attempting" to travel a range of 50 at a muzzleVel of 0. The journey to travel 50 units at 0 units per second is uncompletable, the bullet will never enter the third stage.
To achieve uniform velocities, we must make the muzzleVel unnoticably small as well setting its range small enough that the fragments' duration is calculated to not be infinite.
If we want the fragments to last for one second, similar to the base bullet, then we can set range to 1 and the muzzleVel to 1. The bullet will travel 1 unit at 1 unit per second over a time of 1 second.
    cannon={
        damage=100
        roundsPerSec=1
        muzzleVel=50
        range=50
        power=10

        fragment={ damage=100 muzzleVel=1 range=1 roundsPerBurst=1
        fragment={ damage=100 muzzleVel=1 range=1 roundsPerBurst=1
        fragment={ damage=100 muzzleVel=1 range=1 roundsPerBurst=1
        fragment={ damage=100 muzzleVel=1 range=1 roundsPerBurst=1
		-- All fragments occur. success!
        }}}}
    }
Strangely, a bullet trying to travel a range of 0 at a muzzleVel of 0 completes its journey.
Patterns
For more control over how bullets are spawned, you can select various pattern flags for the pattern field of a bullet. They can be used in both base bullets and fragments.
Below is an example of a cannon using the RANDOM pattern, which would be the same as having pattern not defined.
    cannon={
        damage=100
        roundsPerSec=1
        muzzleVel=50
        range=50
        power=10
        recoil=0

        spread=pi*2
        pattern=RANDOM
    }
Below are all the bullet patterns, they can all be used on both base cannon bullets and fragments except for WAVE, which can only be used on base cannon bullets.
Random
pattern=RANDOM: default spread behaviour, choosing a random angle in the specified spread.
	cannon={ spread=pi*2 pattern=RANDOM

        damage=100 roundsPerSec=5 muzzleVel=50 range=50 recoil=0 }
Constant
pattern=CONSTANT: bullet will angle exactly at the spread angle. Positive spread angles bullet counterclockwise while negative spread angles bullets clockwise.
Firing counterclockwise:
   cannon={ spread=pi*0.5 pattern=CONSTANT

       damage=100 roundsPerSec=5 muzzleVel=50 range=50 recoil=0 }
Firing clockwise:
   cannon={ spread=pi*-0.5 pattern=CONSTANT

       damage=100 roundsPerSec=5 muzzleVel=50 range=50 recoil=0 }
Spiral
pattern=SPIRAL: bullets are evenly distributed within the spread angle. Needs roundsPerBurst and burstyness defined on base cannon bullets but only needs roundsPerBurst defined on fragments.
   cannon={ spread=pi*0.5 pattern=SPIRAL roundsPerBurst=5 burstyness=0.5

       damage=100 roundsPerSec=5 muzzleVel=50 range=50 recoil=0 }
Wave
pattern=WAVE: bullets are distributed according to a sine wave within the spread angle. Do not use on fragments.
   cannon={ spread=pi*0.5 pattern=WAVE roundsPerBurst=20 burstyness=0.5

       damage=100 roundsPerSec=5 muzzleVel=50 range=50 recoil=0 }
Absolute
pattern=ABSOLUTE: bullets do not inherit velocity of ship or previous bullets. It can be mixed with any of the other pattern flags.
This is without ABSOLUTE:
   cannon={ spread=0

       damage=100 roundsPerSec=5 muzzleVel=50 range=50 recoil=0 }
This is with ABSOLUTE:
   cannon={ spread=0 pattern=ABSOLUTE

       damage=100 roundsPerSec=5 muzzleVel=50 range=50 recoil=0 }
Explosive Flags for Fragments
There are fragment specific alternatives for ENABLED, FINAL, and PROXIMITY for the explosive field. Respectively, they are:
FRAG_IMPACT: bullet fragments when hitting a target but not when the bullet reaches the end of its range.FRAG_FINAL: bullet fragments at either the end of its range or when the bullet's damage output is exhausted.FRAG_PROXIMITY: bullet fragments when within proximity of an attackable block.
There is also FRAG_NOFLASH, which makes bullets with this flag spawn without producing a frag spawn particle.
(Explosive flags for non-fragments)
Bullet Poofs
There are four types of bullet poofs:
- Spawn poofs (SPs): when a bullet is spawned, the bullet spawns an SP.
- Despawn poofs (DPs): when a bullet reaches the end of its lifetime, the bullet spawns a DP.
- Primary spawn poofs (PSPs): the SP of the primary bullet stage. If fired from a turreted weapon, the PSP pins to where it was spawned on the turret.
- Hit despawn poofs (HDPs): the DP of a non-explosive bullet that hits a block and is despawned from running out of damage to deal. These travel in a random direction.
Notice how PSPs are twice the radius and are brighter than DPs:
{ 17000
    features=CANNON
    cannon={
        damage=100
        roundsPerSec=0.5
        muzzleVel=200
        range=100
        power=10
        color=0xFFFFFFFF
    }
}
In the above example, the SPs are stationary but the DPs are not. This is because bullet poofs inherit the velocity of whatever spawned them, which in the case above includes a stationary ship and a moving projectile.
Below is a slow motion example to show how bullet poofs inherit velocity from a two-stage cannon:
{ 17000
    features=CANNON
    cannon={
        damage=50
        roundsPerSec=0.5
        muzzleVel=200
        range=100
        power=10
		color=0xFFFFFFFF
		fragment={
			damage=50
			roundsPerBurst=1
			muzzleVel=200
			range=100
			color=0xFFFFFFFF
		}
    }
}
When aesthetics demand it, bullet poofs can be removed using anti-bullet poof stages.
Anti-Bullet Poof Stages
This chapter covers how to create fragments that do not produce (or minimize) PSPs, SPs, and DPs.
There is included an [example of a clean fragment transition]
Anti-Primary Spawn Poof (Anti-PSP Stages)
There is no known way to fully get rid of a PSP, only to make them as invisible as possible and to prevent them from overlapping to reduce the accumulation of noticable opaqueness.
{ 17000
	features=CANNON
    cannon={
    -- Anti-PSP stage:
        roundsPerSec=0.3
        power=10

        damage=50
        muzzleVel=200
        range=    200*1.2
		color=0xFFFF0000
		fragment={
    -- Genuine projectile stage:
			damage=50
			muzzleVel=1
			range=    1*1.2
			color=0xFF0000FF
			explosive=FRAG_NOFLASH
		}
    }
}
Anti-Spawn Poof (Anti-SP Stages)
Spawn poofs of non-primary stages are simple to remove using explosive=FRAG_NOFLASH on the stage which spawns the SP.
{ 17000
	features=CANNON
    cannon={
    -- Red, other primary stage.
        roundsPerSec=0.3
        power=10
        damage=50
        muzzleVel=200
        range=    200*1.2
		color=0xFFFF0000
		fragment={
    -- Blue, non-primary anti-SP stage:
			damage=50
			muzzleVel=1
			range=    1*1.2
			color=0xFF0000FF
			explosive=FRAG_NOFLASH -- Makes this stage anti-SP.
		}
    }
}
Anti-Despawn Poof (Anti-DP Stages)
Getting rid of despawn poofs is less simple than for spawn poofs. DPs can either be removed by:
- Declaring
explosive=FINALon the stage which spawns the DP with the side effect that the bullet cannot to deal damage. - Declaring
explosive=FINALandexplodeRadius=1on the stage with the side effect that the bullet always plays the explosion sound effect on despawn.
Case 1: explosive=FINAL
Only having explosive=FINAL with no definition of explodeRadius makes the bullet use the default explodeRadius of zero, making it never hit anything and play no sound.
{ 17000
	features=CANNON
    cannon={
        damage=50
        roundsPerSec=1
        power=10
        muzzleVel=300
        range=200
		color=0xFFFFFFFF
		explosive=FINAL -- Makes this stage anti-DP.
    }
}
Case 2: explosvie=FINAL and explodeRadius=1
Having explosive=FINAL and defining explodeRadius=1 makes the bullet able to deal damage and makes it play the explosion sound effect on despawn.
{ 17000
	features=CANNON
    cannon={
        damage=50
        roundsPerSec=1
        power=10
        muzzleVel=300
        range=200
		color=0xFFFFFFFF
        -- Makes this stage anti-DP:
		explosive=FINAL
		explodeRadius=1
    }
}
Example of a Clean Fragment Transition
The following fragment transition from the red bullet to the blue bullet contains no poofs, whereby the red anti-DP stage leads into the blue anti-SP stage:
{ 17000
	features=CANNON
    cannon={
    -- Red anti-DP stage:
        damage=25
        muzzleVel=200
        range=    200
        roundsPerSec=0.8
        power=10
		color=0xFFFF0000
		explosive=FINAL
		projectileSize=1
		fragment={
    -- Blue anti-SP stage:
			damage=25
			muzzleVel=1
			range=    1
			color=0xFF0000FF
			explosive=FRAG_NOFLASH
		}
    }
}
Note that despite this stage contains 50 units worth of damage, it can only ever deal 25 units of damage as the first stage's explosion will never overlap with anything as it's undefined explodeRadius is by default set to zero:
Muzzle Flash
Muzzle flash is a desirable effect for making cannons look like they fire rounds with more force.
Poof Muzzle Flash
This cannon uses a coloured PSP to make a circular muzzle flash.
{ 17000
	features=CANNON
    cannon={
    -- Muzzle flash stage:
        roundsPerSec=1
        power=10

		projectileSize=2
		color=0xFFFFAA00

        damage=1
        muzzleVel=0
        range=0

		fragment={
    -- Actual bullet:
			damage=50
			muzzleVel=200
			range=200
			color=0xFFFFFFFF
		}
    }
}
Bullet Muzzle Flash
This cannon uses a coloured bullet to make a bullet-shaped muzzle flash.
Below are what the stages do in order:
- An invisible anti-PSP stage.
- The visible bullet that makes the shape of a muzzle flash. Exists for 1000/40, or 0.04 seconds.
- This stage takes the fragment back in front of the gun. This means that the cannon does not look like it is shooting from behind itself.
- The actual bullet's stage.
{ 17000
	features=CANNON
    -- Muzzle flash stages:
        -- Stage 1:
    cannon={   damage=1 muzzleVel=    1   range=  0   color=1          roundsPerSec=10 power=10
        -- Stage 2:
	fragment={ damage=1 muzzleVel=-1000   range=-40   color=0xFFFFAA00 explosive=FINAL              projectileSize=5 spread=0.2
        -- Stage 3:
	fragment={ damage=1 muzzleVel=-1000*4 range=-40*4 color=1          explosive=FINAL|FRAG_NOFLASH
	fragment={
    -- Actual bullet (stage 4):
		damage=50
		muzzleVel=1
		range=    1
		color=0xFFFFFFFF
		explosive=FRAG_NOFLASH
	}}}}
}
Bullet Shaping
Using the fragment system to create specific looks for a cannon projectile is called bullet shaping.
This chapter covers various types of common bullet shapes:
- Fragball
- Spikey Fragball
- Reverse Bullet
- 2-Tail Bullet
- 3-Tail Bullet
- n-Point Star
- X Shape Lense Flare Bullet
- n-Point Saw.
Fragball
A simple ball of 5 fragments that keeps its formation by inheriting velocity from the primary stage.
{ 17000
	features=CANNON
    cannon={
        damage=1
        roundsPerSec=1
        power=10
        muzzleVel=200
        range=0
		color=0xAAFFFFFF
		explosive=FINAL
		fragment={
			roundsPerBurst=5
			damage=25
			spread=360*pi/180
			muzzleVel=1
			range=    1
			color=0xAAFFFFFF
			explosive=FRAG_NOFLASH
		}
    }
}
Spikey Fragball
Same as the other fragball but with more bullets with a higher velocity so that they are rendered with longer tails.
{ 17000
	features=CANNON
    cannon={
        damage=1
        roundsPerSec=5
        power=10
        muzzleVel=1500
        range=0
		color=0xAAFFFFFF
		explosive=FINAL
		fragment={
			roundsPerBurst=12
			damage=25
			spread=360*pi/180
			muzzleVel=1
			range=    1
			color=0xAAFFFFFF
			explosive=FRAG_NOFLASH
		}
    }
}
Reverse Bullet
Simple bullet that appears backwards.
{ 17000
	features=CANNON
    cannon={
        damage=1
        roundsPerSec=1
        power=10
        muzzleVel=500
        range=0
		color=0xAAFFFFFF
		explosive=FINAL
		fragment={
			spread=180*pi/180
			pattern=CONSTANT
			explosive=FRAG_NOFLASH

			damage=50
			muzzleVel=1
			range=    0.5
			color=0xAAFFFFFF
		}
    }
}
2-Tail Bullet
Two angled bullets inherit velocity from the primary stage to create an arrow shape.
{ 17000
	features=CANNON
    cannon={
        damage=1
        roundsPerSec=1
        power=10
        muzzleVel=500
        range=0
		color=0xAAFFFFFF
		explosive=FINAL
		fragment={
			roundsPerBurst=2
			damage=25
			spread=30*pi/180
			muzzleVel=1
			range=    0.5
			color=0xAAFFFFFF
			explosive=FRAG_NOFLASH
			pattern=SPIRAL
		}
    }
}
3-Tail Bullet
Three angled bullets inherit velocity from the primary stage to create a bullet with three tails.
{ 17000
	features=CANNON
    cannon={
        damage=1
        roundsPerSec=1
        power=10
        muzzleVel=1000
        range=0
		color=0xAAFFFFFF
		explosive=FINAL
		fragment={
			roundsPerBurst=3
			damage=25
			spread=30*pi/180
			muzzleVel=1
			range=    0.5
			color=0xAAFFFFFF
			explosive=FRAG_NOFLASH
			pattern=SPIRAL
		}
    }
}
n-Point Star
The SPIRAL pattern can be used to create an star bullet with any amount of points.
For an n-pointed star, you can calculate the value for the secondary stage's spread by using the formula pi*((n-1)/n)).
For example, an 8-pointed star's spread would be calculated with pi*((8-1)/8), which would be put into the fragment as spread=pi*7/8.
{ 17000
	features=CANNON
    cannon={
        damage=1
        roundsPerSec=1
        power=10
        muzzleVel=1000
        range=0
		color=0xAAFFFFFF
		explosive=FINAL
		fragment={
			roundsPerBurst=8  -- Number of points of the star.
			damage=25
			spread=pi*7/8     -- Spread value here calculated from pi*((n-1)/n)).
			muzzleVel=1
			range=    0.5
			color=0xAAFFFFFF
			explosive=FRAG_NOFLASH
			pattern=SPIRAL
		}
    }
}
X Shape Lens Flare Bullet
Similar to the X shape lens flare always fire decoration.
A more complex bullet that creates an X-shaped bullet that always faces in the same direction using muzzleVel=0 and still travels in the fired direction by inheriting velocity from the primary stage.
The function of the stages are as follows:
- Creates a PSP and supplies the velocity inherited by the rest of the fragment.
- Stage with
muzzleVel=0to force the fragment to face either right or left. - Rotates the fragment by 45° degrees.
- Splits the fragment into four bullets spread over a 270° spread.
- The actual bullet stage that can deal damage and is visible.
{ 17000
	features=CANNON
    -- 1st stage:
    cannon={   damage=1 muzzleVel=1000 range=0 color=0xAAFFFFFF explosive=FINAL              roundsPerSec=1 power=10
    -- 2nd stage:
	fragment={ damage=1 muzzleVel=   0 range=0 color=1          explosive=FINAL|FRAG_NOFLASH
    -- 3rd stage:
	fragment={ damage=1 muzzleVel=   1 range=0 color=1          explosive=FINAL|FRAG_NOFLASH spread= 45*pi/180 pattern=CONSTANT
    -- 4th stage:
	fragment={ damage=1 muzzleVel=   1 range=0 color=1          explosive=FINAL|FRAG_NOFLASH spread=135*pi/180 pattern=SPIRAL roundsPerBurst=4
    -- 5th stage (actual bullet):
	fragment={
		damage=100
		muzzleVel=1
		range=    0.5
		color=0xAAFFFFFF
	}}}}}
}
n-Point Saw
A complex saw blade ring of bullets made out of n bullets defined by the roundsPerBurst value of the 3rd stage.
The spread of the 3rd stage can be calculated in a similar way to that of the n-Point Star, where the spread can be calculated using the formula pi*((n-1)/n)).
For example, a the spread of the 3rd stage of a 9-pointed star would be calculated with pi*((9-1)/9), which would be put into the 3rd stage as spread=pi*8/9.
The function of each stage is as follows:
- Creates a PSP and moves the fragment backwards a small distance. This accounts for the distance which the fragment moves forwards while assembling the saw formation so that it looks like the saw blade spawns from the right place.
- Reverses the fragment again so that it faces forwards without changing its position.
- Splits the fragment into n bullets (in this case, 9) which then travel outwards almost instantly.
- Cancels out the fragment's velocities so that it no longer changes position.
- This stage rotates by 60° anticlockwise using
pattern=CONSTANT. This stage is also the actual bullet stage that can deal damage and is visible.
{ 17000
	features=CANNON
    -- 1st stage:
    cannon={   damage=1 muzzleVel=-1000 range= -10 color=0xAAFFFFFF explosive=FINAL              roundsPerSec=1 power=10
    -- 2nd stage:
    fragment={ damage=1 muzzleVel=-2000 range=   0 color=1          explosive=FINAL|FRAG_NOFLASH
    -- 3rd stage (defines how many bullets there are in the saw):
    fragment={ damage=1 muzzleVel=  400 range=  12 color=1          explosive=FINAL|FRAG_NOFLASH pattern=SPIRAL roundsPerBurst=9 spread=pi*8/9
    -- 4th stage:
    fragment={ damage=1 muzzleVel= -400 range=   0 color=1          explosive=FINAL|FRAG_NOFLASH
    -- 5th stage (actual bullet):
    fragment={
        damage=25
        spread=60*pi/180
        muzzleVel=1
        range=    0.5
        color=0xFFFFFFFF
        explosive=FRAG_NOFLASH
        pattern=CONSTANT
    }}}}}
}
Fragbeams
Fragbeams are cannons that use fragments in such a way that they they look like a laser beam when fired.
This chapter will describe multiple distinct types of fragbeams, each example video includes the fragbeam firing at a target without commands and with commands, as well as advantages and disadvantages for each.
Synchronous, Evenly Spaced Fragbeam
This fragbeam uses pattern=SPIRALto make each bullet split into two travelling in opposite directions. After each split, the distance travelled by each stage decreases until the final stage is reached in synchrony. Because there are no uses of rangeStdDev, this fragbeam is evenly spaced.
{ 17000
    features=CANNON
	cannon={   damage= 1 muzzleVel=121*64 range=32 color=0xFFFFFFFF                                                                    explosive=FINAL|FRAG_NOFLASH roundsPerSec=0.5 recoil=0
	fragment={ damage= 1 muzzleVel=  1    range= 0 color=1                           pattern=ABSOLUTE|       CONSTANT spread=90*pi/180 explosive=FINAL|FRAG_NOFLASH
	fragment={ damage= 1 muzzleVel=121*32 range=32 color=1          roundsPerBurst=2 pattern=ABSOLUTE|SPIRAL          spread=90*pi/180 explosive=FINAL|FRAG_NOFLASH
	fragment={ damage= 1 muzzleVel=  1    range= 0 color=1                           pattern=ABSOLUTE|       CONSTANT spread=90*pi/180 explosive=FINAL|FRAG_NOFLASH
	fragment={ damage= 1 muzzleVel=121*16 range=16 color=1          roundsPerBurst=2 pattern=ABSOLUTE|SPIRAL          spread=90*pi/180 explosive=FINAL|FRAG_NOFLASH
	fragment={ damage= 1 muzzleVel=  1    range= 0 color=1                           pattern=ABSOLUTE|       CONSTANT spread=90*pi/180 explosive=FINAL|FRAG_NOFLASH
	fragment={ damage= 1 muzzleVel=121* 8 range= 8 color=1          roundsPerBurst=2 pattern=ABSOLUTE|SPIRAL          spread=90*pi/180 explosive=FINAL|FRAG_NOFLASH
	fragment={ damage= 1 muzzleVel=  1    range= 0 color=1                           pattern=ABSOLUTE|       CONSTANT spread=90*pi/180 explosive=FINAL|FRAG_NOFLASH
	fragment={ damage= 1 muzzleVel=121* 4 range= 4 color=1          roundsPerBurst=2 pattern=ABSOLUTE|SPIRAL          spread=90*pi/180 explosive=FINAL|FRAG_NOFLASH
	fragment={ damage= 1 muzzleVel=  1    range= 0 color=1                           pattern=ABSOLUTE|       CONSTANT spread=90*pi/180 explosive=FINAL|FRAG_NOFLASH
	fragment={ damage= 1 muzzleVel=121* 2 range= 2 color=1          roundsPerBurst=2 pattern=ABSOLUTE|SPIRAL          spread=90*pi/180 explosive=FINAL|FRAG_NOFLASH
	fragment={ damage=25 muzzleVel=  1    range= 1 color=0xFFFFFFFF                  pattern=ABSOLUTE                                  explosive=      FRAG_NOFLASH
	}}}}}}}}}}}}
}
This fragbeam advantage of being evenly spaced and having all of its visible fragments appear at the same time in synchrony.
However, it has the disadvantage of always having delay before it appears. This cannot be removed by using high speed bullets in a satisfactory way as it will cause differences across different UPS settings.
Synchronous, Unevenly Spaced Fragbeam
This fragbeam uses multiple stages with rangeStdDev to create variation in the distance travelled by each split of the fragment, causing a beam shape to form. This is done at both a high speed and without the loss of bullet travel distance fidelity due to each next stage having decreasing range and muzzleVel values. This approaches a high fidelity of unevenly spaced fragments by the last stage.
{ 17000
    features=CANNON
	cannon={   damage= 1 muzzleVel=  1   range= 0                    color=1                           explosive=FINAL|FRAG_NOFLASH roundsPerSec=4    recoil=0
	fragment={ damage= 1 muzzleVel=500*4 range=10*4 rangeStdDev=10*4 color=1          pattern=ABSOLUTE explosive=FINAL|FRAG_NOFLASH roundsPerBurst=64
	fragment={ damage= 1 muzzleVel=500*3 range=10*3 rangeStdDev=10*3 color=1          pattern=ABSOLUTE explosive=FINAL|FRAG_NOFLASH
	fragment={ damage= 1 muzzleVel=500*2 range=10*2 rangeStdDev=10*2 color=1          pattern=ABSOLUTE explosive=FINAL|FRAG_NOFLASH
	fragment={ damage= 1 muzzleVel=500*1 range=10*1 rangeStdDev=10*1 color=1          pattern=ABSOLUTE explosive=FINAL|FRAG_NOFLASH
	fragment={ damage=10 muzzleVel=  5   range= 1                    color=0x7FFFFFFF pattern=ABSOLUTE explosive=      FRAG_NOFLASH
	}}}}}}
}
This fragbeam has the advantage of being visible while the beam is still forming, which can be useful if desired aesthetically.
However, it has the disadvantage of spreading its final stage fragments along its range inconsistently, which can sometimes spawn bullets inside of an enemy ship when they should have hit its side.
Small Sequential, Unevenly Spaced Fragbeam
Even though the "beam" is not stationary and it looks more like a long bullet, this can still be useful when aesthetics demand it.
This fragment works by spawning one large cluster of fragments, each slight differences in range from a low rangeStdDev value. After each finishes its range, they become the final stage and begin travelling. Because of the high velocity of the final stage, the small difference in delay before each fragment starts travelling is expressed as a line of bullets, which looks like a travelling fragbeam.
{ 17000
    features=CANNON
	cannon={   damage= 1 muzzleVel=   1 range=  0               color=1          explosive=FINAL|FRAG_NOFLASH                   roundsPerSec=2 recoil=0
	fragment={ damage= 1 muzzleVel=  40 range=  1 rangeStdDev=1 color=1          explosive=FINAL|FRAG_NOFLASH roundsPerBurst=16
	fragment={ damage=20 muzzleVel=1000 range=500               color=0xFFFFFFFF explosive=      FRAG_NOFLASH
	}}}
}
Because this fragment only has one stage with rangeStdDev, it has the disadvantage of not being able to create consistent fragment shapes. Additionally, this fragbeam's inability to create a stationary beam makes it unsuitable for creating standard beam weapons, although its relative simplicity makes it useful for creating other effects that only requre a long bullet.
Long Sequential, Unevenly Spaced Fragbeam
This is less like a fragbeam, and more like a bullet that leaves a long trail.
The fragment works by spawning one large cluster of fragments, each with a different range from the high rangeStdDev value. After each finishes its range, they become the final stage, which is stationary and is what looks like a fragbeam.
{ 17000
    features=CANNON
	cannon={   damage= 1 muzzleVel=   1 range=  0                 color=1                                              roundsPerSec=2 recoil=0
	fragment={ damage= 1 muzzleVel=   1 range=  0                 color=1          roundsPerBurst=255
	fragment={ damage=50 muzzleVel=1000 range=750 rangeStdDev=250 color=0xFFFFFFFF
	fragment={ damage=50 muzzleVel=   1 range=  5                 color=0xFFFFFFFF                    pattern=ABSOLUTE
	}}}}
}
The example video below includes the Terran Interceptor flying into the fragbeam.
Although this fragbeam is slow to fully activate, it can be used to create a weapon that behaves differently when it hits an enemy directly and when it is crossed over by an enemy.
X-Spaced Barrel Beam
See the chapter for the X-spaced barrel beam here.
Even though this is technically not a fragbeam (it requires no fragments to achieve a beam like effect, instead using the barrelSpacing field), it is still just as viable as all the other fragbeam variants in creating a laser out of cannon projectiles.
The XSBB has the advantage of both being a consistent weapon to use and acting the same across different UPS settings, as there are no high speed fragments that can travel different distances across different UPS settings.
However, the XSBB has the disadvantage of spawning bullets inside of enemy ships, which may not be desirable from a balancing standpoint. Moreover, it is subject to the XSBB desync glitch, in which bullets randomly do not spawn when fired.
Barrage Frag
A barrage frag is a fragment that has the effect of creating a barrage of bullets that look like they were shot from an artillery line.
This chapter contains a description of the barrage frag in addition to a way of achieving the same effect using barrelSpacing.
The barrage frag has four core stages. Their purposes are as follows:
- Rotate the fragment 90° counterclockwise.
- Almost instantly travel some distance left.
- Almost instantly travel a random distance in between no distance and double the distance travelled from the point of firing, using
rangeStdDevto do so. This stage also has a greater-than-oneroundsPerBurstto make a more bullet dense artillery barrage effect. - The actual, visible bullet, now fired along a line. This stage also has a small
rangeStdDevvalue of 10 to make it look more natural.
{ 17000
    features=CANNON
    cannon={   damage= 1 muzzleVel=  500 range= 50                 color=1          spread= 90*pi/180 pattern=CONSTANT explosive=FINAL              roundsPerSec= 30 power=10 recoil=0
    fragment={ damage= 1 muzzleVel=-1000 range=-100 rangeStdDev=50 color=1                                             explosive=FINAL|FRAG_NOFLASH roundsPerBurst=5
    fragment={ damage= 1 muzzleVel= -500 range=  0                 color=1                                             explosive=FINAL|FRAG_NOFLASH
	fragment={ damage=25 muzzleVel=  500 range=200  rangeStdDev=10 color=0xAAFFFFFF spread=-90*pi/180 pattern=CONSTANT explosive=      FRAG_NOFLASH
	}}}}
}
Y-Spaced Barrel Method: Y-Spaced Barrel Barrage (YSBB)
A similar effect can be created by using the Y part of the barrelSpacing field.
The primary stage has a high roundsPerSec so that the cannon cycles through its barrels rapidly. It also has a high roundsPerBurst and burstyness to avoid the tapping of the fire button causing only a few of the barrels to be shot out of. This stage also has a small range and rangeStdDev with a relatively high muzzleVel to add variation to when the secondary stage appears, making the barrage look more random.
The secondary stage is the actual bullet. Even though its muzzleVel is 460, it will actually travel at the speed of 500 because of what it inherits from the primary stage. The secondary stage also has a small rangeStdDev value of 10 to make it look more natural.
{ 17000
	features=CANNON|TURRET|
	barrelSize={0.000001,0.000001}
	barrelCount=32
	barrelSpacing={0,5}
	cannon={
		roundsPerSec=120
		roundsPerBurst=32
		burstyness=0.9
		damage=1
		muzzleVel= 40
		range=      4
		rangeStdDev=4
		color=1
		explosive=FINAL
		recoil=0
		fragment={
			damage=25
			muzzleVel= 460
			range=     460*0.4
            rangeStdDev=10
			color=0xFFFFFFFF
		}
	}
}
Compared to the frag barrage, the YSBB is more consistent, not being concentrated at the center due to the use of rangeStdDev and the standard deviation curve.
A disadvantage of the YSBB compared to the frag barrage is that the YSBB relies on utilising a turreted block, and thus cannot work anywhere but the start of a fragment.
Flamethrowers
Flamethrowers are a common weapon type that can be made in multiple different ways. However, this chapter contains one flamethrower (as well as a version without pattern=ABSOLUTE) that can be modified to act differently.
The following flamethrower is designed to look similar to a real world flamethrower, which starts off yellow before going from orange to red and then fading out, while having a bright white center. The first three stages have been tailored specific spread values to achieve a specific, continuously morphing effect.
The purposes of the stages are as follows:
- Primary, invisible stage with
spread=0.2to make denser clusters of projectiles in the 2nd stage, as it hasroundsPerBurst=16.
-
Predominantly cosmetic stages:
- This stage bursts into multiple fragments with
roundsPerBurst=16across a spread of 0.1 radians. This is the only stage that usesrangeStdDevas it makes the following groups of bullets more clustered together. - Similar to stage 2, but with a lower
roundsPerBurstof 2 and with a higher alpha value to keep a consistent brightness by accounting for the bullets being more spread out. - A dimmer stage that begins fading out the fragment and neither adds new bullets nor changes the angle.
- Still fading out.
- This stage bursts into multiple fragments with
- Invisible, damage dealing stage.
{ 17000
    features=CANNON
    -- 1st stage:
	cannon={   damage=1 muzzleVel=  1 range= 0                color=1          spread=0.2 explosive=FINAL              pattern=ABSOLUTE                                    recoil=0 roundsPerSec=15
	-- Predominantly cosmetic stages:
        -- 2nd stage:
	fragment={ damage=1 muzzleVel=200 range=50 rangeStdDev=25 color=0x10FF7000 spread=0.1 explosive=FINAL|FRAG_NOFLASH pattern=ABSOLUTE projectileSize=2 roundsPerBurst=16
        -- 3rd stage:
	fragment={ damage=1 muzzleVel=100 range=25                color=0x20FF4000 spread=0.1 explosive=FINAL|FRAG_NOFLASH pattern=ABSOLUTE projectileSize=2 roundsPerBurst=2
        -- 4nd stage:
	fragment={ damage=1 muzzleVel=100 range=15                color=0x10FF2000            explosive=FINAL|FRAG_NOFLASH pattern=ABSOLUTE projectileSize=2
        -- 5th stage:
	fragment={ damage=1 muzzleVel=100 range=15                color=0x05FF2000            explosive=FINAL|FRAG_NOFLASH pattern=ABSOLUTE projectileSize=1
	-- 6th, damage dealing stage:
	fragment={ damage=5 muzzleVel=  1 range= 0                color=1                     explosive=      FRAG_NOFLASH pattern=ABSOLUTE
	}}}}}}
}
Version Without pattern=ABSOLUTE
This is the same flamethrower, but it is more complex in that it does not use pattern=ABSOLUTE. This makes it fit in better with Reassembly's other weapons by allowing the flamethrower to inherrit the velocity of its ship.
Instead of using ABSOLUTE to get rid of every stage's inherrited velocity, each stage with significant velocity is followed by a stage that cancels out the velocity, and then another that reverses the direction of the fragment.
{ 17000
 	features=CANNON|PALETTE
	-- 1st stage:
	cannon={   damage=1 muzzleVel=   1 range= 0                color=1          spread=0.2 explosive=FINAL                                                  recoil=0 roundsPerSec=15
	-- Primarily cosmetic stages:
        -- 2nd stage:
	fragment={ damage=1 muzzleVel= 200 range=50 rangeStdDev=25 color=0x10FF7000 spread=0.1 explosive=FINAL|FRAG_NOFLASH projectileSize=2 roundsPerBurst=16
	fragment={ damage=1 muzzleVel=-200 range= 0                color=1                     explosive=FINAL|FRAG_NOFLASH
	fragment={ damage=1 muzzleVel=  -1 range= 0                color=1                     explosive=FINAL|FRAG_NOFLASH
        -- 3rd stage:
	fragment={ damage=1 muzzleVel= 100 range=25                color=0x20FF4000 spread=0.1 explosive=FINAL|FRAG_NOFLASH projectileSize=2 roundsPerBurst=2
	fragment={ damage=1 muzzleVel=-100 range= 0                color=1                     explosive=FINAL|FRAG_NOFLASH
	fragment={ damage=1 muzzleVel=  -1 range= 0                color=1                     explosive=FINAL|FRAG_NOFLASH
        -- 4nd stage:
	fragment={ damage=1 muzzleVel= 100 range=15                color=0x10FF2000            explosive=FINAL|FRAG_NOFLASH projectileSize=2
	fragment={ damage=1 muzzleVel=-100 range= 0                color=1                     explosive=FINAL|FRAG_NOFLASH
	fragment={ damage=1 muzzleVel=  -1 range= 0                color=1                     explosive=FINAL|FRAG_NOFLASH
        -- 5th stage:
	fragment={ damage=1 muzzleVel= 100 range=15                color=0x05FF2000            explosive=FINAL|FRAG_NOFLASH projectileSize=1
	fragment={ damage=1 muzzleVel=-100 range= 0                color=1                     explosive=FINAL|FRAG_NOFLASH
	fragment={ damage=1 muzzleVel=  -1 range= 0                color=1                     explosive=FINAL|FRAG_NOFLASH
	-- 6th, damage dealing stage:
	fragment={ damage=5 muzzleVel=   1 range= 0                color=1                     explosive=      FRAG_NOFLASH
	}}}}}}}}}}}}}}
}
The example video shows how the version of the weapon without ABSOLUTE inherits the velocity of the ship its on, and how it aids in ranged combat.
Phase Frags
When a frag has enough stages with a high enough velocity it can phase through enemy ships, hence the name 'phase frag'.
Key factors:
- High velocity of fragments, usually above 2000. (Can be inherited from previous stages.)
- Short range per fragment. (Each fragment should only exist for a few frames.)
- Many fragment stages.
Their behaviour changes depending on whether they have pattern=ABSOLUTE.
Two videos are included for each example:
- Against a brick of target blocks with 50 health each in front of a hexagonal asteroid.
- Against a scale 3 (the largest) Farmer shield at a slight offset so that the phase frag does not hit the shield head on (i.e.: not perpendicular to the tangent of the shield's collision circle).
The position of the weapon block is identical in each test.
Without pattern=ABSOLUTE
Each stage increases muzzleVel, so it accelerates. The frag's angle can be diverted by hull and shields.
{ 17000
 	features=CANNON
	cannon={   damage=50 muzzleVel=2000 range=1 color=0xFFFFFFFF recoil=0 roundsPerSec=1
	fragment={ damage=50 muzzleVel=  15 range=1 color=0xFFFFFFFF
	fragment={ damage=50 muzzleVel=  15 range=1 color=0xFFFFFFFF
	fragment={ damage=50 muzzleVel=  15 range=1 color=0xFFFFFFFF
	fragment={ damage=50 muzzleVel=  15 range=1 color=0xFFFFFFFF
	fragment={ damage=50 muzzleVel=  15 range=1 color=0xFFFFFFFF
	fragment={ damage=50 muzzleVel=  15 range=1 color=0xFFFFFFFF
	fragment={ damage=50 muzzleVel=  15 range=1 color=0xFFFFFFFF
	fragment={ damage=50 muzzleVel=  15 range=1 color=0xFFFFFFFF
	fragment={ damage=50 muzzleVel=  15 range=1 color=0xFFFFFFFF
	fragment={ damage=50 muzzleVel=  15 range=1 color=0xFFFFFFFF
	fragment={ damage=50 muzzleVel=  15 range=1 color=0xFFFFFFFF
	fragment={ damage=50 muzzleVel=  15 range=1 color=0xFFFFFFFF
	fragment={ damage=50 muzzleVel=  15 range=1 color=0xFFFFFFFF
	fragment={ damage=50 muzzleVel=  15 range=1 color=0xFFFFFFFF
	fragment={ damage=50 muzzleVel=  15 range=1 color=0xFFFFFFFF
	fragment={ damage=50 muzzleVel=  15 range=1 color=0xFFFFFFFF
	fragment={ damage=50 muzzleVel=  15 range=1 color=0xFFFFFFFF
	fragment={ damage=50 muzzleVel=  15 range=1 color=0xFFFFFFFF
	fragment={ damage=50 muzzleVel=  15 range=1 color=0xFFFFFFFF
	fragment={ damage=50 muzzleVel=  15 range=1 color=0xFFFFFFFF
	fragment={ damage=50 muzzleVel=  15 range=1 color=0xFFFFFFFF
	fragment={ damage=50 muzzleVel=  15 range=1 color=0xFFFFFFFF
	fragment={ damage=50 muzzleVel=  15 range=1 color=0xFFFFFFFF
	fragment={ damage=50 muzzleVel=  15 range=1 color=0xFFFFFFFF
	fragment={ damage=50 muzzleVel=  15 range=1 color=0xFFFFFFFF
	fragment={ damage=50 muzzleVel=  15 range=1 color=0xFFFFFFFF
	fragment={ damage=50 muzzleVel=  15 range=1 color=0xFFFFFFFF
	fragment={ damage=50 muzzleVel=  15 range=1 color=0xFFFFFFFF
	fragment={ damage=50 muzzleVel=  15 range=1 color=0xFFFFFFFF
	fragment={ damage=50 muzzleVel=  15 range=1 color=0xFFFFFFFF
	fragment={ damage=50 muzzleVel=  15 range=1 color=0xFFFFFFFF
	fragment={ damage=50 muzzleVel=  15 range=1 color=0xFFFFFFFF
	fragment={ damage=50 muzzleVel=  15 range=1 color=0xFFFFFFFF
	fragment={ damage=50 muzzleVel=  15 range=1 color=0xFFFFFFFF
	fragment={ damage=50 muzzleVel=  15 range=1 color=0xFFFFFFFF
	fragment={ damage=50 muzzleVel=  15 range=1 color=0xFFFFFFFF
	fragment={ damage=50 muzzleVel=  15 range=1 color=0xFFFFFFFF
	fragment={ damage=50 muzzleVel=  15 range=1 color=0xFFFFFFFF
	fragment={ damage=50 muzzleVel=  15 range=1 color=0xFFFFFFFF
	}}}}}}}}}}}}}}}}}}}}}}}}}}}}}}}}}}}}}}}}
}
Oscillating and Without pattern=ABSOLUTE
This frag oscillates between positive and negative muzzleVel, so it does not change velocity on its own. The frag's angle can be diverted by hull and shields.
{ 17000
 	features=CANNON
	cannon={   damage=50 muzzleVel=2000 range= 1 color=0xFFFFFFFF spread=0 recoil=0 roundsPerSec=1
	fragment={ damage=50 muzzleVel=  15 range= 1 color=0xFFFFFFFF spread=0
	fragment={ damage=50 muzzleVel= -15 range=-1 color=0xFFFFFFFF spread=0
	fragment={ damage=50 muzzleVel=  15 range= 1 color=0xFFFFFFFF spread=0
	fragment={ damage=50 muzzleVel= -15 range=-1 color=0xFFFFFFFF spread=0
	fragment={ damage=50 muzzleVel=  15 range= 1 color=0xFFFFFFFF spread=0
	fragment={ damage=50 muzzleVel= -15 range=-1 color=0xFFFFFFFF spread=0
	fragment={ damage=50 muzzleVel=  15 range= 1 color=0xFFFFFFFF spread=0
	fragment={ damage=50 muzzleVel= -15 range=-1 color=0xFFFFFFFF spread=0
	fragment={ damage=50 muzzleVel=  15 range= 1 color=0xFFFFFFFF spread=0
	fragment={ damage=50 muzzleVel= -15 range=-1 color=0xFFFFFFFF spread=0
	fragment={ damage=50 muzzleVel=  15 range= 1 color=0xFFFFFFFF spread=0
	fragment={ damage=50 muzzleVel= -15 range=-1 color=0xFFFFFFFF spread=0
	fragment={ damage=50 muzzleVel=  15 range= 1 color=0xFFFFFFFF spread=0
	fragment={ damage=50 muzzleVel= -15 range=-1 color=0xFFFFFFFF spread=0
	fragment={ damage=50 muzzleVel=  15 range= 1 color=0xFFFFFFFF spread=0
	fragment={ damage=50 muzzleVel= -15 range=-1 color=0xFFFFFFFF spread=0
	fragment={ damage=50 muzzleVel=  15 range= 1 color=0xFFFFFFFF spread=0
	fragment={ damage=50 muzzleVel= -15 range=-1 color=0xFFFFFFFF spread=0
	fragment={ damage=50 muzzleVel=  15 range= 1 color=0xFFFFFFFF spread=0
	fragment={ damage=50 muzzleVel= -15 range=-1 color=0xFFFFFFFF spread=0
	fragment={ damage=50 muzzleVel=  15 range= 1 color=0xFFFFFFFF spread=0
	fragment={ damage=50 muzzleVel= -15 range=-1 color=0xFFFFFFFF spread=0
	fragment={ damage=50 muzzleVel=  15 range= 1 color=0xFFFFFFFF spread=0
	fragment={ damage=50 muzzleVel= -15 range=-1 color=0xFFFFFFFF spread=0
	fragment={ damage=50 muzzleVel=  15 range= 1 color=0xFFFFFFFF spread=0
	fragment={ damage=50 muzzleVel= -15 range=-1 color=0xFFFFFFFF spread=0
	fragment={ damage=50 muzzleVel=  15 range= 1 color=0xFFFFFFFF spread=0
	fragment={ damage=50 muzzleVel= -15 range=-1 color=0xFFFFFFFF spread=0
	fragment={ damage=50 muzzleVel=  15 range= 1 color=0xFFFFFFFF spread=0
	fragment={ damage=50 muzzleVel=  15 range= 1 color=0xFFFFFFFF spread=0
	fragment={ damage=50 muzzleVel=  15 range= 1 color=0xFFFFFFFF spread=0
	fragment={ damage=50 muzzleVel= -15 range=-1 color=0xFFFFFFFF spread=0
	fragment={ damage=50 muzzleVel=  15 range= 1 color=0xFFFFFFFF spread=0
	fragment={ damage=50 muzzleVel= -15 range=-1 color=0xFFFFFFFF spread=0
	fragment={ damage=50 muzzleVel=  15 range= 1 color=0xFFFFFFFF spread=0
	fragment={ damage=50 muzzleVel= -15 range=-1 color=0xFFFFFFFF spread=0
	fragment={ damage=50 muzzleVel=  15 range= 1 color=0xFFFFFFFF spread=0
	fragment={ damage=50 muzzleVel= -15 range=-1 color=0xFFFFFFFF spread=0
	fragment={ damage=50 muzzleVel=  15 range= 1 color=0xFFFFFFFF spread=0
	}}}}}}}}}}}}}}}}}}}}}}}}}}}}}}}}}}}}}}}}
}
With pattern=ABSOLUTE
This frag stays at a constant speed of 2000 units per second. The frag's angle is not diverted by hull and shields.
{ 17000
 	features=CANNON
	cannon={   damage=50 muzzleVel=2000 range=2000/15 color=0xFFFFFFFF pattern=ABSOLUTE recoil=0 roundsPerSec=1
	fragment={ damage=50 muzzleVel=2000 range=2000/15 color=0xFFFFFFFF pattern=ABSOLUTE
	fragment={ damage=50 muzzleVel=2000 range=2000/15 color=0xFFFFFFFF pattern=ABSOLUTE
	fragment={ damage=50 muzzleVel=2000 range=2000/15 color=0xFFFFFFFF pattern=ABSOLUTE
	fragment={ damage=50 muzzleVel=2000 range=2000/15 color=0xFFFFFFFF pattern=ABSOLUTE
	fragment={ damage=50 muzzleVel=2000 range=2000/15 color=0xFFFFFFFF pattern=ABSOLUTE
	fragment={ damage=50 muzzleVel=2000 range=2000/15 color=0xFFFFFFFF pattern=ABSOLUTE
	fragment={ damage=50 muzzleVel=2000 range=2000/15 color=0xFFFFFFFF pattern=ABSOLUTE
	fragment={ damage=50 muzzleVel=2000 range=2000/15 color=0xFFFFFFFF pattern=ABSOLUTE
	fragment={ damage=50 muzzleVel=2000 range=2000/15 color=0xFFFFFFFF pattern=ABSOLUTE
	fragment={ damage=50 muzzleVel=2000 range=2000/15 color=0xFFFFFFFF pattern=ABSOLUTE
	fragment={ damage=50 muzzleVel=2000 range=2000/15 color=0xFFFFFFFF pattern=ABSOLUTE
	fragment={ damage=50 muzzleVel=2000 range=2000/15 color=0xFFFFFFFF pattern=ABSOLUTE
	fragment={ damage=50 muzzleVel=2000 range=2000/15 color=0xFFFFFFFF pattern=ABSOLUTE
	fragment={ damage=50 muzzleVel=2000 range=2000/15 color=0xFFFFFFFF pattern=ABSOLUTE
	fragment={ damage=50 muzzleVel=2000 range=2000/15 color=0xFFFFFFFF pattern=ABSOLUTE
	fragment={ damage=50 muzzleVel=2000 range=2000/15 color=0xFFFFFFFF pattern=ABSOLUTE
	fragment={ damage=50 muzzleVel=2000 range=2000/15 color=0xFFFFFFFF pattern=ABSOLUTE
	fragment={ damage=50 muzzleVel=2000 range=2000/15 color=0xFFFFFFFF pattern=ABSOLUTE
	fragment={ damage=50 muzzleVel=2000 range=2000/15 color=0xFFFFFFFF pattern=ABSOLUTE
	fragment={ damage=50 muzzleVel=2000 range=2000/15 color=0xFFFFFFFF pattern=ABSOLUTE
	fragment={ damage=50 muzzleVel=2000 range=2000/15 color=0xFFFFFFFF pattern=ABSOLUTE
	fragment={ damage=50 muzzleVel=2000 range=2000/15 color=0xFFFFFFFF pattern=ABSOLUTE
	fragment={ damage=50 muzzleVel=2000 range=2000/15 color=0xFFFFFFFF pattern=ABSOLUTE
	fragment={ damage=50 muzzleVel=2000 range=2000/15 color=0xFFFFFFFF pattern=ABSOLUTE
	fragment={ damage=50 muzzleVel=2000 range=2000/15 color=0xFFFFFFFF pattern=ABSOLUTE
	fragment={ damage=50 muzzleVel=2000 range=2000/15 color=0xFFFFFFFF pattern=ABSOLUTE
	fragment={ damage=50 muzzleVel=2000 range=2000/15 color=0xFFFFFFFF pattern=ABSOLUTE
	fragment={ damage=50 muzzleVel=2000 range=2000/15 color=0xFFFFFFFF pattern=ABSOLUTE
	fragment={ damage=50 muzzleVel=2000 range=2000/15 color=0xFFFFFFFF pattern=ABSOLUTE
	fragment={ damage=50 muzzleVel=2000 range=2000/15 color=0xFFFFFFFF pattern=ABSOLUTE
	fragment={ damage=50 muzzleVel=2000 range=2000/15 color=0xFFFFFFFF pattern=ABSOLUTE
	fragment={ damage=50 muzzleVel=2000 range=2000/15 color=0xFFFFFFFF pattern=ABSOLUTE
	fragment={ damage=50 muzzleVel=2000 range=2000/15 color=0xFFFFFFFF pattern=ABSOLUTE
	fragment={ damage=50 muzzleVel=2000 range=2000/15 color=0xFFFFFFFF pattern=ABSOLUTE
	fragment={ damage=50 muzzleVel=2000 range=2000/15 color=0xFFFFFFFF pattern=ABSOLUTE
	fragment={ damage=50 muzzleVel=2000 range=2000/15 color=0xFFFFFFFF pattern=ABSOLUTE
	fragment={ damage=50 muzzleVel=2000 range=2000/15 color=0xFFFFFFFF pattern=ABSOLUTE
	fragment={ damage=50 muzzleVel=2000 range=2000/15 color=0xFFFFFFFF pattern=ABSOLUTE
	fragment={ damage=50 muzzleVel=2000 range=2000/15 color=0xFFFFFFFF pattern=ABSOLUTE
	}}}}}}}}}}}}}}}}}}}}}}}}}}}}}}}}}}}}}}}}
}
Cannon Boosts
Cannon boosters have the CANNON_BOOST feature, they can change various statistics of a cannon. They can attach to cannons and can connect to other cannon boosters to use multiple boosters, such as for the Tinkrell faction.
They can affect both spinal and turreted cannons. Their effects on damage, muzzle velocity, and roundsPerSec can be seen on the barrels of turreted cannons.
A cannon boost shape is normally used for cannon boosters, such as DISH_WEAPON, ISOTRI_25_WEAPON, and RECT_CANNON_BOOST, but they can also use non-cannon boost shapes, as cannon boosting can be done through normal ports. Here is a link to the custom cannon boost shapes chapter.
The cannonBoost field is a list of containers for statistic modifers, which affect a specific quality of the cannon. They are formatted as in the example below:
{ 17000
    features=CANNON_BOOST
    shape=SQUARE_1
    cannonBoost={
        { damage       ={1,0} }
        { range        ={1,0} }
        { muzzleVel    ={1,0} }
        { power        ={1,0} }
        { roundsPerSec ={1,0} }
        { explodeRadius={1,0} }
        { spread       ={1,0} }
    }
}
The first number is the multiplier and the second number is the adder. Both can be positive or negative.
Note that balancing cannon boosters can difficult.
Lasers
Below is an example laser which has the most basic features.
{ 17000
    features=LASER
    laser={
        damage=100      -- ...per second of contact.
        range=1000
        power=10        -- ...per second firing.
        width=2         -- ...of laser.
        color=0xFFFFFFFF  -- AARRGGBB color value.
        decay=0.1       -- Seconds after firing ceases for laser to fade away.
    }
}
Firing in Bursts
If you want a laser to fire in bursts, you need to define its burstyness, pulsesPerBurst, and pulsesPerSec.
Burst firing lasers work similarly to burst firing cannons (see Cannons: Firing in Bursts), but roundsPerSec and roundsPerBurst are replaced by pulsesPerSec and pulsesPerBurst respectively.
{ 17000
    features=LASER
    laser={
        burstyness=0.5
        pulsesPerBurst=5
        pulsesPerSec=5
        -- Other laser fields here.
    }
}
Lasers that Exert Force
There are two types of force a laser can exert: an immobilization force and a linear force.
Imobilization Force
When a target is continuously hit by an imobilization laser, the immobilizeForce is exerted on the target to keep them in the same location as when they were initially hit.
{ 17000
    features=LASER
    laser={
        immobilizeForce=100000
        -- Other laser fields here.
    }
}
Linear Force
Force exerted in the direction of the laser. Positive linearForce drives targets away, negative linearForce draws them in.
{ 17000
    features=LASER
    laser={
        linearForce=100000
        -- Other laser fields here.
    }
}
Explosive Lasers
If you want a laser to be explosive, you need to define its explosive and explodeRadius.
The explosive field has three flags for lasers:
ENABLED: todo.FINAL: todo.PROXIMITY: todo.
{ 17000
    features=LASER
    cannon={
        -- This laser will explode on hitting a block.
        -- It will deal its damage to all blocks in a radius of 50.
        explosive=ENABLED
        explodeRadius=50
        -- Other laser fields here.
    }
}
Launchers
Below is an example launcher that fires a missile that does nothing and dies after 2 seconds.
{ 17000
	features=PALETTE|LAUNCHER
	shape=RECT_LAUNCHER
	replicateBlock={
		shape=MISSILE
		lifetime=2
	}
	replicateTime=1
	launcherPower=100
	launcherOutSpeed=100
	launcherAngVel=0
}
Launchables (what launchers fire) should not have IDs or a group value.
Because launchers generate a fully customisable block, they can be very diverse.
The rest of this chapter will contain the most common launcher variants.
Mine Layer
Mines have the EXPLODE feature.
	replicateBlock={
        features=EXPLODE
		shape=HEPTAGON
		lifetime=20

        explodeDamage=100
        explodeRadius=100
	}
Torpedo Launcher
Torpedoes have the EXPLODE and THRUSTER features.
	replicateBlock={
        features=EXPLODE|THRUSTER
		shape=MISSILE
		lifetime=8

        explodeDamage=100
        explodeRadius=100

        thrusterForce=3000
        thrusterColor=0xFFFFFFFF
        thrusterColor1=0xFFFFFFFF
	}
Missile Launcher
Missiles have the COMMAND, EXPLODE, THRUSTER, and TORQUER features.
	replicateBlock={
        features=COMMAND|EXPLODE|THRUSTER|TORQUER
		shape=MISSILE
		lifetime=8

        explodeDamage=100
        explodeRadius=100

        thrusterForce=3000
        thrusterColor=0xFFFFFFFF
        thrusterColor1=0xFFFFFFFF

        torquerTorque=10000
	}
Drone Launcher
Drones have the COMMAND, NOCLIP_ALLY, FREERES, THRUSTER, TORQUER, GENERATOR, either CANNON or LASER, and usually TURRET features.
Cannon Drone
	replicateBlock={
        features=COMMAND|NOCLIP_ALLY|FREERES|THRUSTER|TORQUER|GENERATOR|CANNON|TURRET
		shape=DISH_MISSILE
        scale=3
		lifetime=30

        thrusterForce=3000
        thrusterColor=0xFFFFFFFF
        thrusterColor1=0xFFFFFFFF

        torquerTorque=10000

        turretSpeed=4

        cannon={
            damage=20
            roundsPerSec=5
            muzzleVel=500
            range=500
            power=1
            spread=0.1
            color=0xFFFFFFFF
        }

        powerCapacity=100
        generatorCapacityPerSec=100
	}
Laser Drone
	replicateBlock={
        features=COMMAND|NOCLIP_ALLY|FREERES|THRUSTER|TORQUER|GENERATOR|LASER|TURRET
		shape=DISH_MISSILE
        scale=3
		lifetime=30

        thrusterForce=3000
        thrusterColor=0xFFFFFFFF
        thrusterColor1=0xFFFFFFFF

        torquerTorque=10000

        turretSpeed=4

        laser={
            damage=20
            range=500
            power=2
            width=2
            color=0xFFFFFFFF
            decay=0.05
        }

        powerCapacity=100
        generatorCapacityPerSec=100
	}
Launcher Drone Launcher
It is very possible to create drones that fire launchables. Below is an example for a drone that fires drones; a mothership drone?
{ 17000
	group=98
	features=PALETTE|LAUNCHER
	shape=RECT_LAUNCHER1
	replicateBlock={
        features=COMMAND|NOCLIP_ALLY|FREERES|THRUSTER|TORQUER|GENERATOR|LAUNCHER
		shape=MISSILE_LAUNCHER
        scale=3
		lifetime=20
		density=1

        thrusterForce=3000
        thrusterColor=0xFFFF0000
        thrusterColor1=0x00000001

        torquerTorque=10000

		replicateBlock={
			features=COMMAND|NOCLIP_ALLY|FREERES|THRUSTER|TORQUER|GENERATOR|LASER|TURRET
			shape=MISSILE_SHORT
			scale=1
			lifetime=20
			density=1

			thrusterForce=3000
			thrusterColor=0xFF0000FF
			thrusterColor1=0x00000001

			torquerTorque=10000

			turretSpeed=4

			laser={
				damage=20
				range=500
				width=0.5
				power=1
				decay=0.1
				color=0xFFFFFFFF
			}

			powerCapacity=100
			generatorCapacityPerSec=100
		}
		replicateTime=1
		launcherPower=1
		launcherOutSpeed=100
		launcherAngVel=0

        powerCapacity=100
        generatorCapacityPerSec=100
	}
	replicateTime=1
	launcherPower=100
	launcherOutSpeed=100
	launcherAngVel=0
}
Blueprint Drones
Blueprint drones are special drones that can grow blocks according to a specified ship blueprint.
Key/recommended factors:
- Drone command block (must have its own ID). Requires
COMMAND,REGROWERorASSEMBLER(depending on if you want it to rebuild using debris), andFREERES; also needslifetime. - Bespoke blocks (hull, thrusters, weapons) for the blueprint drone that have
FREERES,lifetime, andNOPALETTE. See below to see how to make these using block extensions. - (Optionally give the blocks
NOCLIP_ALLYjust as with standard launchables.) - The blueprint drone's ship file in
ships/. - In the drone command's
command={}field, a declaration ofblueprint="<your blueprint drone name here>". - In the launcher block, set
replicateBlock=<ID of your drone command block here>.
Alternative factors:
- Bespoke blocks are not strictly necessary, standard faction blocks used on normal ships can also be used on blueprint drones, especially if standalone blocks with specific features for blueprint drones are not required.
lifetimeis not required if a blueprint drone with an indefinite lifetime is desired, which would make the launcher a pseudo-factory block.EXPLODEand its required fields can be used on a drone command block to make it explode instantly after its lifetime ends.FREERESis not strictly required.
Build the blueprint drone in the same way as you would with any other ship with any bespoke blocks if you made them. Comment out (add -- at the start of the line of) lifetime so that the blueprint drone does not despawn while building. Add it back after finishing. Use ssave (ss) and make sure that the blueprint is in ships/.
Below is an example of a blueprint drone and its dedicated blocks for faction 98:
Reassembly/
└── mods/
    └── Faction 98/
        ├── ships/
        │   └── 98_My_Blueprint_Drone.lua
        └── blocks.lua
-- blocks.lua

-- Dedicated Blueprint Drone Parts:
{ 17000
	features=NOPALETTE|FREERES
	group=98
	growRate=50
	lifetime=20
}
{ 17001
	features=NOPALETTE|FREERES|GENERATOR
	group=98
	shape=OCTAGON
	generatorCapacityPerSec=20
	powerCapacity=10
	capacity=0
	growRate=50
	lifetime=20
}
{ 17002
	features=NOPALETTE|FREERES|THRUSTER
	group=98
	shape=THRUSTER_RECT
	thrusterForce=1000
	thrusterColor=0x7FFF0000
	thrusterColor1=0x7FFFAA00
	growRate=50
	lifetime=20
}
{ 17003
	features=NOPALETTE|FREERES|LASER|TURRET
	group=98
	shape=OCTAGON
	turretSpeed=12
	laser={
		damage=50
		range=1000
		power=2
		color=0xFFFF5500
		width=2
		decay=0.1
	}
	growRate=50
	lifetime=20
}

-- Blueprint Drone Command:
{ 17004
	features=NOPALETTE|FREERES|COMMAND|REGROWER
	--features=NOPALETTE|ASSEMBLER|COMMAND|REGROWER
	group=98
	shape=COMMAND
	command={ blueprint="98_My_Blueprint_Drone" }
	lifetime=20
}

-- Launcher:
{ 17005
	features=PALETTE|LAUNCHER
	group=98
	shape=RECT_LAUNCHER1

	replicateBlock=17004

    replicateTime=1
    launcherPower=100
    launcherOutSpeed=100
}
Bespoke Blocks for Blueprint Drones
If you want a blueprint drone to use the same blocks that your faction normally uses but with different features, then you should use block extensions.
An example of this for a hull block and a laser is below:
-- Normal Faction Blocks:

{ 17000
	features=PALETTE
	group=98
}
{ 17001
	features=PALETTE|LASER|TURRET
	group=98
	shape=OCTAGON
	turretSpeed=12
	laser={
		damage=50
		range=1000
		power=2
		color=0xFFFF5500
		width=2
		decay=0.1
	}
}

-- Dedicated Blueprint Drone Blocks:

{ 17100 extends=17000 features=FREERES|NOPALETTE              growRate=50 lifetime=20 }
{ 17101 extends=17001 features=FREERES|NOPALETTE|LASER|TURRET growRate=50 lifetime=20 }
Launcher Chaining
Turreted Weapons
Cannons, lasers, and launchers can all be turreted.
{ 17000
    features=CANNON|TURRET
    cannon={
        -- Cannon fields here.
    }
    turretSpeed=6
    turretLimit=pi
}
{ 17001
    features=LASER|TURRET
    laser={
        -- Laser fields here.
    }
    turretSpeed=6
    turretLimit=pi
}
{ 17002
    features=LAUNCHER|TURRET
    replicateBlock={
        launcherSpeed=100
        -- Other replicated block fields here.
    }
    -- launcherOutSpeed is not used for turreted launchers.
    turretSpeed=6
    turretLimit=pi
}
Note that turreted launchers use launcherSpeed defined on the replicated block to control the speed that the launchable is fired at.
Barrel Appearance
Turreted cannons and lasers both display barrels which have fields that control how the look and where their bullets are fired from.
{ 17000
    features=CANNON|TURRET  -- Same fields for `LASER|TURRET`
    barrelSize={5,2.5}      -- Length and width dimensions of the barrel.
                            -- (Height value is doubled.)
    barrelOffset={10,0}     -- Offset of (first if there are multiple) barrel.
    barrelSpacing={0,10}    -- Spacing between each barrel if there are multiple.
    barrelCount=2
    barrelTaper=0.75        -- Multiplier on barrel width at the end of the barrel.
                            -- Lasers have it default to 0.
}
Invisible Barrels
If you want a barrel to be near-invisible then use two near-zero values for its barrelSize;
{ 17000
    features=CANNON|TURRET
    barrelSize={0.001,0.001}
}
If you want the remove the dot that is created by this method, then cover it up using a shroud seemlessly-colored shroud on a higher Z level.
X-Spaced Barrel Beams
Also called just 'barrel beams' or alternatively 'hellbores'.
X-spaced barrel beams fire an evenly spaced "beam" of burst bullets across multiple X-spaced invisible barrels. They can penetrate enemy ships.
Key fields:
barrelCount=roundsPerBurst.- Near 1
burstyness. - High
roundsPerSeccompared to normal cannons to counteract highroundsPerBurst. - (Low
muzzleVelandrangeif you want it to be a stationary beam.) - (Low
recoilif you do not want to be flung around because of highroundsPerBurst.)
{ 17000
	features=CANNON|TURRET
	barrelSize={0.000001,0.000001}
	barrelCount=32
	barrelSpacing={20,0}
	barrelOffset={32*20*0.5,0}
    cannon={
        damage=100
        roundsPerSec=32*2
		roundsPerBurst=32
		burstyness=1
        muzzleVel=2
        range=1
        color=0xFFFFFFFF
        recoil=0
    }
}
When a ship has no commands, it is difficult for the beam to penetrate it as the bullets are required to hit the side of a ship, unlike when attacking ships that have a command.
The XSBB has the advantage of both being a consistent weapon to use and acting the same across different UPS settings, as there are no high speed fragments that can travel different distances across different UPS settings.
However, the XSBB has the disadvantage of spawning bullets inside of enemy ships, which may not be desirable from a balancing standpoint. Moreover, it is subject to the XSBB desync glitch, in which bullets randomly do not spawn when fired.
Y-Spaced Barrel Barrage
This effect is a different method of creating a barrage frag. See here.
Cosmetic Launchable Laser Printer
A launchable-generating cosmetic laser printer effect can be created with a barrel-spaced laser block with a high barrel count to mimic a moving laser.
The laser printer blocks use a visible laser and an high fire rate invisible cannon to cycle through the barrels.
The direction of the laser is decided by the sign of barrelSpacing's Y change, allowing for a mirrored version of the laser printer.
Both the laser printer's cycle time (1 second, because barrelCount / roundsPerSec = 1) and the launcher's replicateTime are the same, allowing for the two blocks to synchronize their functionality if activated at the right time.
{ 17000 features=LASER|CANNON|ALWAYSFIRE|TURRET
    name="Laser Printer Left -> Right"
	shape=271390000
	scale=4
	barrelCount=30
	barrelSize={0.0001,0.0001}
	barrelSpacing={0,-1}
	turretLimit=0
	sound=NONE
    laser={
        damage=0.0001
        range=40
        width=0.5
        color=0xFFFFFFFF
    }
	cannon={
		muzzleVel=0
		range=0
        color=0x01000000
        damage=0.0001
		roundsPerSec=30
		recoil=0
		explosive=FINAL
	}
}
{ 17001 extends=17000 name="Laser Printer Right -> Left" shape=271390001 barrelSpacing={0,1}}
{ 17002 features=LAUNCHER|TURRET|NOICON
    name="Launcher"
	scale=4
	turretLimit=0
	replicateBlock={
		features=NOCLIP_ALLY
		shape=MISSILE_SHORT
		scale=3
		lifetime=2
	}
	replicateTime=1
}
This shape is a direct copy of the base game's RECT_LONG with a mirrored counterpart for both directions of the laser printer.
{271390000, {{verts={{5, -5}, {-5, -5}, {-5, 5}, {5, 5}}, ports={{3, 0.5}, {0, 0.5},
           {1, 0.5}, {2, 0.5}}},
      {verts={{5, -10}, {-5, -10}, {-5, 10}, {5, 10}}, ports={{3, 0.25}, {3, 0.75}, {0, 0.5}, {1, 0.25},
           {1, 0.75}, {2, 0.5}}},
      {verts={{5, -15}, {-5, -15}, {-5, 15}, {5, 15}}, ports={{3, 0.167}, {3, 0.5}, {3, 0.833}, {0, 0.5},
           {1, 0.167}, {1, 0.5}, {1, 0.833}, {2, 0.5}}},
      {verts={{5, -20}, {-5, -20}, {-5, 20}, {5, 20}}, ports={{3, 0.125}, {3, 0.375}, {3, 0.625}, {3,
            0.875}, {0, 0.5}, {1, 0.125}, {1, 0.375}, {1, 0.625}, {1, 0.875}, {2, 0.5}}},
      {verts={{5, -25}, {-5, -25}, {-5, 25}, {5, 25}}, ports={{3, 0.1}, {3, 0.5}, {3, 0.9}, {0, 0.5},
          {1, 0.1}, {1, 0.5}, {1, 0.9}, {2, 0.5}}},
      {verts={{5, -30}, {-5, -30}, {-5, 30}, {5, 30}}, ports={{3, 0.083}, {3, 0.25}, {3, 0.417}, {3, 0.583},
           {3, 0.75}, {3, 0.917}, {0, 0.5}, {1, 0.083}, {1, 0.25}, {1, 0.417}, {1, 0.583}, {1, 0.75},
          {1, 0.917}, {2, 0.5}}},
      {verts={{5, -35}, {-5, -35}, {-5, 35}, {5, 35}}, ports={{3, 0.071}, {3, 0.357}, {3, 0.643}, {3,
            0.929}, {0, 0.5}, {1, 0.071}, {1, 0.357}, {1, 0.643}, {1, 0.929}, {2, 0.5}}},
      {verts={{5, -40}, {-5, -40}, {-5, 40}, {5, 40}}, ports={{3, 0.062}, {3, 0.188}, {3, 0.312}, {3,
            0.438}, {3, 0.562}, {3, 0.688}, {3, 0.812}, {3, 0.938}, {0, 0.5}, {1, 0.062}, {1, 0.188},
          {1, 0.312}, {1, 0.438}, {1, 0.562}, {1, 0.688}, {1, 0.812}, {1, 0.938}, {2, 0.5}}},
      {verts={{5, -45}, {-5, -45}, {-5, 45}, {5, 45}}, ports={{3, 0.056}, {3, 0.278}, {3, 0.5}, {3, 0.722},
           {3, 0.944}, {0, 0.5}, {1, 0.056}, {1, 0.278}, {1, 0.5}, {1, 0.722}, {1, 0.944}, {2, 0.5}}},
      {verts={{5, -50}, {-5, -50}, {-5, 50}, {5, 50}}, ports={{3, 0.05}, {3, 0.15}, {3, 0.25}, {3, 0.35},
           {3, 0.45}, {3, 0.55}, {3, 0.65}, {3, 0.75}, {3, 0.85}, {3, 0.95}, {0, 0.5}, {1, 0.05}, {1,
            0.15}, {1, 0.25}, {1, 0.35}, {1, 0.45}, {1, 0.55}, {1, 0.65}, {1, 0.75}, {1, 0.85}, {1, 0.95},
           {2, 0.5}}}}},
{271390001 {} mirror_of=271390000}
The laser printer is placed next to the turreted launcher it seem like they are one mechanism.
Point Defense Weapons
Point defense weapons have the AUTOFIRE field. They are set to the point defense binding by default and are used to automatically destroy down enemy launchables and enemy ships if there are no other targets.
Point defense cannons and lasers are usually turreted and have a high turretSpeed, upwards of 20 radians (1146°) per second in vanilla Reassembly.
Point defense missiles and drones only need AUTOFIRE on the launcher, not the launchable. (The launchable is automatically given the POINT_DEFENSE by the game.)
{ 17000 name="Point Defense Cannon"
    features=CANNON|TURRET|AUTOFIRE
    turretSpeed=12
	cannon={
		damage=10
		roundsPerSec=10
		range=500
		muzzleVel=1500
        color=0xFFFFFFFF
	}
}
{ 17001 name="Point Defense Laser"
    features=LASER|TURRET|AUTOFIRE
	turretSpeed=20
	laser={
		damage=20
		range=500
		color=0xFFFFFFFF
		width=2
		decay=0.1
	}
}
{ 17002 name="Point Defense Missile Launcher"
	features=LAUNCHER|AUTOFIRE
	group=98
	shape=RECT_LAUNCHER1
	replicateBlock={
        features=COMMAND|EXPLODE|THRUSTER|TORQUER
        shape=MISSILE
        lifetime=16

        explodeDamage=25
        explodeRadius=5

        thrusterForce=3000
        thrusterColor=0xFFFFFFFF
        thrusterColor1=0xFFFFFFFF

        torquerTorque=10000

	}
}
{ 17003 name="Point Defense Drone Launcher"
	features=LAUNCHER|AUTOFIRE
	group=98
	shape=RECT_LAUNCHER1
    replicateBlock={
        features=COMMAND|NOCLIP_ALLY|FREERES|THRUSTER|TORQUER|GENERATOR|CANNON|TURRET
        shape=DISH_MISSILE
        scale=3
        lifetime=30

        thrusterForce=3000
        thrusterColor=0xFFFFFFFF
        thrusterColor1=0xFFFFFFFF

        torquerTorque=10000

        turretSpeed=4

        cannon={
            damage=20
            roundsPerSec=5
            muzzleVel=1500
            range=500
            power=1
            color=0xFFFFFFFF
        }

        powerCapacity=100
        generatorCapacityPerSec=100
    }
}
Charging Cannons and Lasers
Cannons and lasers with the CHARGING feature must have their key binding held down and released to fire. It has two fields: chargeMaxTime and chargeMind.
chargeMaxTimeis the time in seconds needed for the weapon to achieve maximum charge, letting it deal its defined damage.chargeMinis the fraction (between 0.0 and 1.0) of charge at which the weapon may fire, but with less damage.
{ 17000
    features=CANNON|CHARGING

    chargeMaxTime=2
    chargeMin=0.5
    -- Charge time:        2 seconds.
    -- Min Discharge time: 1 second.

    cannon={
        damage=25
        range=100
        muzzleVel=100
        roundsPerSec=1
        color=0xFFFFFFFF
    }
}
{ 17001
    features=LASER|CHARGING

    chargeMaxTime=2
    chargeMin=0.5
    -- Charge time:        2 seconds.
    -- Min Discharge time: 1 second.

    LASER={
        damage=25
        range=100
        width=2
        decay=1
        color=0xFFFFFFFF
    }
}
When a charging weapon is fired, it creates a unique effect (its size depends on how charged the weapon was):
Always and Never Firing Weapons
Always Fire Weapons
Cannons, lasers, and launchers can be given the ALWAYSFIRE feature to continuously fire with enough energy. Weapons with ALWAYSFIRE are unselectable in the bindings menu and are ignored by the AI.
{ 17000
    features=CANNON|ALWAYSFIRE
}
{ 17001
    features=LASER|ALWAYSFIRE
}
{ 17002
    features=LAUNCHER|ALWAYSFIRE
}
Never Fire Weapons
The inverse of ALWAYSFIRE is NEVERFIRE.
launcherPower=inf is necessary for non-turreted launchers, as otherwise, AI-controlled ships can fire the launchable.
{ 17000
    features=CANNON|NEVERFIRE
}
{ 17001
    features=LASER|NEVERFIRE
}
{ 17002
    features=LAUNCHER|NEVERFIRE
    launcherPower=inf
}
{ 17003
    features=LAUNCHER|TURRET|NEVERFIRE
}
ALWAYSFIRE takes priority over NEVERFIRE.
Always Fire Weapons as Decorations
As weapons are so flashy, they can be used purely as cosmetics using the always fire features.
This chapter will contain a few common always fire weapon decorations.
When using always fire cannons cosmetically, it is important to check how UPS will affect the visuals as having too low a roundsPerSec on a high UPS will cause the cannon to flicker. It is thus recommeneded to have roundsPerSec=120 by default unless lag due to the sheer amount of bullets becomes an issue.
Frag Spike
{ 17000
	features=CANNON|ALWAYSFIRE
	sound=None                  -- Having a sound is annoying.
    cannon={
        -- Cosmetic fields:
		projectileSize=2        -- Override projectile size calculation based on damage.
        muzzleVel=10000         -- Affects length of the bullet.
        color=0xFFFFFFFF

        -- Functional fields:
        damage=0.0001           -- Prevents it from dealing damage.
        roundsPerSec=120        -- Minimal flicker on 60 UPS and above.
        range=0                 -- So that the bullet does not travel.
        power=0.0001            -- Cosmetics should not use power.
		recoil=0                -- Cosmetics should not have recoil.
		explosive=FINAL         -- Removes bullet end particle.
    }
}
Laser Spike
{ 17000
	features=LASER|ALWAYSFIRE
	sound=None                  -- Having a sound is annoying.
    laser={
        -- Cosmetic fields:
        range=50
        width=3
        color=0xFFFFFFFF

        -- Functional fields:
        damage=0                -- Prevents it from dealing damage.
        power=0.0001            -- Cosmetics should not use power.
    }
}
You could also use a negative width, such as width=-3 in the below example:
Laser Light
{ 17000
	features=LASER|ALWAYSFIRE|TURRET
	sound=None
	barrelSize={0.001,0.001}    -- Centers the laser.
    laser={
        -- Cosmetic fields:
        width=3                 -- Affects the size of the light.
        color=0xFFFFFFFF

        -- Functional fields:
        damage=0
        range=0
        power=0.0001
    }
}
You can also make them flash:
    laser={
		burstyness=0.5
		pulsesPerBurst=1
		pulsesPerSec=1
        -- Other laser features here.
    }
Frag Tentacle
{ 17000
    features=ALWAYSFIRE|CANNON
	sound=None
	cannon={
        -- Cosmetic fields:
		projectileSize=1        -- Override bullet size calculation based on damage.
		muzzleVel=100           -- "Speed" of tentacle wave.
		range=50                -- Length of tentacle.
        color=0xAAFFFFFF
		spread=pi*0.25          -- Width of tentacle.
		burstyness=0.0203       -- Try to making this value as small as possible to
                                -- make the wave pattern cycle seemless.
		roundsPerBurst=60       -- Amount of bullets in a wave cycle.
		roundsPerSec=30         -- Fidelity of tentacle.

        -- Functional fields:
		pattern=WAVE
        damage=0.0001           -- Prevents it from dealing damage.
        power=0.0001            -- Cosmetics should not use power.
		recoil=0                -- Cosmetics should not have recoil.
		explosive=FINAL         -- Removes bullet end particle.
	}
}
Lens Flare
A lens flare effect that does change direction when the ship it is on rotates.
1st stage: invisible anti-FSP stage with spread just above 180° to be centered and muzzleVel=0 to make the frag always face in the same direction.
2nd stage: invisible 90° rotation stage by using pattern=CONSTANT.
3rd stage: visible lens flare using 2 frags that always face in the same direction using pattern=SPIRAL.
{ 17000
	features=CANNON|ALWAYSFIRE
	sound=None
	cannon={
	-- 1st stage:
		muzzleVel=0
		range=0
        color=0x01000000
		spread=pi*0.5*1.0001
		pattern=ABSOLUTE
        damage=0.0001
		roundsPerSec=120
		recoil=0
		explosive=FINAL
		fragment={
	-- 2nd stage:
			muzzleVel=1
			range=0
			color=0x01000000
			pattern=CONSTANT
			damage=0.0001
			explosive=FINAL|FRAG_NOFLASH
			spread=pi*1/2
			fragment={
	-- 3rd stage:
				projectileSize=2
				muzzleVel=3000
				range=0
				color=0xFFFFFFFF
				pattern=SPIRAL
				damage=0.0001
				explosive=FINAL|FRAG_NOFLASH
				spread=pi*1/2
				roundsPerBurst=2
			}
		}
	}
}
X Shape Lens Flare
You can also make lens flares with an 'X' shape.
This X-shaped lens flare does not contain the 90° rotating 2nd stage of the standard lens flare frag as the X shape does not require it.
The visible (2nd) stage's roundsPerBurst is changed from 2 to 4 and its spread is changed from pi*1/2 (180°) to pi*3/4 (270°).
{ 17000
	features=CANNON|ALWAYSFIRE
	sound=None
	cannon={
	-- 1st stage:
		muzzleVel=0
		range=0
        color=0x01000000
		spread=pi*0.5*1.0001
		pattern=ABSOLUTE
        damage=0.0001
		roundsPerSec=120
		recoil=0
		explosive=FINAL
		fragment={
	-- 2nd stage:
			projectileSize=2
			muzzleVel=3000
			range=0
			color=0xFFFFFFFF
			pattern=SPIRAL
			damage=0.0001
			explosive=FINAL|FRAG_NOFLASH
			spread=pi*3/4
			roundsPerBurst=4
		}
	}
}
Frag Rings
Here is an example of a basic frag ring you could make for a generator:
1st stage: invisible anti-FSP stage with spread just above 180° is used to center the frag.
2nd stage: invisible stage of a 20-round burst in a uniform spiral which are sent outwards.
3rd stage: this is the stage visible to the player. pattern=ABSOLUTE is used to reset the bullet velocities, and projectileSize, muzzleVel, and color affect how the frag looks.
{ 17000
	features=CANNON|ALWAYSFIRE|GENERATOR
	sound=None
	shape=OCTAGON
	scale=3
    cannon={
	-- 1st stage:
        damage=0.0001
		projectileSize=0.001
        muzzleVel=1
        range=0
        power=0.01
		recoil=0
        roundsPerSec=120
		pattern=CONSTANT
		spread=pi*0.5*1.0000001
        color=0x01000001
		fragment={
	-- 2nd stage:
			damage=0.0001
			projectileSize=0.1
			muzzleVel=10*60
			range=10
			pattern=ABSOLUTE|SPIRAL
			roundsPerBurst=20
			spread=pi*340/360
			explosive=FINAL|FRAG_NOFLASH
			color=0x01000000
			fragment={
	-- 3rd stage:
				damage=0.0001
				projectileSize=0.1
				muzzleVel=-1
				range=0
				pattern=ABSOLUTE
				explosive=FINAL|FRAG_NOFLASH
				color=0xFFFFFFFF
			}
		}
    }
	-- Generator fields here.
}
Poof Particle Emitter
A simple fragless setup that emits 120 frag despawn poofs every second. A neat effect for a generator.
{ 17000
	features=CANNON|ALWAYSFIRE|GENERATOR
	sound=None
	shape=OCTAGON
	scale=3
	cannon={
		projectileSize=1
		muzzleVel=100
		range=0
        color=0xFFFFFFFF
		spread=pi
		pattern=ABSOLUTE
        damage=0.0001
		roundsPerSec=120
		recoil=0
	}
	-- Generator fields here.
}
Launchable Laser Printer
See the main page for the Launchable Laser Printer.
One-Use Weapons
Combining Weapon Types
Other Features and Fields
Here are some other features and fields that are certainly useful, but undeserving of having their own sections.
Health and Mass
Directly define exact values for health and mass.
Unnecessary for most cases when durability and density exist.
{ 17000
    health=50
    mass=50
}
No Regen
Blocks with NOREGEN do not regenerate after taking damage or being destroyed.
{ 17000
    features=NOREGEN
}
Commands that do not give resources on death
FREERES is strongly recommended for launchables with commands.
{ 17000
    features=COMMAND|FREERES
}
Features and Fields Not To Use
There are various features and fields that shouldn't be used because they are either used by the game internally, are unnecessary for their purpose, or are disliked by the community.
Ignore these guidelines if the cons do not affect you.
Armor
The value of armor is subtracted from all the damage output of all non-explosive cannon bullets.
{ 17000
    armor=10
}
The armor value on shields causes bullets to 'slide' around shield's radius if the subtracted damage from the bullet causes its damage to be below the armor value.
{ 17000
    features=SHIELD
    shield={
        armor=100.
        -- Other shield features here.
    }
}
Perishable
Used to allow the lifetime field to be used but is now unnecessary.
{ 17000
    features=PERISHABLE
    lifetime=5
}
Persistent
Used internally for keeping map objectives, stations, and agents functional.
{ 17000
    features=PERSISTENT
}
Deactivating Commands
Used during early development by Terran stations making them unable to be truly destroyed, only deactivated.
{ 17000
    features=COMMAND|DEACTIVATES
}
Launch
Used internally for launchables like missiles and seeds grown from launchers. Do not use.
{ 17000
    features=LAUNCH
}
{ 17001
    features=LAUNCHER
    replicateBlock={
        features=LAUNCH
    }
}
Auto-Launch
Identical to ALWAYSFIRE, but only works for not-turreted launchers and is used put on the launchable in the same way as LAUNCH.
It is unique in that it overrides NEVERFIRE and is selectable in the bindings menu, but as neither of these traits are useful, ALWAYSFIRE should be used instead.
{ 17000
    features=LAUNCHER
    replicateBlock={
        features=AUTOLAUNCH
    }
}
{ 17001
    features=LAUNCHER|NEVERFIRE
    replicateBlock={
        features=AUTOLAUNCH
    }
}
Growing and Ungrowing
Used internally for blocks that are either growing or ungrowing.
{ 17000
    features=GROW
}
{ 17001
    features=UNGROW
}
Unique
Block cannot be scaled, deleted, or copied in the editor. Used internally for the ship the player is editing in the constructor and ships exported from the constructor.
{ 17000
    features=UNIQUE
}
Transient Blocks
Used internally for blocks that are in the process of being scavenged by non-player ships with the TRACTOR_TRANSIENT AI flag from debris.
{ 17000
    features=TRANSIENT
}
Vanilla Shapes
This is a list of every vanilla shape (shape in the base game that every mod can use) with images sourced from the RWDK.
{ 17000
    shape=SQUARE
}
{ 17001
    shape=DISH_THRUSTER
}
{ 17002
    shape=RIGHT_TRI2L
}
{ 17003
    shape=RIGHT_TRI2R
}
Alphabetical
See just this image [here]<./diagrams/vanilla_shapes.png>.

Grid
SQUARE: normal square; 1x1, 2x2, 3x3...SQUARE_1COMMANDSQUARE_HALFRECT: normal rectangle.RECT_LONG: 1x1, 1x2, 1x3... (Tinkrell)RECT_LONG_NARROWRECT_QUARTERRIGHT_TRI: 1x1 triangle.RIGHT_TRI2L: 1x2 triangle (left).RIGHT_TRI2R: 1x2 triangle (right).ADAPTEROCTAGONRIGHT_TRI_22_5L: Bee long triangle (left).RIGHT_TRI_22_5R: Bee long triangle (right).
Hex
HEXAGONTRI
Penrose
The rhombuses of the Penrose shape palette can be described by the ratio of their two different angles.
RHOMBUS_36_144: 1:4rhom.RHOMBUS_72_108: 2:3rhom.PENTAGONISOTRI_36ISOTRI_72
Isosceles Triangles
ISOTRI_3ISOTRI_6ISOTRI_13ISOTRI_25ISOTRI_36ISOTRI_72ISOTRI_80
Regular Polygons
TRISQUAREPENTAGONHEXAGONHEPTAGONOCTAGONOCTAGON_1NONAGON
Thrusters
DISH_THRUSTERTHRUSTERTHRUSTER_PENTTHRUSTER_RECT
Spinal Weapons
CANNONCANNON2RECT_CANNON
Cannon Boosters
DISH_WEAPONISOTRI_25_WEAPONRECT_CANNON_BOOST
Launchers
RECT_LAUNCHER: two launcher ports between left and right sides.RECT_LAUNCHER1: launcher port on front side.SQUARE_LAUNCHERGEM_2_LAUNCHERGEM_3_LAUNCHERGEM_4_LAUNCHERHEPTAGON_LAUNCHER
Launchables
MISSILEMISSILE_SHORTDISH_MISSILESQUARE_MISSILECOMMAND_MISSILEISOTRI_13_MISSILEISOTRI_25_MISSILEMISSILE_LAUNCHER: missile port on back side, two launcher ports between left and right sides.
Roots
RECT_ROOT
Plants
GEM_1GEM_2GEM_3GEM_4
Seeds
SEED_1SEED_2SEED_3SEED_4
Other
SENSOR
shapes.lua
shapes.lua is also well-named. It controls the shapes used by the blocks in blocks.lua by using a block's shape field.
Quickly, the one limitation
However, before you understand how to create custom shapes, you need to understand the limitations of shape modding. Luckily, there's only one main limitation.
Shapes in Reassembly cannot be concave, sort of. This is because Reassembly polygons are rendered by drawing triangles from the starting vertex. (More precisely, the triangles are constructed from the starting vertex and each of its non-adjacent sides.)
This makes certain concave shapes possible with the correct first vertex. However, other concave shapes, that have no vertex with an unobstructed line of sight to each other vertex, are not possible.
The Syntax
{
{ <ID here>          -- First shape
    {                -- List of different scales
        {            -- Scale 1
            <vertex and port stuff here>
        }
        {            -- Scale 2
            <vertex and port stuff here>
        }
        {            -- Scale 3
            <vertex and port stuff here>
        }
    }
}
{ <Different ID here> -- Second block
    {                -- List of only one scale
        {            -- Scale 1
            <vertex and port stuff here>
        }
    }
}
{ <Another Different ID here> -- Third block
    <more of the same>
}
}
Just as with blocks.lua, Reassembly understands where one thing starts and ends using curly brackets in a shapes.lua.
Shape IDs are not relocated on the Steam Workshop, so to avoid shape ID conflicts have them somewhere in the range: 10000000 <= shape ID <= 4294967295. You should have the last three digits of your first shape ID be 000 so that you can easily add new shapes with incrementing IDs. For example, the first ID you could have could be 12345000, then 12345001, and so on.
Shape scales are defined with two lists:
-
verts: contains the vertices of a shape in clockwise order. Each vertex is one{X,Y}pair. -
ports: contains the ports (i.e.: the connecting points) of the sides. Each port is defined with{<side index>,<port position>, <port type (optional)>}:- Side index, starting from zero.
- Position along the side, between 0.0 and 1.0. (Clockwise, from one vertex to the next).
- Port type (optional).
Below is how a shapes.lua containing a square, a 1:2 right triangle, and a mirrored 1:2 right triangle would look:
{
{ 271390000 { -- Square
    {
        -- A normal 1x1 square is actually 10x10 units.
        verts={ {-5,-5} {-5,5} {5,5} {5,-5} }
        ports={ {0,1/2} {1,1/2} {2,1/2} {3,1/2} }
    }
} }
{ 271390001 { -- 1x2rightTriL
    {
        verts={ {-10,-5} {-10,5} {10,-5} }
        -- Only go up to three decimal places for vertices and port positions.
        -- 22.361 is the side length of the hypotenuse (irrational side).
        ports={ {0,1/2} {{1,6.181/22.361} 1,16.181/22.361} {2,1/4} {2,3/4} }
    }
} }
{ 271390002 {} mirror_of=271390001 } -- 1x2rightTriR
}
And here is a blocks.lua that would match the example above:
{
{ 17000
    name="Square"
    group=98
    shape=271390000
}
{ 17001 extends=17001 scale=2 }
{ 17002 extends=17001 shape=271390001 name="1x2rightTriL" }
{ 17003 extends=17001 shape=271390002 name="1x2rightTriR" }
}
Mirrored Shapes
If you have a shape with the ID 271390000 and you want to mirror it to a shape with the ID 271390001, then you would define 271390001 as follows:
{ 271390001 {} mirror_of=271390000 }
Shapes: Further Essentials
This chapter contains information that is necessary for quality shapes.
Shapes with Mirror Symmetry
Shapes with mirror symmetry should almost always have their line of symmetry along the X-axis.
If this is not the case, then the shape will not mirror correctly in the game and cause erroneous behaviour when building.
An alternative solution for shapes with mirror symmetry that do not have their line of symmetry along the X-axis is to make a mirrored varient of them, which is actually identical.
Blocks That Should be Scalable
Different "tiers" of blocks, such as generators, weapons, shields, and other components may use different shapes. For example, a gun may have its first tier be a scale 2 RECT, its second tier a scale 1 SQUARE, and its third tier a scale 2 RECT_LONG.
To improve the mod's quality of life, these blocks should be scalable. Since blocks cannot scale between different shapes, a custom shape must be made which combines whatever shapes are required.
-- shapes.lua
{ 271390000 {
    { -- Scale 1 RECT
        verts={ {-5,-2.5} {-5,2.5} {5,2.5} {5,-2.5} }
        ports={ {0,1/2} {1,1/2} {2,1/2} {3,1/2} }
    }
    { -- Scale 1 SQUARE
        verts={ {-5,-5} {-5,5} {5,5} {5,-5} }
        ports={ {0,1/2} {1,1/2} {2,1/2} {3,1/2} }
    }
    { -- Scale 2 RECT_LONG
        verts={ {-10,-5} {-10,5} {10,5} {10,-5} }
        ports={ {0,1/2} {1,1/4} {1,3/4} {2,1/2} {3,1/4} {3,3/4} }
    }
} }
-- blocks.lua
{ 17000 name="Tiered Gun" blurb="Tier 1"
    group=98
    features=PALETTE|CANNON|TURRET
    shape=271390000
    cannon={
        -- Cannon fields here.
    }
}
{ 17001 extends=17000 blurb="Tier 2" scale=2 cannon={
    -- Cannon fields here.
} }
{ 17002 extends=17000 blurb="Tier 3" scale=3 cannon={
    -- Cannon fields here.
} }
Adding "Mirrored" Shapes for Asymmetric Blocks
Some blocks that use shapes with mirror symmetry may be asymmetric due to shrouds, frags, or other features/fields.
To improve the mod's quality of life, the shape can be given a "mirrored" shape (that is mirrored in so far that Reassembly will let whatever block that uses the shape to be mirrored when building).
Below is an example of a shrouded block that can have its shroud mirrored:
-- shapes.lua
{ 271390000 {
    {
        verts={ {-5,-5} {-5,5} {5,5} {5,-5} }
        ports={ {0,1/2} {1,1/2} {2,1/2} {3,1/2} }
    }
} }
{ 271390001 {} mirror_of=271390000 }
-- blocks.lua
{ 17000
	group=98
	shape=271390000
	shroud={ { shape=RIGHT_TRI offset={2.5, 5,0} size={5, 5} } }
}
{ 17001
	extends=17000
	shape=271390001
	shroud={ { shape=RIGHT_TRI offset={2.5,-5,0} size={5,-5} } }
}
Calculating Port Positions
Calculating port positions for rationally lengthed sides (i.e.: whole number-lengthed sides) is fairly simple. The example below of different scales of squares can help you intuit it:

Using fractions makes calculating ports for rational sides easy and makes copying them for larger scales simpler. However, irrationally lengthed sides, so as those of hypotenuses, are more complicated.
Fraction = Numerator / Denominator.
Port position = position of port in Reassembly units / length of side in Reassembly units.
If you want to get the port position of any side, you must calculate the length of the side in Reassembly units:
\( \text{Side Length} = \sqrt{(x_2 - x_1)^2 + (y_2 - y_1)^2} \)
Here's how you would calculate the irrational hypotenuse of a 1x2 right triangle with the vertices defined below:
verts={ {-10,-5} {-10,5} {10,-5} }
You could also use this program to calculate it (you can edit and run it in this guide):
fn main() {
    let x1: f32 = -10.0;
    let y1: f32 = 5.0;
    let x2: f32 = 10.0;
    let y2: f32 = -5.0;

    let side_length = ((x1 - x2).powi(2) + (y1 - y2).powi(2)).sqrt();

    print!("{:.3}", side_length);
}
Next, find the positions of your ports in Reassembly units. Depending on the shape, you will need to calculate this differently. Here are some examples for shapes with odd and even numbers of ports on one side:
Odd (3 Ports)
(This shape should really only have two ports on this side, but I won't judge it because it's an example.)
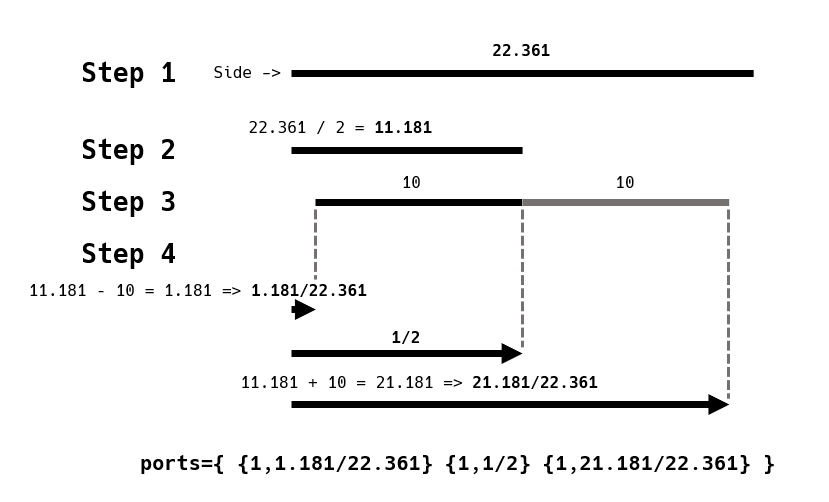
        verts={ {-10,-5} {-10,5} {10,-5} }
        ports={ {1,1.181/22.361} {1,1/2} {1,21.181/22.361} }
Even (2 Ports)
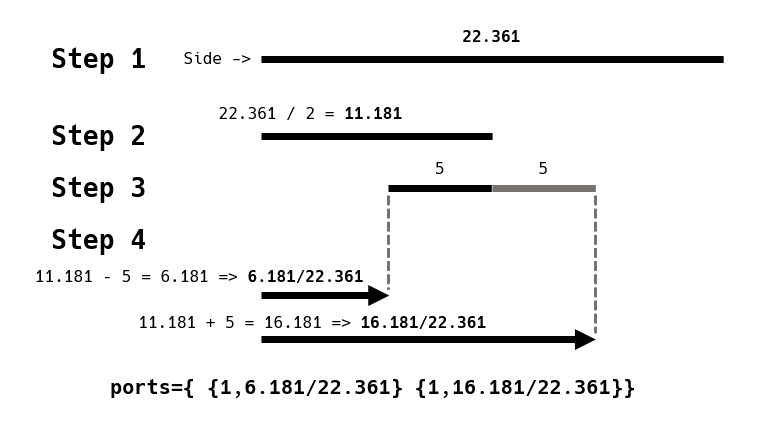
        verts={ {-10,-5} {-10,5} {10,-5} }
        ports={ {1,6.181/22.361} {1,16.181/22.361} }
A program to do it for you.
If you understand how to calculate port positions intuitively, then you can use a program to make it less tedious.
Edit the values side_index, x1, y1, x2, y2, port_spacing to get your specific values.
Optionally, change the corresponding true to false to edit port_count and port_flags.
fn main() {
    let side_index: usize = 0;

    let x1: f32 = -10.0;
    let y1: f32 = 5.0;
    let x2: f32 = 10.0;
    let y2: f32 = -5.0;

    let port_spacing: f32 = 10.0;

    let side_length = ((x1 - x2).powi(2) + (y1 - y2).powi(2)).sqrt();

    let port_count: usize = if true {
        (side_length / port_spacing).floor() as usize
    } else {
        3 // To set your own value here, replace `true` with `false`.
    };

    let port_flags: &str = if true {
        ""
    } else {
        ",LAUNCHER" // To set your own value here, replace `true` with `false`.
    };

    print!("ports={{ ");

    for port_index in 0..port_count {
        let port_distance = side_length * 0.5
            - port_spacing * (port_count - 1) as f32 * 0.5
            + port_spacing * port_index as f32;
        let port_position = format!("{}/{}", port_distance, side_length);
        print!("{{{},{}{}}} ", side_index, port_position, port_flags);
    }

    print!("}}");
}
Port Flags
For normal ports, do not have to define their port types as they are automatically set to DEFAULT.
-- An example of how port flags are used:
        ports={
            {0,1/2,WEAPON_IN|WEAPON_OUT}
            {1,0,NONE}
            {2,1/2,WEAPON_IN|WEAPON_OUT}
            {3,0,NONE}
        }
Here are the different port flags:
THRUSTER_OUT: where thrust will be generated from. Must be on a side facing left, the back of the shape. Colored yellow.THRUSTER_IN: where thrusters connect to other thrusters and to normal blocks. Colored blue.WEAPON_OUT: wherecannonsand lasers fire from. Connects toWEAPON_IN. Colored yellow.WEAPON_IN: connects toWEAPON_OUTto add cannon boost modifiers (does not work for lasers). Colored blue.LAUNCHER: port of aLAUNCHERblock that launchables will generate from. Colored yellow.MISSILE: port of a launchable (areplicateBlock) that will attach to one of its launcher'sLAUNCHERports. Colored blue.ROOT: port of aROOTorSEEDblock used by plants and buildings to attach toENVIRONMENTblocks. Colored yellow. See here for how to use this properly.NONE: no port on this side, ensures that it always draws a line. Define as{<side index>,0,NONE}.NORMAL: same as defining the port with no port type.
If a side has no defined ports then it will render no line.
Root Shapes
Root shapes are used for plants and structures that can spawn, attach, and or grow on asteroids.
They are defined the same as normal shapes, but they must have a single port with the ROOT port flag.
The ROOT port must be the first in the list of ports. (This does not mean it must be on the first side.)
It does not matter which direction the root port faces. (The root port of vanilla seeds faces left while the root port of RECT_ROOT faces right.)
{ 271390000 {
	{
        verts={ {-2.5,-5} {-2.5,5} {2.5,5} {2.5,-5} }
        -- Root port must be the first.
        ports={ {2,1/2,ROOT} {0,1/2} {1,0,NONE} {3,0,NONE} }
	}
} }
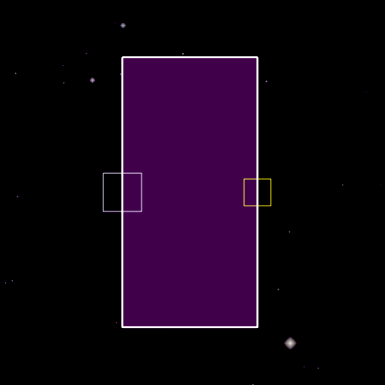
Multiple ROOT Ports
When a shape has multiple ROOT ports, only the one that is the first in ports is used.
Below is an example of a shape with two ROOT ports aligned to asteroid port spacing used on structures:
{ 271390000 {
	{
        verts={ {-2.5,-15} {-2.5,15} {2.5,15} {2.5,-15} }
        ports={ {0,1/6,ROOT} {0,5/6,ROOT} {1,0,NONE} {3,0,NONE} {2,1/2} }
	}
} }

Only the first root port is used for spawning on asteroids. The second root port is often off the edge of the asteroid.

The second port does not connect to the alligned port of an asteroid. This behaviour persists after reloading a save. This may have no meaningful effect.
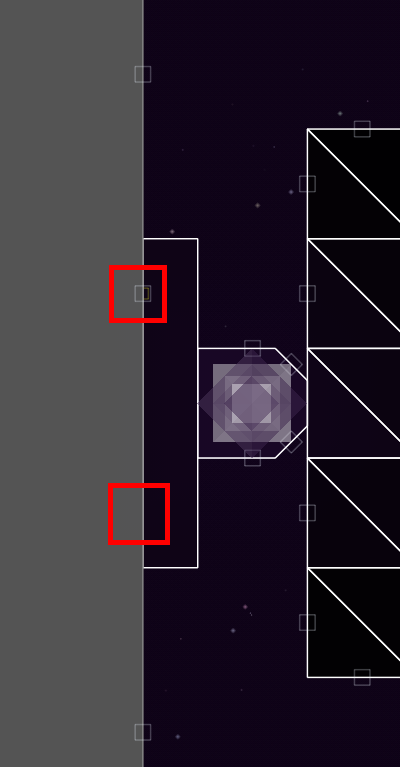
Cannon Boost Shapes
Cannon boost shapes use the WEAPON_IN and or WEAPON_OUT port flags.
Cannon boost shapes can also (todo)
Niche Port Flag Combinations
audio.lua
audio.lua handles sound effects in Reassembly. The main use of it in modding is to give weapons or other blocks custom sound effects to make them sound cooler.
Audacity is a great tool for editing audio and is recomended for creating sounds for Reassembly. It can be downloaded at https://www.audacityteam.org/download/
Custom audio should be stored in the <your mod here>/audio/ folder, which must be created manually. audio.lua locates samples using paths starting in the audio/ folder. You can add subfolders to organise your sounds, but it is not necessary for most mods since different names for different sounds is usually good enough.
Audio files must be in the .ogg format (https://fileinfo.com/extension/ogg). If a sound is emitted from something in Reassembly's world, such as from a cannon as opposed to a GUI button, then it must be a single audio track, or mono sound file: that means that there is only one audio channel in the file. If you have a stereo (two channel) sound, then go to here
Unlike the other .lua files, audio.lua requires a large block of code at the top of the file, remember to copy and paste it:
-- Press Control-r in game to reload this file (when kEnableDevBindings = true)
-- all paths are relative to "data/audio/"


-- default event settings
{
   -- samples  = { { file1, file2 }, { file3, file4} }
   -- pick between file1 and file2, and between file3 and file4
   -- play both selected samples when event is triggered

   volume         = 1,          -- volume to play samples at (0 is silent)
   pitch          = 1,          -- pitch samples up and down
   pitchRandomize = 0.0,        -- increase or decrease pitch randomly by up to this amount

   rolloff        = 0.8,        -- 3d: how fast the sound attenuates
   minDist        = 100,        -- 3d: point it starts attenuating
   maxDist        = 9999999999, -- 3d: stops attenuating

   priority       = 0,          -- lower priorities will skip playback if there are too many sounds

   flags          = 0           -- special flags to control playback, connected with "|"
   --  stream:      load files while playing (set this for music tracks). No Polyphony
   --  music:       only play one music track at a time (with crossfading)
   --  loop:        loop event when finished playing
   --  round_robin: cycle through samples instead of picking randomly
   --  crosssync:   keep music offset when changing tracks
   --  cluster:     group event together with spacially nearby events and only play once
   --  cull_vol:    don't play event if volume <kSoundVolumeCull
   --  cull3d_vol:  don't start playing if calculated 3d vol is < kSound3DVolumeCull
}

-- settings for each event
-- event names ('e.g' ButtonPress) are hard coded in the game binary.
Assume that the code block above is included in other examples of audio.lua.
Below is the syntax of the part of the audio.lua that you would actually code:
{
MyNewSoundEffect={
    samples={
        "MyNewSoundEffect_000.ogg"
        "MyNewSoundEffect_001.ogg"
        "MyNewSoundEffect_002.ogg"
    }
    flags=cluster|cull_vol|cull3d_vol
    priority=-2
    pitch=1.0
    minDist=120
    volume=0.75
    pitchRandomize=0.05
}
AnotherSoundEffect={
    samples={ "AnotherSoundEffect_000.ogg" }
    flags=cluster|cull_vol|cull3d_vol
    volume=0.5
    pitchRandomize=0.05
}
LaserSoundEffect={
    samples={ "LaserSoundEffect_000.ogg" }
    flags=cull_vol|cull3d_vol
    volume=0.3
}
}
In the blocks.lua, the sound field is used to define what sound a block plays when activated. The sound's name must be inside quote marks.
{ 17000
    features=CANNON
    sound="MyNewSoundEffect"
    cannon={
        -- Cannon fields here.
    }
}
Mixing a Stereo File Down to Mono
factions.lua
factions.lua controls general faction identity.
{
	98={                            -- Faction ID should be same as group.
                                    -- (Technically does not have to be,
                                    -- but it is strongly recommended.)
		name="My Faction"

		playable=2                  -- 0: Unplayable.
                                    -- 1: Unlockable by killing a >1000P ship.
                                    -- 2: Always playable.

		start="98_Starter_Ship"     -- Requires this format to work.

		primaries=3                 -- Amount of primary colors.
		color0=0x5555AA
		color1=0x3333AA
		color2=0xFFFFFF

        -- Explosion color does not have to be defined.
        -- If defined, either color is randomly picked for each explosion.
		explosionColor0=0xFF0000
        explosionColor1=0xFFAA00

		thrustSFX=0                 -- 0: Normal thrust SFX.
                                    -- 1: 'Magic' thrust SFX.

		aiflags=BAD_AIM|CAUTIOUS    -- How ships of this faction will act.
                                    -- Some ships deviate on an individual basis.
									-- *
	}
	-- More factions:
	256={
		-- Fleet fields here.
	}
	888={
		-- Fleet fields here.
	}
}
aiflags uses command flags.
regions.lua
regions.lua controls how sectors procedurally generate in the galaxy by defining regions.
Below is an example of a regions.lua that defines the region for one faction. Note that regions.luas that define multiple regions have a different syntax.
{
	-- General region identity:
	ident=98                    -- Region ID should be same as group.
                                -- (Technically does not have to be,
                                -- but it is strongly recommended.)

	color=0x5555AA              -- Color on galaxy map.

	faction=98                  -- Faction of the region.
                                -- Region name is taken from the faction.

    -- Region Spawning:
	count=3                     -- Number of this region on the map.

	position={0.90,0.95}        -- Range of this region's position 0.0-1.0.
                                -- 0.0 is the center of the galaxy,
                                -- 1.0 is at the edge.

	radius=  {0.05,0.10}        -- Range of this region's size 0.0-1.0.
                                -- 0.0 could just not spawn the region,
                                -- 1.0 could make the region galaxy-sized.

	type=2                      -- Defines the region's shape.
                                -- 0: Voronoi - evenly spaced, recommended (bias:).
                                -- 1: Splats  - what the Reds use.
                                -- 2: Circles - what most factions use.

	-- *:
	fleets={
		{ 98 {
			{0,1000}
			{1,3000}
		} }
		{ 8 {
			{0,3000}
		} }
	}
	fleetCount={1,4}            -- Range of number of ships per fleet in each sector.
	fleetFraction=1.0           -- Probability that a fleet spawns
								-- in each sector 0.0-1.0.

	-- Fortresses (entities that surrounded damaged stations):
	fortress={
		"98_Fortress_1"
		"98_Fortress_2"
		"98_Fortress_3"
	}
	fortressCount={3, 6}         -- Range of fortresses per damaged station.
	fortressRadius={500, 500}    -- Range of distances of fortresses from station.

	-- **:
	unique={
		{
			"98_Special_Station"
		}
		{
			"98_Other_Thing_1"
			"98_Other_Thing_2"
		}
		{
			"8_interceptor"
		}
	}
	uniqueFraction=0.5          -- Probability that a unique fleet spawns
								-- in each sector 0.0-1.0.

	-- Asteroids:
	ambient={1,2}               -- List that decides what spawns on asteroids.
	                            -- 0: Nothing.
                                -- 1: Green plants.
                                -- 2: Blue plants.
                                -- 3: Pink plants.
                                -- Only -1: only faction structures.

	asteroidDensity={0.1,0.2}   -- Range of density of asteroids in region 0.0-1.0.
	asteroidSize={12,24}        -- Range of block count per asteroid.
	asteroidFlags=EXPLOSIVE     -- See all flags below.
}
Asteroid Flags
Many asteroid flags sadly do not work (they can be found in ), but the ones that do are listed below:
EXPLOSIVE: asteroid blocks are replaced with their explosive variants.UNIFORM_SIZE: all asteroids in a sector have the same number of blocks.
Regions Visualizer
The RWDK's region editor is a useful tool for visualising how much of the galaxy a region will take up.

Fleet Spawning
(Fleet spawning is surprisingly complex, but there has been so much misinformation and mods that have gone on to use fleet code "incorrectly", that even if you do not understand fleets at all, you probably won't even notice.)
When a sector is generated in this region, it has fleetFraction (0.0-1.0) probability to spawn one type of fleet in from fleets.
fleets is a list of fleet types. Each fleet type in fleets has a faction ID and also has a list of number pairs that represent the total P of fleets at different locations in the region. The 2nd number of the number pair is a P allocation distributed in a fleet, and the 1st number being which distance from the center of the region that P allocation is for.
In other words, fleets controls how much P is allocated to a fleet of a faction in a sector at different distances from the center of a region.
Also, each fleet type's list of P allocations should have a value at 0.0 distance and at 1.0 distance.
fleetCount is a list of ranges of ship numbers for the fleet type at the same index.
So, every time a fleet is spawned in a sector, a random number in the range of the relevant fleetCount element is chosen to decide how many ships will be in the fleet. Then, the relevant P allocation for the fleet (dependent on the sector's distance from the center of the region) is spread out between the number of ships in the fleet.
    fleets={
		{ 98    -- Faction ID of the faction that can spawn
				-- in a sector in this region.
			{
				-- Each faction 98 fleet in the center of the region has 10000P total.
				{0.0,10000}

				-- Each faction 98 fleet 1/4 from the center of the region
				-- has (10000+3000)/2=6500P total.

				-- Each faction 98 fleet halfway into the region has 3000P total.
				{0.5, 3000}

				-- Each faction 98 fleet 1/4 from the edge of the region
				-- has (3000+1000)/2=2000P total.

				-- Each faction 98 fleet at the edge of the region has 1000P total.
				{1.0, 1000}
			}
		}
		{ 8     -- The Terrans (faction 8) could also spawn in this region.
			{
				{0.0,    0}
				-- No Terrans can spawn anywhere from the center
				-- to 80% of the region. It will all be faction 98.
				{0.8,    0}

				-- Increasing from 80% to 100% of the region,
				-- Terran fleets can begin to spawn in sectors.
				{1.0, 1000}
				-- At the edge of the region, each fleet has a maximum of 1000P total.
			}
		}
    }

	fleetCount={
		{4,8}	-- Each faction 98 fleet has 4 to 8 ships.
		{10,16} -- Each Terran fleet has 10 to 16 ships.
	}

				-- Every sector in this region has a 75% chance of spawning a
				-- faction 98 fleet and a 75% of spawning a Terran fleet.
	fleetFraction=0.75
Fleet P Allocation Example
Below is an example of a unique region that exploits the P allocation curve of 2 factions, where bigger ships have more P.
{
	fleets={
		{ 200 -- Red Colored Faction
			{
				{0.00,10000}
				{0.10, 5000}
				{0.25,    0}
				{0.75,    0}
				{0.90, 3000}
				{0.10, 5000}
			}
		}
		{ 300 -- Blue Colored Faction
			{
				{0.00,    0}
				{0.25,    0}
				{0.26,10000}
				{0.75, 8000}
				{0.76,    0}
				{0.10,    0}
			}
		}
	}
	fleetCount={
		{3,3}
		{3,3}
	}
	fleetFraction=1
	-- Other fields here.
}
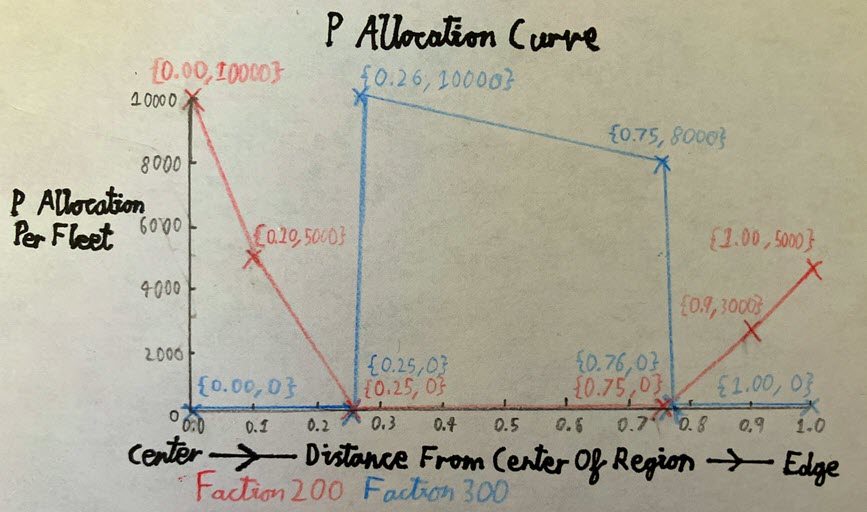
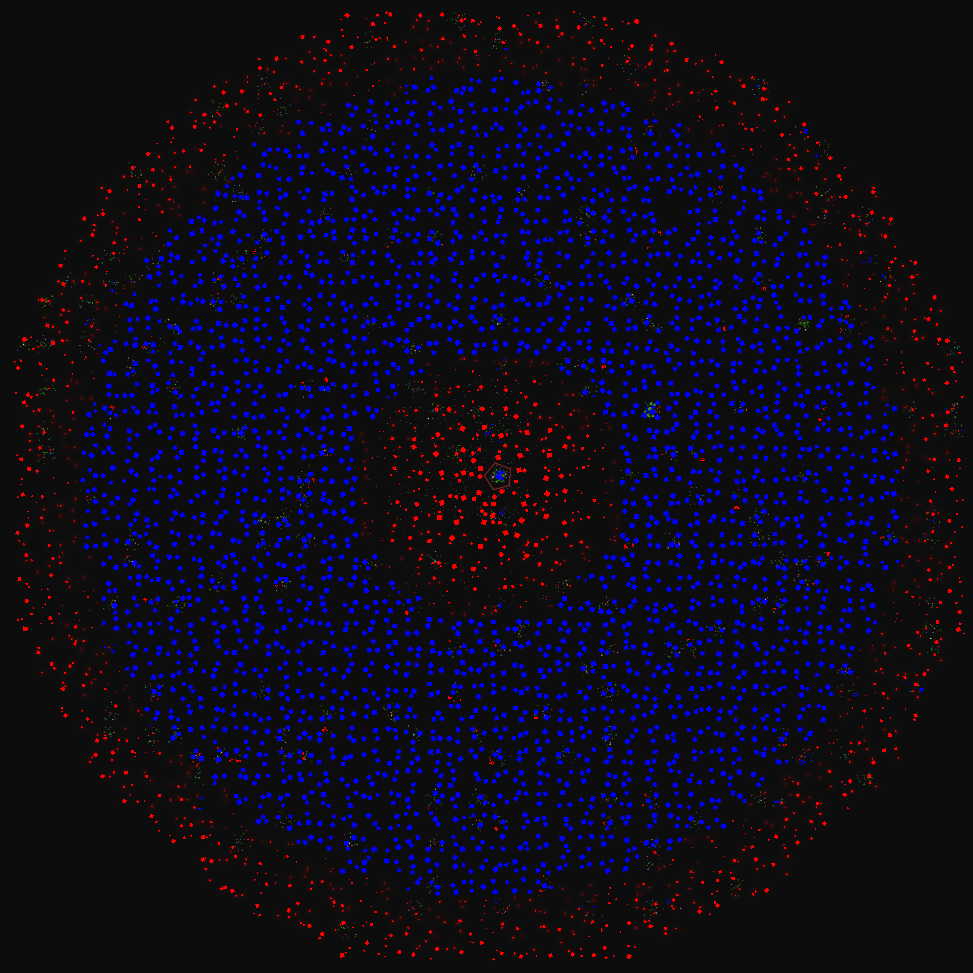
This shows how versatile regions are, but a better way of doing this that would have the same effect would be to use subregions.
Unique Fleet Spawning
Regions can contain special structures or ships that are unrelated to their fleets, fortresses or buildings: they are unique spawns.
	unique={           -- The unique field contains a list of unique fleets.
		{
			"200_2250" -- Red Faction
		}
		{
			"300_2250" -- Green Faction
		}
		{
			"400_2250" -- Blue Faction
			"500_2250" -- White Faction
		}
	}
	uniqueFraction=1.0
For each sector in a region, uniqueFraction is the probability that a unique fleet will spawn in it.
Each item in the unique field is a unique fleet, and each unique fleet is a list of ship names (ship names must be repeated to appear multiple times). Each unique fleet spawns all the ships in its ship list unless there is not enough space in the sector, which can be because of other ships, asteroids, or space debris/plants.
When a sector is chosen to contain a unique fleet, it will contain the unique fleet whose position in the unique list matches the sector's distance from the center of the region.
The galaxy image below uses the unique defined above to show how uniques are spawned based on their definition's position in the list.
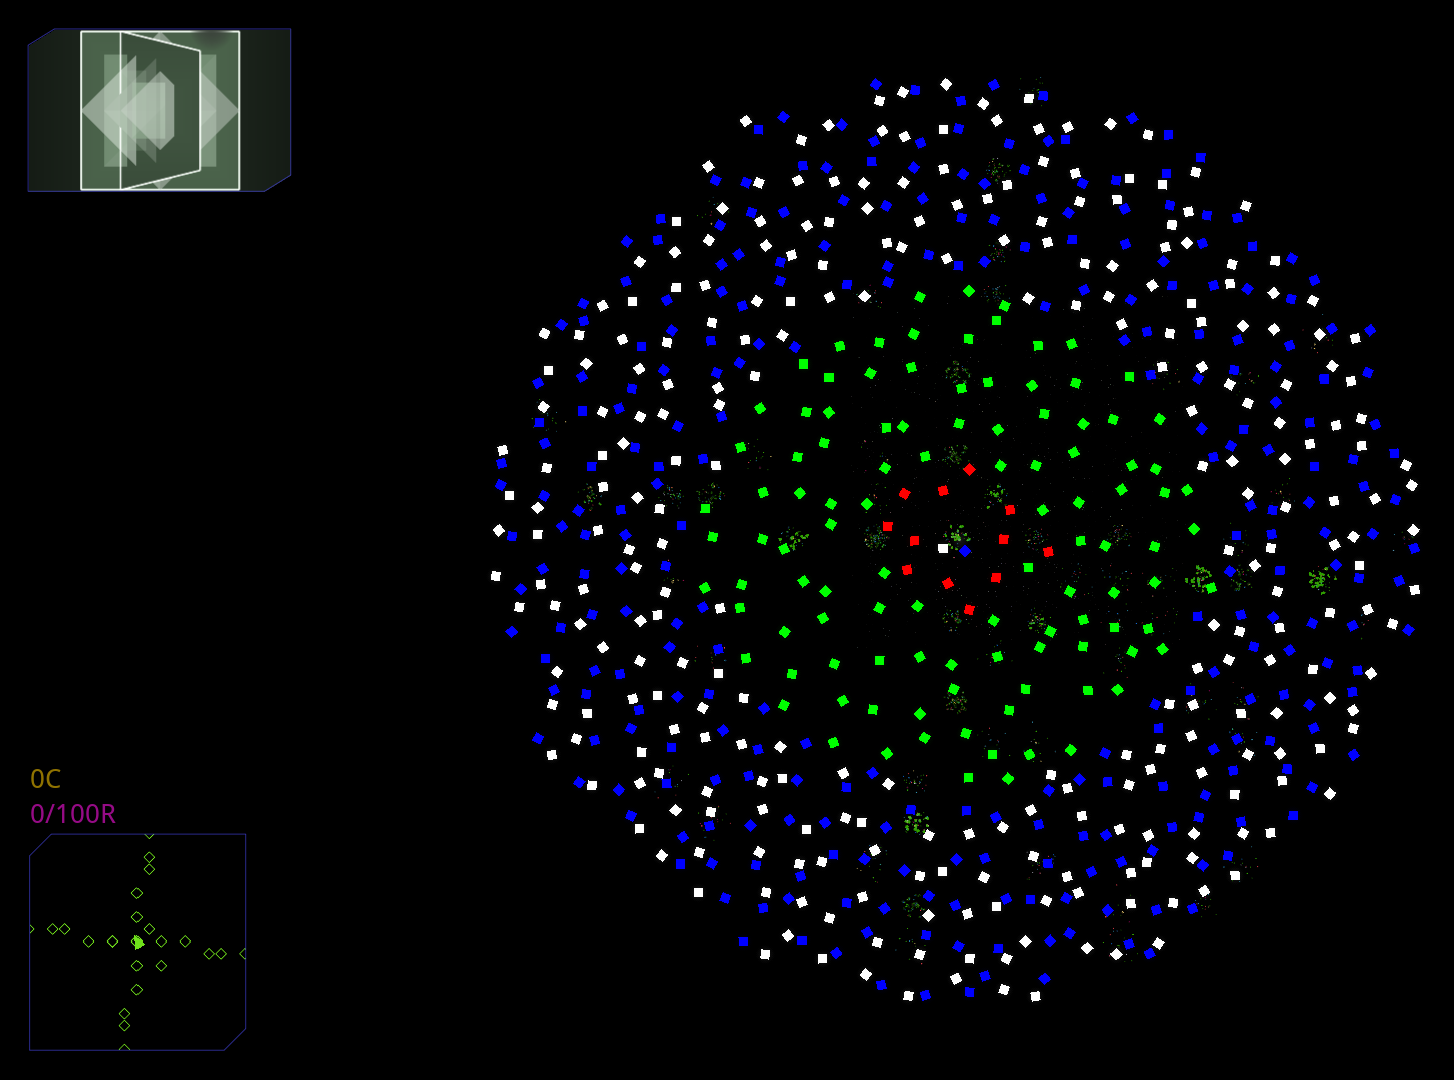
The central sector contains the last defined unique fleet for some reason, even if it is not where the player spawns.
Subregions
Each region can optionally have the subregions field, which is a list of other regions, each with its own unique ident as well as other fields.
Note that the radius and position fields of each subregion is relative to the parent region.
{
    ident=98

    color=0x5555AA
    faction=98

    count=3
    position={0.70,0.80}
    radius=  {0.05,0.10}

    subregions={ -- Ensure that each subregion has a unique ident.
        {
            ident=980

            color=0x8888AA
            faction=98

            count=1
            position=0.70
            radius=  0.30
            -- Other fields here.
        }
        {
            ident=981

            color=0xAAAA55
            faction=98

            count=3
            position=0.2
            radius=  0.1
            -- Other fields here.
        }
        {
            ident=982

            color=0x333388
            faction=98

            count=3
            position={0.00,1.00}
            radius=  {0.20,0.30}
            -- Other fields here.
        }
    }
}
Subregions can even contain other subregions, creating a region tree.
-- Many fields excluded.
{
    ident=980
    faction=98

    subregions={
        {
            ident=981
            faction=98
        }
        {
            ident=982
            faction=98

            subregions={
                {
                    ident=983
                    faction=98
                }
                {
                    ident=984
                    faction=98
                }
            }
        }
    }
}
Example of a Unique Region
The Makai & Monolith Orbital Runeworks mod uses nested subregions well by imitating the shape of its rune blocks with regions of different shapes.
(Fields that do not affect region map appearance have been removed.)
{
-- Deep Blue Background:
	ident=2671
	color=0x1E142B
	faction=267
	count=4
	type=2
	position={0.9,1.0}
	radius=  {0.2,0.2}
	subregions = {
-- Inner Light Orange Splats:
        {
            ident=2672
            color=0xEE915B
            faction=267
            count=2
            type=1
            position={0.2,0.6}
            radius=  {0.2,0.3}
        }
        {
-- White Outer Rim:
            ident=2673
            color=0xFFFFFF
            faction=267
            count=40
            type=2
            position={1.0,1.0}
            radius=  {0.1,0.1}
        }
    }
}


Multiple Regions in One Mod
Below is an example of a mod that contains different regions for factions 200, 300, and 400.
{
    -- No fields are defined in the outermost scope.
    subregions={
        {
            ident=200
            -- Other fields here.
        }
        {
            ident=300
            -- Other fields here.
        }
        {
            ident=400
            -- Other fields here.
        }
    }
}
The outermost brackets represent the entire galaxy, which is itself a region, but has unique functionality to allow multiple subregions definitions to coexist and extend each other.
Structures on Asteroids
Structures are ships without thrusters that can be spawned connected to asteroids in their faction's regions when a sector is generated.
They require a block both with features=ROOT and a valid root shape, such as RECT_ROOT. Its yellow port must be free (not connected to anything) and face the direction of the asteroid. See below:
In the regions.lua, the region that has structures requires ambient={-1}. It will then use structures of the faction with the faction ID of the faction field.
{
	ident=98
	faction=98

	ambient={-1} -- No other ambient types are allowed.

	asteroidDensity={0.2,0.2}
	asteroidSize={12,24}

    -- Other region fields here.
}
Create and save your structures as you would any other modded ship. They should be in the ships/ folder.
Reassembly/
└── mods/
    └── Faction 98/
        ├── ships/
        │   ├── 98_Structure_1.lua
        │   ├── 98_Structure_2.lua
        │   └── 98_Structure_3.lua
        ├── blocks.lua
        └── factions.lua
        └── regions.lua
When you generate new sectors for the faction, you should find structures on every asteroid.
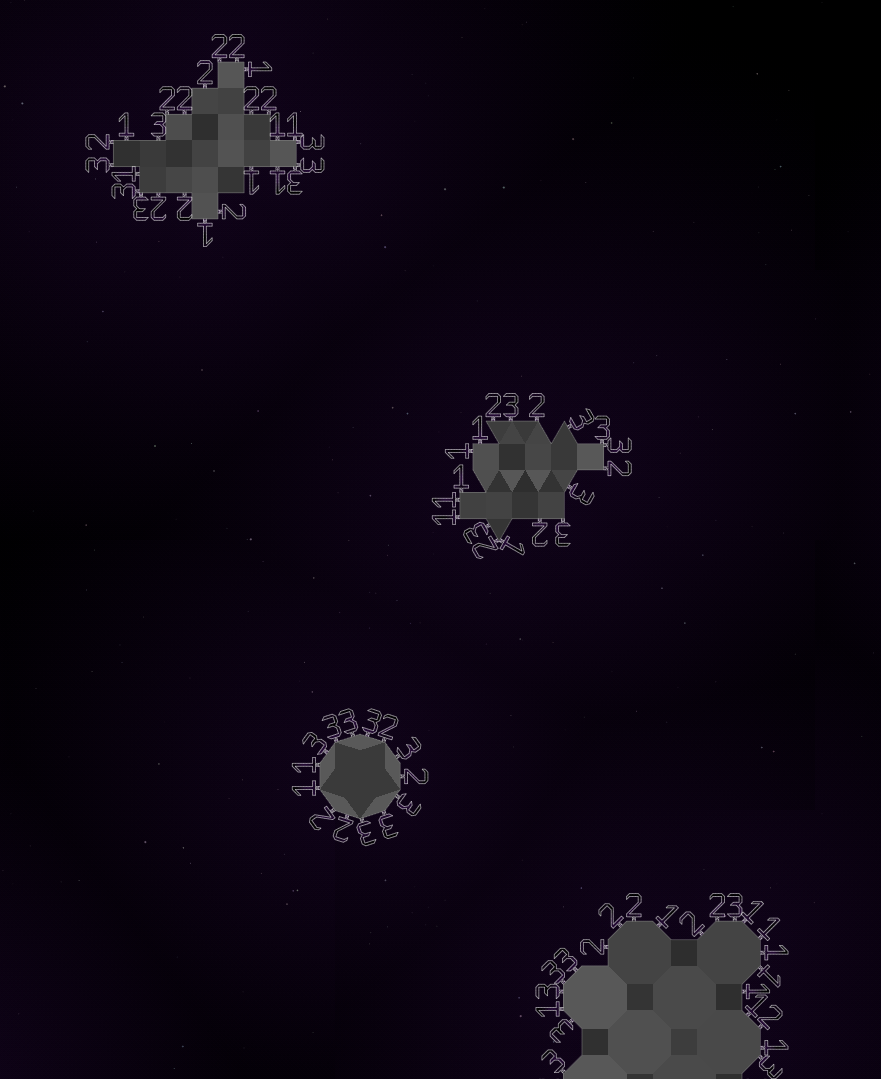
Note that there is no way of controlling asteroid shape usage.
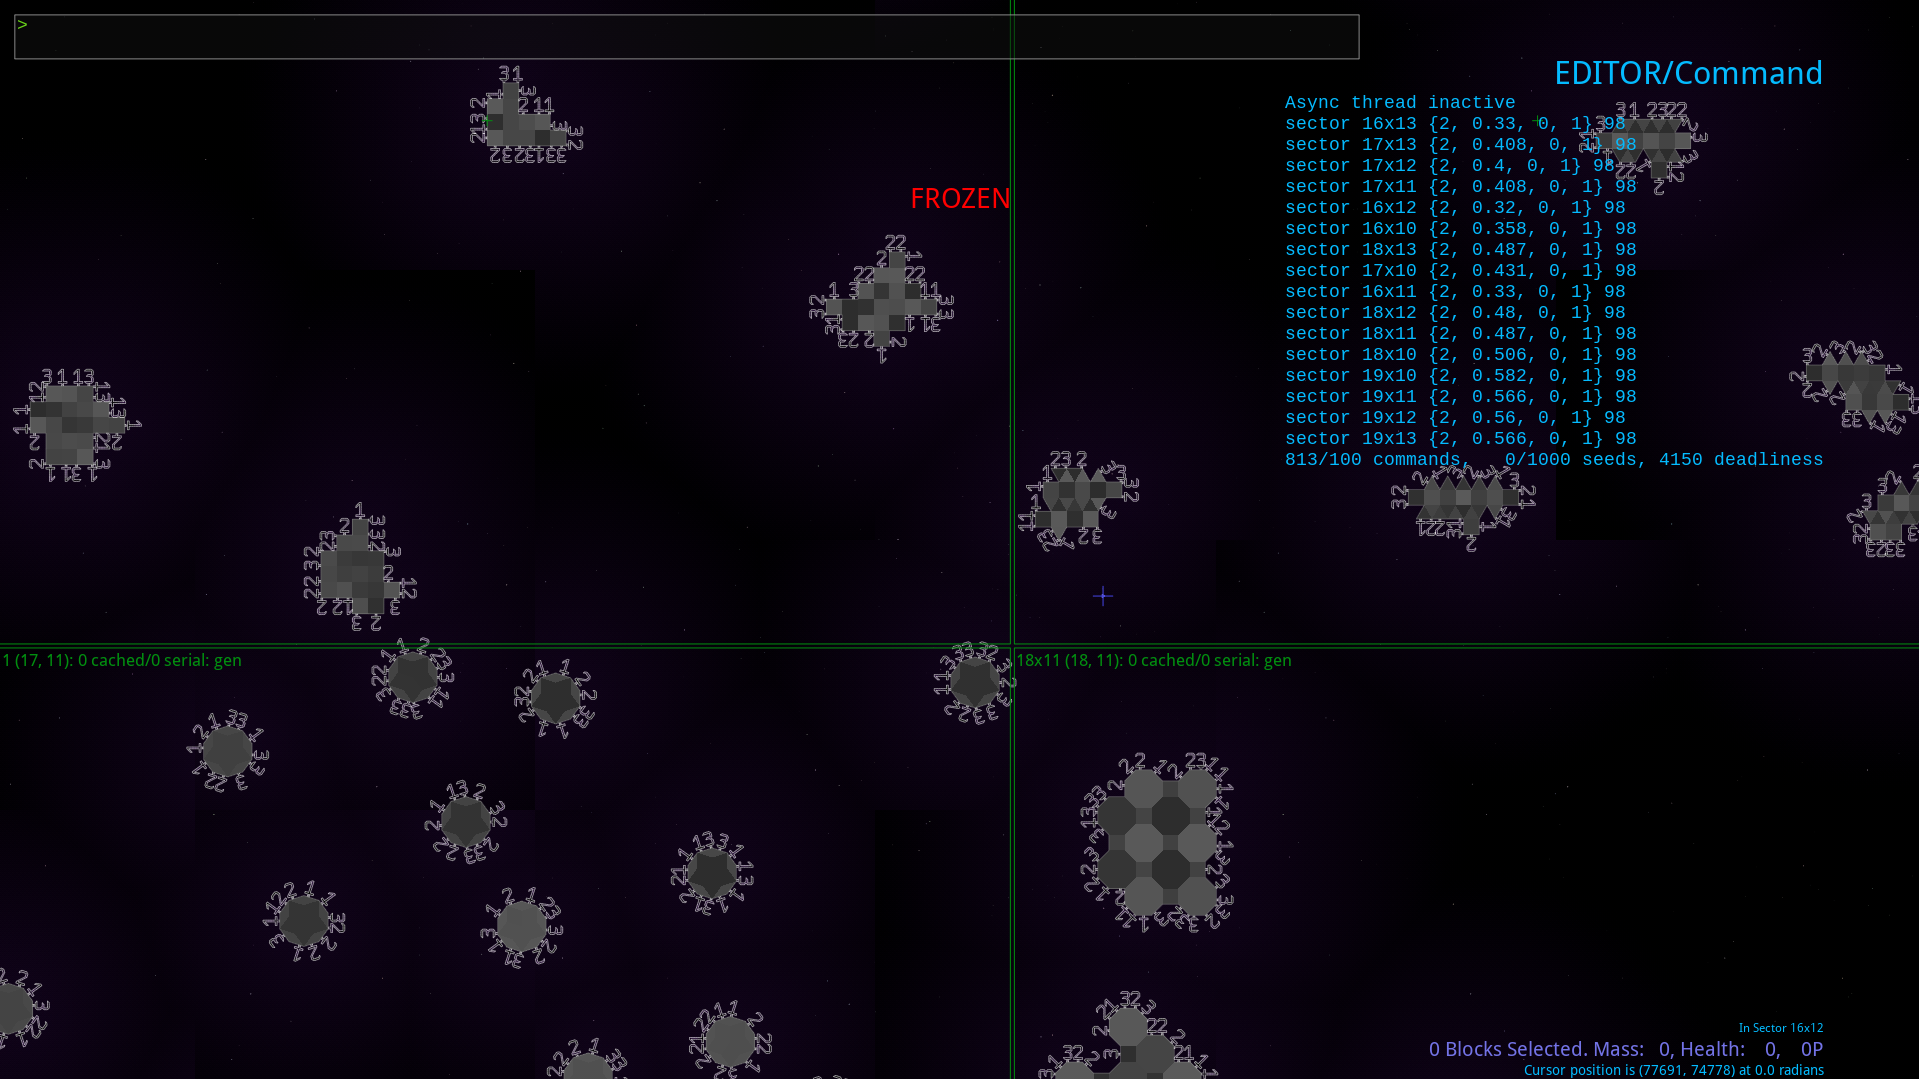
Nonfunctional Asteroid Flags
The following asteroid flags do not work:
HEXAGONOCTAGONPENROSESQUARETRIANGLEUNIFORM_TYPE
cvars.txt
Standard Deviation Fields
StdDev stands for 'standard deviation', In Reassembly modding, it is used for fields that add randomness to values.
The value you set as the standard deviation decides the maximum value that can be added and subtracted from the value it modifies.
Here is a standard deviation curve:
Every time a value is modified by its respective standard deviation value, a random value is taken between the StdDev value and the negative StdDev value. It is based on the standard deviation curve, so values close to 0 are less likely than values closer to the defined StdDev value.
Standard deviation fields are useful in fragments as they can make effects look less static and more alive.
UPS
UPS represents 'physics updates per seconds', or in other words, Reassembly's simulation step rate.
Reassembly mods should be made to function at UPS settings 60 or higher.
UPS should beg kept in mind when creating cannons or launchers that do a lot in a short amount of time, such as having a high roundsPerSec, a high muzzleVel with a short range, or constantly producing blocks with an instant replicateTime.
It is recommened to make UPS-affected blocks function identically across UPS settings above 60 to ensure that all players have the same experience and to avoid requiring players to switch UPS settings.